Compliance Just Got Easier: Stay ahead of regulatory changes with instant notifications on updates that matter.
['CMV Inspections']
['Daily vehicle inspections', 'Pre-trip inspections']
2025-02-27T06:00:00Z
JOIN TODAY TO CONTINUE READING THIS ARTICLE & OTHER INDUSTRY NEWS!
You'll also get exclusive access to:
A database of easy-to-understand regulationsAsk unlimited questions to our expertsPre-led discussions forumsAnd more
TRY IT FREE TODAY
Already have an account? Log in now.

Copyright 2026 J. J. Keller & Associate, Inc. For re-use options please contact copyright@jjkeller.com or call 800-558-5011.
NewsIndustry NewsFleet SafetyFocus AreaIn-Depth ArticleFleet OperationsDaily vehicle inspectionsEnglishUSAPre-trip inspectionsTransportationCMV Inspections
Safety first: Why the air brake test is essential after your CDL exam
2025-02-27T06:00:00Z
Drivers are taught to do an air brake test during Entry Level Driver Training (ELDT). You’re often told you must do it in a specific order or fail the Commercial Driver’s License (CDL) test. Many drivers do not know the real reason this test is important. The result is that this crucial test is seldom if ever done after a driver obtains a CDL. Evidence of this is found when asked to demonstrate an inspection during training initiatives. Many drivers can list the steps, however the order and criteria are often incorrect.
Why we do an air brake test
Drivers skip this test because they do not know the reason the test is important. When surveying drivers about why the test is performed, answers are usually things like:
- So I could pass my CDL test,
- To test my brakes, or
- To be sure I can stop.
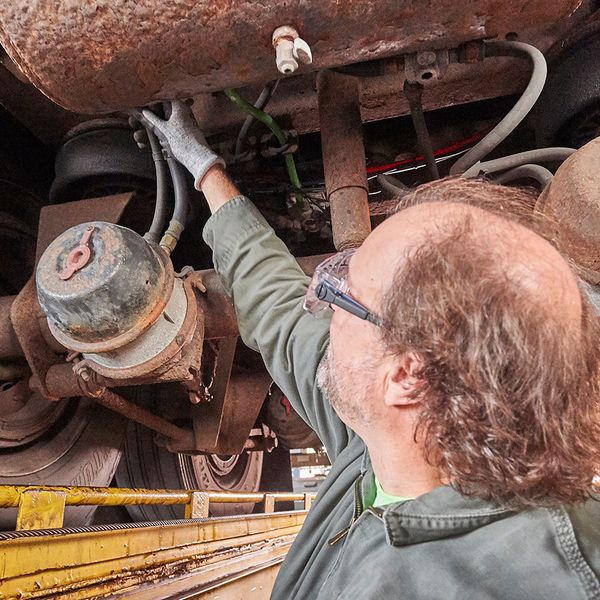
While these are valid answers, they are not the root answer. The purpose is to test the condition of the truck’s safety devices. We need to know if the failsafe in the truck operates properly if the air compressor fails. Failure usually happens while the truck is being driven on the highway. Confirming the vehicle warning devices work properly allows you to take action to stop the truck safely. Test requirements vary from state to state regarding CDL exams. Following these steps will help ensure your trucks are operating safely on the road. This procedure should be followed each day a vehicle is driven.
Preparing for the test
Start the engine and allow the air pressure to rise. As it builds, ensure the pressure builds from 85 to 100 PSI within 45 seconds with no more than 1300 RPMs of the engine. This ensures the compressor is providing air quickly enough to replenish any pressure used. The governor should “cut out,” making an audible pop when air pressure reaches approximately 120 PSI. This will avoid excess pressure on the system.
Leak test
Turn off the engine. When the engine stops, return the key to the on position. Place your foot firmly on the brake pedal and hold for 60 seconds. When the time expires, measure the air loss after the initial drop from brake application. A combination vehicle should not lose more than 4 PSI. A single vehicle cannot lose more than 3 PSI. A successful test ensures the air system will maintain pressure until you become aware of an air compressor failure.
With the wheels chocked and the parking brake released, pump the brake pedal until the air pressure drops to approximately 60 PSI. A warning light and audible alarm should initiate to alert you to the loss of air. The vehicle is now unsafe to operate and you should pull off the road at a safe location as soon as possible.
Button pop out test
Continue to pump the brake pedal, discharging more air from the system. At approximately 20 PSI the parking brake should automatically set. This ensures that, if you are unable to get to a safe place or slow the truck, the parking brake will override your action. This does not guarantee the truck will stop, only that the warning devices are operating properly.
Testing the brakes
Start the engine and return the pressure to 120 PSI. With the parking brakes engaged and chocks removed, tug against the parking brake. This is done by putting the vehicle in gear and attempting to move. The truck should not move. This will confirm the parking brake will hold the truck in place when parked. It also confirms the truck will stop if you fail to take action in an air loss emergency. The final step is to release the parking brake. Drive the truck forward, not exceeding 5 miles per hour, and firmly depress the brake pedal. The truck should stop and not pull left or right.
Key to remember: Ensuring proper operation of safety devices protect drivers, equipment, brand reputation, and the motoring public.

NewsIndustry NewsFleet SafetyFocus AreaIn-Depth ArticleFleet OperationsDaily vehicle inspectionsEnglishUSAPre-trip inspectionsTransportationCMV Inspections
Safety first: Why the air brake test is essential after your CDL exam
2025-02-27T06:00:00Z

Written by
Tim Adam
Industry Business Advisor
Tim Adam
Industry business advisor on HOS, vehicle inspections and maintenance, and driver training/ELDT.
Drivers are taught to do an air brake test during Entry Level Driver Training (ELDT). You’re often told you must do it in a specific order or fail the Commercial Driver’s License (CDL) test. Many drivers do not know the real reason this test is important. The result is that this crucial test is seldom if ever done after a driver obtains a CDL. Evidence of this is found when asked to demonstrate an inspection during training initiatives. Many drivers can list the steps, however the order and criteria are often incorrect.
Why we do an air brake test
Drivers skip this test because they do not know the reason the test is important. When surveying drivers about why the test is performed, answers are usually things like:
- So I could pass my CDL test,
- To test my brakes, or
- To be sure I can stop.
While these are valid answers, they are not the root answer. The purpose is to test the condition of the truck’s safety devices. We need to know if the failsafe in the truck operates properly if the air compressor fails. Failure usually happens while the truck is being driven on the highway. Confirming the vehicle warning devices work properly allows you to take action to stop the truck safely. Test requirements vary from state to state regarding CDL exams. Following these steps will help ensure your trucks are operating safely on the road. This procedure should be followed each day a vehicle is driven.
Preparing for the test
Start the engine and allow the air pressure to rise. As it builds, ensure the pressure builds from 85 to 100 PSI within 45 seconds with no more than 1300 RPMs of the engine. This ensures the compressor is providing air quickly enough to replenish any pressure used. The governor should “cut out,” making an audible pop when air pressure reaches approximately 120 PSI. This will avoid excess pressure on the system.
Leak test
Turn off the engine. When the engine stops, return the key to the on position. Place your foot firmly on the brake pedal and hold for 60 seconds. When the time expires, measure the air loss after the initial drop from brake application. A combination vehicle should not lose more than 4 PSI. A single vehicle cannot lose more than 3 PSI. A successful test ensures the air system will maintain pressure until you become aware of an air compressor failure.
With the wheels chocked and the parking brake released, pump the brake pedal until the air pressure drops to approximately 60 PSI. A warning light and audible alarm should initiate to alert you to the loss of air. The vehicle is now unsafe to operate and you should pull off the road at a safe location as soon as possible.
Button pop out test
Continue to pump the brake pedal, discharging more air from the system. At approximately 20 PSI the parking brake should automatically set. This ensures that, if you are unable to get to a safe place or slow the truck, the parking brake will override your action. This does not guarantee the truck will stop, only that the warning devices are operating properly.
Testing the brakes
Start the engine and return the pressure to 120 PSI. With the parking brakes engaged and chocks removed, tug against the parking brake. This is done by putting the vehicle in gear and attempting to move. The truck should not move. This will confirm the parking brake will hold the truck in place when parked. It also confirms the truck will stop if you fail to take action in an air loss emergency. The final step is to release the parking brake. Drive the truck forward, not exceeding 5 miles per hour, and firmly depress the brake pedal. The truck should stop and not pull left or right.
Key to remember: Ensuring proper operation of safety devices protect drivers, equipment, brand reputation, and the motoring public.


See More
RELATED NEWS

NewsCMV Parts and MaintenanceTransportationIn-Depth ArticleEnglishVehicle maintenanceCMV InspectionsIndustry NewsFleet SafetyDaily vehicle inspectionsMaintenance and periodic inspectionsFleet OperationsBrakesPre-trip inspectionsFocus AreaUSA
07/26/2024
Brake Check: Ensuring your Canadian commercial trucks stop safely


Specialized Industries
Go beyond the regulations! Visit the Institute for in-depth guidance on a wide range of compliance subjects in safety and health, transportation, environment, and human resources.
J. J. Keller® COMPLIANCE NETWORK is a premier online safety and compliance community, offering members exclusive access to timely regulatory content in workplace safety (OSHA), transportation (DOT), environment (EPA), and human resources (DOL).

Interact With Our Compliance Experts
Puzzled by a regulatory question or issue? Let our renowned experts provide the answers and get your business on track to full compliance!

Upcoming Events
Reference the Compliance Network Safety Calendar to keep track of upcoming safety and compliance events. Browse by industry or search by keyword to see relevant dates and observances, including national safety months, compliance deadlines, and more.

SAFETY & COMPLIANCE NEWS
Keep up with the latest regulatory developments from OSHA, DOT, EPA, DOL, and more.


REGSENSE® REGULATORY REFERENCE
Explore a comprehensive database of word-for-word regulations on a wide range of compliance topics, with simplified explanations and best practices advice from our experts.

THE J. J. KELLER INSTITUTE
The Institute is your destination for in-depth content on 120+ compliance subjects. Discover articles, videos, and interactive exercises that will strengthen your understanding of regulatory concepts relevant to your business.


ADD HAZMAT, ENVIRONMENTAL, & HR RESOURCES
Unlock exclusive content offering expert insights into hazmat, environmental, and human resources compliance with a COMPLIANCE NETWORK EDGE membership.

DIRECT ACCESS TO COMPLIANCE EXPERTS
Struggling with a compliance challenge? Get the solution from our in-house team of experts! You can submit a question to our experts by email, set up a phone or video call, or request a detailed research report.


EVENTS
Register to attend live online events hosted by our experts. These webcasts and virtual conferences feature engaging discussions on important compliance topics in a casual, knowledge-sharing environment.
Most Recent Highlights In Environmental

NewsIndustry NewsIndustry NewsSafe Drinking WaterWater ProgramsWater QualityEnvironmental Protection Agency (EPA)Maximum Contaminant LevelsEnvironmentalUSAWater ProgramsEnglishFocus AreaCWA Compliance
2026-05-20T05:00:00Z
EPA floats major changes to current PFAS drinking water rules
The Environmental Protection Agency (EPA) has released two proposed rules that, if finalized, would have major impacts on drinking water regulations for per- and polyfluoroalkyl substances (PFAS), specifically, the 2024 National Primary Drinking Water Regulation (NPDWR) for PFAS (2024 PFAS NPDWR).
Proposed rule: MCL compliance extension
The first rule proposes to establish a federal exemption that allows public water systems (PWSs) to request an extension of the deadline to comply with the Maximum Contaminant Levels (MCLs) for perfluorooctanoic acid (PFOA) and perfluorooctane sulfonic acid (PFOS) from April 26, 2029, to April 26, 2031.
The rule would require PWSs that meet the eligibility requirements to submit a request to EPA for the federal exemption within 180 days of the date a final rule is published. PWSs would have to provide specific information in the request (such as recent water sample results and a certified statement that the system can’t comply with the original MCL deadline).
Additionally, EPA’s proposed rule would require:
- All PWSs with the federal exemption to notify customers of the exemption, and
- PWSs with PFOA or PFOS levels at or above 12 parts per trillion to implement two control measures (from six options) during the exemption period.
Who would be impacted?
The proposed federal exemption would apply to PWSs:
- Regulated by the 2024 PFAS NPDWR for PFOA and PFOS;
- In operation on or before June 25, 2024;
- Not under a variance for small systems for the PFOA and PFOS MCLs; and
- In a state that doesn’t have primacy for the 2024 PFAS NPDWR.
PWSs in states with primacy for the 2024 PFAS NPDWR may request an exemption from the primacy agency.
Proposed rule: Rescinding PFAS NPDWRs
The second rule proposes to rescind EPA’s determinations to regulate:
- Perfluorohexane sulfonic acid (PFHxS);
- Perfluorononanoic acid (PFNA);
- Hexafluoropropylene oxide dimer acid and its ammonium salt (HFPO-DA, called GenX chemicals); and
- Perfluorobutane sulfonic acid (PFBS).
It also proposes to remove the related 2024 PFAS NPDWR provisions from 40 CFR Parts 141 and 142, including:
- The MCLs and MCL Goals (MCLGs) for PFHxS, PFNA, and HFPO-DA;
- The MCL and MCLG for mixtures with two or more of PFHxS, PFNA, HFPO-DA, and PFBS (referred to as the Index PFAS); and
- All other compliance requirements.
The proposed rule would maintain the 2024 PFAS NPDWR requirements for PFOA and PFOS.
Who would be impacted?
The rule would impact PWSs, including community water systems (CWSs) and non-transient non-CWSs, subject to the 2024 PFAS NPDWR standards for PFHxS, PFNA, HFPO-DA, or the Index PFAS.
How do I give feedback?
EPA will hold a virtual public hearing for verbal comments on the proposed rules on July 7, 2026. Written comments for the proposed compliance extension rule (Docket ID No. EPA-HQ-OW-2025-1742) and proposed rescission rule (Docket ID No. EPA-HQ-OW-2025-0654) are due by July 20, 2026.
Key to remember: EPA has proposed major changes to the national drinking water regulations for PFAS.
NewsRecyclingChange NoticesChange NoticeCaliforniaSustainabilityEnvironmentalProduct StewardshipEnglishSustainabilityFocus Area
2026-05-20T05:00:00Z
California approves plastic packaging regulations
Effective date: May 1, 2026
This applies to: Producers of single-use packaging and plastic single-use food service ware
Description of change: CalRecycle approved permanent regulations to implement the Plastic Pollution Prevention and Packaging Producer Responsibility Act (SB 54). The regulations require producers of covered materials (single-use packaging and plastic single-use food service ware) to administer an extended producer responsibility program.
Producers must meet minimum recycled content requirements for covered materials and pay fees (including annual mitigation surcharges for all producers and fees to producers participating in a producer responsibility organization (PRO) plan).
By June 1, 2026, producers must:
- Register with Circular Action Alliance (CAA) and submit supply data to CAA if participating in an approved PRO plan,
- Register with CalRecycle and apply to be an independent producer if complying individually, or
- Register with CalRecycle and apply for the small producer exemption if qualified.
NewsToxic Substances Control Act - EPANew MexicoNew Mexico Environment Department (NMED)Change NoticesTSCA ComplianceChange NoticeToxic Substances - EPAEnvironmentalEnglishFocus Area
2026-05-20T05:00:00Z
New Mexico adopts PFAS product phaseout regulations
Effective date: July 1, 2026
This applies to: Manufacturers, distributors, and retailers that sell, offer for sale, distribute, or distribute for sale products that contain intentionally added per- and polyfluoroalkyl substances (PFAS) in New Mexico
Description of change: The New Mexico Environment Department adopted regulations implementing the PFAS Protection Act (HB212), which phases out consumer products with intentionally added PFAS. The regulations contain:
- The prohibitions of products (with specific product categories and timelines),
- Reporting and testing requirements,
- Labeling requirements, and
- Fees for mandatory reporting and “currently unavoidable use” designation applications.
The regulations establish three phaseout deadlines:
- The first group of products must be phased out by January 1, 2027.
- The second group of products must be phased out by January 1, 2028.
- All other nonexempt products and products without currently unavoidable use designations must be phased out by January 1, 2032.
NewsPublicly Owned Treatment WorksWater ProgramsWater QualityWater ProgramsStormwaterEnglishCWA ComplianceMunicipal WastewaterPoint SourcesChange NoticesChange NoticeCaliforniaIndustrial WastewaterEnvironmentalFocus Area
2026-05-20T05:00:00Z
California adopts risk-based water quality standards for nonpotable water
Effective date: April 22, 2026
This applies to: Owners and operators of on-site treated nonpotable water systems (OTNWS)
Description of change: The California State Water Resources Control Board adopted risk-based water quality standards that apply to OTNWS for the on-site treatment and reuse of nonpotable water for nonpotable end uses in:
- Multifamily residential buildings,
- Commercial buildings, and
- Mixed-use buildings.
The types of nonpotable water include on-site:
- Wastewater,
- Graywater,
- Stormwater, and
- Roof runoff.
The regulations apply to indoor and outdoor nonpotable uses, including:
- Toilet and urinal flushing,
- Drain trap priming,
- Clothes washing,
- Decorative fountains,
- Landscape irrigation,
- Ornamental plant irrigation,
- Dust suppression, and
- Car washing.
Related state info: Industrial water permitting — California

NewsWater ProgramsEnvironmental Protection Agency (EPA)Mobile Emission SourcesCAA ComplianceAir PermittingWater ProgramsCWA ComplianceEnglishAir ProgramsIndustry NewsIndustry NewsWater PermittingPoint SourcesCriteria Air PollutantsIndustrial WastewaterEnvironmentalFocus AreaAir ProgramsStationary Emission SourcesUSA
2026-05-19T05:00:00Z
EPA proposes major changes to multiple rules
The Environmental Protection Agency (EPA) has been on a rulemaking roll! In recent weeks, the agency has published significant proposed rules in the Federal Register that affect coal-fired power plant wastewater, pre-construction air permits, and vehicle emission requirements.
Coal-fired power plants: Unmanaged CRL discharges
EPA proposes to revise the wastewater requirements established by a 2024 final rule (2024 Rule) for unmanaged combustion residual leachate (CRL) from coal-fired power plants.
Unmanaged CRL (a type of waste stream) is water that contains coal combustion residuals and leaks from landfills or surface impoundments (i.e., waste management units). Unmanaged CRL includes:
- Pumped unmanaged CRL (leached CRL that’s captured, pumped to the surface, and discharged directly to waters of the United States); and
- The functional equivalent of an unmanaged CRL direct discharge (determined by the permitting authority).
The proposed rule applies to coal-fired power plants with unmanaged CRL that are subject to the 2024 Rule’s technology-based effluent limitations guidelines and standards.
The agency proposes three options to revise the unmanaged CRL requirements:
- Option 1 (preferred by EPA) would maintain the 2024 rule’s mercury and arsenic numeric limits for pumped unmanaged CRL discharges, but it would delay the compliance deadline from December 31, 2029, to December 31, 2034. Additionally, the permitting authorities would determine best available technology economically achievable (BAT) limits for functional equivalents on a case-by-case basis.
- Option 2 would maintain the 2024 rule’s mercury and arsenic numeric limits for pumped unmanaged CRL discharges and functional equivalents. It would also maintain the original compliance timeline of December 31, 2029.
- Option 3 would impose zero-discharge limits for all pollutants in pumped unmanaged CRL discharges and functional equivalents. It would also establish interim BAT limits for mercury and arsenic. Facilities would have to meet the zero-discharge limits by December 31, 2034.
Public comments are due by June 17, 2026 (Docket ID No. EPA–HQ–OW–2009–0819).
Pre-construction air permits: Begin actual construction
EPA proposes to allow construction-related activities on components or structures that don’t emit air pollutants to start before obtaining a New Source Review (NSR) pre-construction permit to build or modify a stationary source. The proposed rule:
- Redefines “begin actual construction," and
- Adds “pollutant-emitting activities” to the regulatory definitions.
Both definitions list equipment, components, and processes that are excluded, meaning that construction on these activities may begin before obtaining an NSR permit. Examples of exempt activities include compacting and stabilizing soil, paving surfaces, and installing concrete pads.
If finalized, the proposed rule will distinguish between construction on stationary sources and construction on non-emitting components (e.g., utility infrastructure, certain building foundations) and codify that on-site construction of non-emitting components or structures can begin before getting an NSR permit.
Public comments are due by June 29, 2026 (Docket ID No. EPA-HQ-OAR-2025-0618).
Light- and medium-duty vehicle regulations: Tier 4 standards
EPA published Part 1 of a two-part rulemaking effort to revise the Tier 4 criteria air pollutant standards set in 2024 (Tier 4 Rule) for light- and medium-duty vehicles (LMDVs), which include:
- Light-duty vehicles and trucks,
- Medium-duty passenger vehicles, and
- Medium-duty vehicles.
In Part 1, EPA proposes to amend the phase-in schedule for Tier 4 criteria air pollutant requirements by:
- Extending the Tier 3 standards set in 2014 (Tier 3 Rule) for LMDVs to model years (MYs) 2027 and 2028,
- Delaying the start of phasing in Tier 4 standards for LMDVs from MY 2027 to MY 2029, and
- Removing the optional early phase-in of Tier 4 standards for LMDVs with a gross vehicle weight rating of more than 6,000 pounds from MYs 2027 and 2028.
The agency also proposes to delay changes to the test protocols for emissions performance certification evaluations to MY 2029.
In Part 2, EPA will reconsider the Tier 4 Rule for LMDVs, which may include changing emission standards, lead time and phase-in schedules, and test procedures.
Public comments are due by July 6, 2026 (Docket ID No. EPA–HQ–OAR–2025–3297).
Key to remember: EPA has issued a series of proposed rules that, if finalized, may have significant regulatory impacts on power plant wastewater, pre-construction air permits, and vehicle emission requirements.
Most Recent Highlights In Transportation

NewsAir QualityIndustry NewsStationary Emission SourcesEnvironmental Protection Agency (EPA)Hazardous Air PollutantsCAA ComplianceEnvironmentalIn-Depth ArticleFocus AreaEnglishAir PermittingAir ProgramsAir ProgramsUSA
2026-05-14T05:00:00Z
MACT emission standards: 7 questions answered
Standards are more than just suggestions when it comes to environmental regulations; they define the minimum level of performance that must be achieved and, as a result, determine who complies and who doesn’t. For industrial facilities that release air toxics, emission standards are foundational to compliance.
The Environmental Protection Agency (EPA) controls the release of more than 180 air toxics, known as hazardous air pollutants (HAPs), from industrial sources (such as factories and refineries) through the National Emission Standards for Hazardous Air Pollutants (NESHAP) program. For major sources, EPA develops maximum achievable control technology (MACT) standards to reduce HAP emissions.
Understanding the basics of MACT standards can help you navigate the requirements specific to your facility. Here’s what you need to know.
What’s a MACT standard?
A MACT standard refers to the specific technology-based requirements set by EPA to control HAP emissions from major sources in a specific industrial source category. The agency bases the standards on the emission levels already being achieved with existing control technologies by the best-controlled and lowest-emitting facilities in an industry.
What’s a MACT floor?
MACT floors are the minimum control levels that regulated facilities must meet. EPA sets MACT floors differently for new and existing facilities:
- The MACT floors for new facilities must be at least as stringent as the emission control achieved by the best-controlled similar source.
- The MACT floors for existing facilities (which may be less stringent than the floors for new sources) have to be at least as strict as the average emission limitation achieved by either:
- The top-performing 12 percent of sources in a category or subcategory with 30 or more sources, or
- The top-performing 5 sources in a category or subcategory with fewer than 30 sources.
Keep in mind that EPA may establish requirements stricter than the MACT floor, known as “beyond-the-floor” standards.
What types of facilities are subject to MACT standards?
MACT standards generally apply to major sources of HAP emissions. A facility is considered a major source if it emits or has the potential to emit:
- 10 tons per year (tpy) of any one HAP, or
- 25 tpy of any combination of HAPs.
How are MACT standards organized?
EPA develops MACT standards by industry sector and publishes them as part of the NESHAP regulations. Most of the rules appear under 40 CFR Part 63, organized by subparts based on source category. Facilities must identify their source category to determine which NESHAP subpart applies.
A limited number of the rules are found under Part 61, organized by subparts based on specific HAPs (such as vinyl chloride) or activities (like asbestos demolition). Facilities need to confirm whether any of the NESHAPs for specific HAPs or activities apply.
How are MACT standards enforced?
The air permitting authority (usually a state or local air agency) incorporates applicable NESHAP requirements, including MACT standards, into a facility’s Title V operating permit.
What do MACT standards cover?
MACT standards can include a combination of measures, methods, processes, systems, and techniques to reduce or eliminate HAP emissions. Examples include:
- Conducting process changes;
- Substituting materials;
- Enclosing systems or processes; and
- Collecting, capturing, and/or treating HAP releases from emission points.
MACT standards may also contain design, equipment, work practice, and operation requirements.
Can MACT standards change?
Yes. The Clean Air Act requires EPA to evaluate MACT standards every 8 years (known as a risk and technology review). The agency will revise MACT standards when it determines improvements in technologies, practices, processes, or other emission-reduction methods warrant revisions.
Real-world example
Let’s take a look at the NESHAP for Polyether Polyols (PEPO) Production (PEPO NESHAP), recently updated in March 2026.
The MACT standards that apply to the PEPO NESHAP (Part 63 Subpart PPP) include:
- Emission limits for process vents;
- Equipment and work practice requirements for storage vessels, wastewater, and equipment leaks; and
- Work practice standards for heat exchange systems.
EPA concluded that improvements in controls warranted updates to specific MACT standards in the PEPO NESHAP, including for heat exchange systems. Specifically, the revised rule requires owners and operators of existing and new heat exchange systems in organic HAP service to:
- Conduct quarterly monitoring using the Modified El Paso Method (also known as the Air Stripping Method), and
- Repair leaks of total strippable hydrocarbon concentration (as methane) in the stripping gas of 6.2 parts per million by volume or greater.
The agency found that the Modified El Paso Method is more effective at identifying leaks, and it measures more compounds than previously required methods. As a result, this revised MACT standard will further reduce HAP emissions from heat exchange systems.
Key to remember: EPA controls hazardous air pollutant emissions from major sources through MACT standards based on the emission levels already achieved by the best-controlled facilities in an industry.

NewsGreenhouse GasesWaste/HazWasteToxic Substances Control Act - EPASafe Drinking WaterWater AnalysisWater ProgramsWater QualityMaximum Contaminant LevelsWalking Working SurfacesMonthly Roundup VideoCAA ComplianceSolid WasteCWA ComplianceLaddersEnglishUSAHeat StressIndustry NewsHeat and Cold ExposureSafety & HealthGeneral Industry SafetyWasteMaritime SafetyEnvironmentalFocus AreaWater MonitoringVolatile Organic CompoundsAir ProgramsStationary Emission SourcesVideo
EHS Monthly Round Up - April 2026
In this April 2026 roundup video, we’ll review the most impactful environmental health and safety news.
Hi everyone! Welcome to the monthly news roundup video, where we’ll review the most impactful environmental health and safety news. Let’s take a look at what happened over the past month.
OSHA revised its National Emphasis Program on heat-related hazards. Going forward, the agency will prioritize inspections in 55 high-risk industries in indoor and outdoor work settings. The program remains in effect for 5 years from its April 10 effective date.
An OSHA proposed rule seeks to eliminate the November 18, 2036, deadline in the Walking-Working Surfaces standard that would require all fixed ladders extending more than 24 feet above a lower level to be equipped with personal fall arrest systems or ladder safety systems. OSHA also seeks feedback on nine specific questions related to the proposal, with comments due on June 5.
On April 17, OSHA revoked its House Falls in Marine Terminals standard at 1917.41. The agency said that because most cargo has been containerized and is moved by cranes, the standard is no longer necessary to protect employees.
Turning to environmental news, an EPA final rule further delays the submission period for the one-time PFAS report required of manufacturers. It pushes the start of the submission period to either 60 days after the effective date of a future final rule updating the PFAS Reporting Rule or January 31, 2027, whichever comes first.
An EPA final rule makes technical changes to the emission standards established in March 2024 for crude oil and natural gas facilities. The changes take effect June 8.
EPA published the draft 6th Contaminant Candidate List for the next group of contaminants to be considered for regulation under the Safe Drinking Water Act. The proposed list designates microplastics and pharmaceuticals as priority contaminant groups for the first time.
And finally, EPA plans to make significant changes to coal combustion residuals requirements. A proposed rule published April 13 would revise the regulations governing the disposal of coal combustion residuals in landfills and surface impoundments, as well as the beneficial use of coal combustion residuals.
Thanks for tuning in to the monthly news roundup. We’ll see you next month!

NewsGreenhouse GasesEnforcement and Audits - OSHAMonthly Roundup VideoWalking Working SurfacesCAA ComplianceUSAInjury and Illness RecordkeepingLaddersEnglishIndustry NewsEnforcement and Audits - OSHAOSHA InspectionsSafety & HealthInjury and Illness Recording CriteriaGeneral Industry SafetyEnvironmentalFocus AreaAir ProgramsVideo
EHS Monthly Round Up - February 2026
In this Februrary 2026 roundup video, we'll discuss the most impactful environmental health and safety news.
Hi everyone! Welcome to the monthly news roundup video, where we’ll review the most impactful environmental health and safety news. Let’s take a look at what happened over the past month.
Fatal work injuries fell 4 percent in 2024, largely due to a decline in workplace drug- and alcohol-related overdoses. According to the Bureau of Labor Statistics, overdose fatalities fell from 512 in 2023 to 410 in 2024. Across all types of workplace incidents, there were 5,070 fatal work injuries in 2024, compared to 5,283 in 2023. Transportation incidents continue to be the most frequent type of fatal event, accounting for over 38 percent of all occupational fatalities in 2024.
OSHA is fast-tracking a proposal to remove the 2036 obligation to upgrade fall protection systems on fixed ladders that extend over 24 feet. This follows an industry petition from major chemical and petroleum industry groups, which argue the provision is unjustified, costly, and not supported by the rulemaking record. OSHA frames the upcoming proposed action as deregulatory, allowing employers to update fixed ladders at the end of their service lives. We’ll provide updates as more information becomes available.
As OSHA leans into “deregulatory” actions, lawmakers are moving to pressure the agency to issue “regulatory” rulemaking to protect American workers. The latest legislative wave of bills aims to fill regulatory gaps, tackle emerging hazards, expand OSHA authority, and raise penalties. Topics addressed by these bills include musculoskeletal disorders, heat stress, infectious diseases, wildfire smoke, and workplace violence.
In a recently issued letter of interpretation, OSHA states that a burn injury caused by a personal lithium-ion battery fire is work related if it occurs in the workplace during assigned working hours. The letter details an incident where an employee was burned when their rechargeable lithium-ion batteries for e-cigarettes sparked a fire after coming into contact with a key used for work.
A new report from the Department of Labor Office of Inspector General concludes that OSHA struggles to meet its mission, particularly in high-risk industries like healthcare, construction, and manufacturing. Several pages point to OSHA’s difficulties in effectively enforcing annual injury and illness reporting requirements, reaching the nation’s high-risk worksites for inspection, and addressing workplace violence by regulatory or other action.
Turning to environmental news, EPA extended the deadlines for Facility Evaluation Reports and related requirements for coal combustion residuals facilities. In most instances, the deadlines have been moved one or two years out.
And finally, EPA announced a final rule eliminating the 2009 Endangerment Finding and related greenhouse gas emission requirements for on-highway vehicles and vehicle engines. When the final rule takes effect, manufacturers and importers of new motor vehicles and motor vehicle engines will no longer have to measure, report, certify, or comply with federal greenhouse gas emission standards.
Thanks for tuning in to the monthly news roundup. We’ll see you next month!

NewsWaste ManifestsEnforcement and Audits - OSHAWaste/HazWasteWater ProgramsMonthly Roundup VideoCAA ComplianceUSACWA ComplianceStormwaterEnglishAir ProgramsIndustry NewsEnforcement and Audits - OSHAMunicipal WastewaterSafety & HealthGeneral Industry SafetyWasteEnvironmentalFocus AreaAir ProgramsVideo
EHS Monthly Round Up - March 2026
In this March 2026 roundup video, we'll review the most impactful environmental health and safety news.
Hi everyone! Welcome to the monthly news roundup video, where we’ll review the most impactful environmental health and safety news. Let’s take a look at what happened over the past month.
OSHA released an updated Job Safety and Health poster. Employers can use either the revised version or the older one, but the poster must be displayed in a conspicuous place where workers can easily see it.
OSHA recently removed a link from its Data topic webpage that displayed a list of “high-penalty cases” at or over $40,000 since 2015. The agency says it discontinued and removed it in December. The data is frozen and archived elsewhere.
OSHA published two new resources as part of its newly launched Safety Champions Program. The fact sheet provides an overview of how the program works, eligibility criteria, and key benefits. The step-by-step guide helps businesses navigate the core elements of OSHA’s Recommended Practices for Safety and Health Programs.
Several forces are nudging OSHA to address a number of workplace hazards and high-hazard industries. This comes from other agencies, safety organizations, watchdogs, legislative proposals, and persistent injury/fatality data. Among the hazards are combustible dust; first aid; personal protective equipment; and workplace violence. How all this translates into new regulations, guidance, programmed inspections, or other initiatives remains to be seen.
Turning to environmental news, EPA issued a proposed rule to require waste handlers to use electronic manifests to track all RCRA hazardous waste shipments. Stakeholders have until May 4 to comment on the proposal.
On March 10, EPA finalized stronger emission limits for new and existing large municipal waste combustors and made other changes to related standards.
And finally, EPA temporarily extended coverage under the 2021 Multi-Sector General Permit for industrial stormwater discharges until the agency issues a new general permit. The permit expired February 28 and remains in effect for facilities previously covered. EPA won’t take enforcement action against new facilities for unpermitted stormwater discharges if the facilities meet specific conditions.
Thanks for tuning in to the monthly news roundup. We’ll see you next month!

NewsCERCLA, SARA, EPCRA CERCLA, SARA, EPCRASafety and Health Programs and TrainingElectronic Reporting of Injury and Illness RecordsWater ProgramsMonthly Roundup VideoSafety and Health Programs and TrainingUSAWater ProgramsHazard CommunicationInjury and Illness RecordkeepingEnglishTier II Inventory ReportingIndustry NewsSafety & HealthInjury and Illness RecordkeepingWater ReportingGeneral Industry SafetyEnvironmentalHazard CommunicationSARA ComplianceFocus AreaVideo
EHS Monthly Round Up - January 2026
In this January 2026 roundup video, we'll review the most impactful environmental health and safety news.
Hi everyone! Welcome to the monthly news roundup video, where we’ll review the most impactful environmental health and safety news. Let’s take a look at what happened over the past month.
Chemical manufacturers, importers, distributors, and employers will have an extra four months to comply with the provisions of OSHA’s revised Hazard Communication standard. When the rule was revised in 2024, it contained staggered compliance dates for those who classify or use chemical substances and mixtures. The first compliance date is now May 19 rather than January 19 of 2026.
On January 8, OSHA issued further technical corrections to its Hazard Communication final rule. An initial set of corrections was published in October 2024, and OSHA continued to review the standard for errors. The agency said these corrections should reduce confusion during the chemical classification process and prevent errors on labels and safety data sheets.
In 2024, private industry employers reported 2.5 million nonfatal workplace injuries and illnesses, according to the Bureau of Labor Statistics. This is down 3.1 percent from 2023 and largely due to a decrease in respiratory illnesses. The greatest number of cases involving days away from work, job restriction, or transfer were caused by overexertion, repetitive motion, and bodily conditions, followed by contact incidents.
Registration is open for OSHA’s Safety Champions Program, which is designed to help employers develop and implement effective safety and health programs. Participants can work at their own pace through Introductory, Intermediate, and Advanced levels.
Turning to environmental news, on January 9, EPA withdrew its direct final rule on SDS/Tier II reporting tied to OSHA HazCom, before it had a chance to take effect. The direct final rule was published back on November 17, 2025, and was intended to relax the Tier II and safety data sheet reporting requirements and align with OSHA’s HazCom standard. EPA said it plans to write a new rule addressing all public comments.
And finally, EPA published a final rule that changes certain requirements for wastewater discharges from coal-fired steam electric power plants. It applies to the deadlines established by the preceding rule finalized in 2024.
Thanks for tuning in to the monthly news roundup. We’ll see you next month!
Most Recent Highlights In Safety & Health

NewsIndustry NewsIndustry NewsToxic Substances Control Act - EPAToxic Subtances Control Act - EPATSCA ComplianceToxic Substances - EPAEnvironmental Protection Agency (EPA)EnvironmentalEnglishFocus AreaUSA
2026-05-07T05:00:00Z
EPA postpones compliance for TCE uses with TSCA Section 6(g) exemptions
On May 5, 2026, the Environmental Protection Agency (EPA) published a final rule postponing the effective date of compliance requirements for trichloroethylene (TCE) uses with Toxic Substances Control Act (TSCA) Section 6(g) exemptions until pending judicial review is concluded.
Who’s impacted?
The delay applies to the conditions imposed on each TSCA Section 6(g) exemption at 40 CFR 751.325, including the Workplace Chemical Protection Program requirements at 751.315.
Since the compliance requirements haven’t taken effect, facilities that use TCE with TSCA Section 6(g) exemptions don’t have to comply with the provisions yet.
Why the delay?
In December 2024, EPA released the final TCE rule (2024 TCE rule). The rule ultimately bans all uses of TCE, but it allows uses with TSCA Section 6(g) exemptions to continue for a limited time as long as facilities comply with strict workplace controls. Currently, the 2024 TCE rule is under judicial review. EPA has delayed the effective date of the requirements for TCE uses with TSCA Section 6(g) exemptions until the judicial challenges to the 2024 TCE rule are resolved.
If you have a sense of déjà vu, it’s for a good reason. This is the fifth time the agency has delayed the compliance requirements for TSCA Section 6(g) exemptions. However, EPA’s previous postponements established specific dates for the provisions to take effect, but this rule doesn’t.
Key to remember: EPA has delayed the compliance requirements for TCE uses with TSCA Section 6(g) exemptions until pending judicial review is concluded.
NewsSafe Drinking WaterChange NoticesChange NoticeWater ProgramsEnvironmentalCWA ComplianceEnglishWisconsinFocus Area
2026-05-04T05:00:00Z
Wisconsin adds requirements to federal lead and copper drinking water rule
Effective date: May 1, 2026
This applies to: Public water systems
Description of change: The Wisconsin Department of Natural Resources (department) finalized amendments to align state regulations with the Environmental Protection Agency’s (EPA’s) updated lead and copper control requirements for drinking water. While most of the amendments conform to federal standards, the state has additional standards. The department also:
- Requires community water systems to make four contact attempts (two more than federal requirements) by two different means for elementary schools and childcare facilities to schedule lead monitoring,
- Requires public water systems on reduced annual monitoring to analyze and report the same number of sample results for copper and lead (instead of the federal requirements that only half of the copper samples are analyzed),
- Requires public water systems undergoing temporary treatment or source water changes (unregulated by EPA) for more than 30 days to notify the department 10 days before the planned change or as soon as possible for an unplanned emergency change,
- Requires groundwater system water suppliers that request to limit their entry point sampling to obtain prior approval from the department,
- Requires water suppliers that provide point-of-use treatment devices for the corrosion control treatment compliance flexibility option to submit a written plan to the department (not required by the federal rule),
- Grants the department the authority to require analysis of total and dissolved lead during distribution system and site assessments where the federal rule doesn’t provide this authority to the state,
- Requires water suppliers that request to invalidate a reported sample result to provide substantial evidence that the sample meets one of the invalidation criteria in the rule, and
- Combines the lead and copper monitoring waivers into one waiver and requires public water systems to complete at least two 6-month rounds of standard tap water monitoring (for which the federal rule only requires one 6-month round).
NewsDistrict of ColumbiaChange NoticesChange NoticeCAA ComplianceEnvironmentalAir PermittingFocus AreaEnglishAir Programs
2026-05-04T05:00:00Z
District of Columbia updates odor control permit rules
Effective date: April 10, 2026
This applies to: Entities required to obtain an operating air permit under Nuisance Odor Regulations
Description of change: The District of Columbia’s Department of Energy and Environment (DOEE) finalized a rulemaking that allows sources of nuisance odors to implement odor controls before obtaining an operating air permit under 20 DCMR Section 200.
To qualify, an entity must obtain from the DOEE written approval of the controls in the Odor Control Plan (OCP) decision letter. Additionally, the source must apply for an operating permit under 200.2 within 60 days of receiving an OCP decision letter.
Related state info: Clean air operating permits state comparison
NewsChange NoticesChange NoticeCaliforniaMobile Emission SourcesCAA ComplianceEnvironmentalFocus AreaEnglishAir Programs
2026-05-04T05:00:00Z
California permanently adopts emergency vehicle rules
Effective date: April 1, 2026
This applies to: New vehicle and engine manufacturers
Description of change: The California Air Resources Board (CARB) permanently adopted the Emergency Vehicle Emissions Regulations, which CARB adopted in 2025 as a temporary measure.
The rule reverts the emission standards and requirements for vehicle and engine manufacturers to the regulations in effect before the adoption of:
- Advanced Clean Cars II (ACC II), and
- Heavy-Duty Engine and Vehicle Omnibus Low NOx (Omnibus).
CARB allows manufacturers to comply with ACC II and Omnibus requirements voluntarily.
In 2025, the Environmental Protection Agency revoked CARB’s waivers to implement the ACC II, Omnibus, and Advanced Clean Trucks rules.

NewsHazardous WasteIndustry NewsWaste GeneratorsWaste ManifestsWaste/HazWasteWaste HandlersWasteEnvironmental Protection Agency (EPA)TSD FacilitiesEnvironmentalIn-Depth ArticleEnglishFocus AreaUSA
2026-04-28T05:00:00Z
Hazardous waste manifests: Hybrid vs. fully electronic
More industries are embracing the exclusive use of electronic platforms. For example, digital payments are replacing cash, news sites are going fully online, and cloud storage is eclipsing external computer storage. And, based on recent proposed rulemaking, hazardous waste manifests may join the list.
The Environmental Protection Agency (EPA) proposed the Paper Manifest Sunset Rule in March 2026, planning to shift to electronic-only manifests for tracking hazardous waste that’s regulated by the Resource Conservation and Recovery Act (RCRA).
If the proposed rule is finalized, regulated entities will have to track all hazardous waste shipments electronically. Specifically, generators, transporters, and receiving facilities could only use hybrid or fully electronic manifests on the Hazardous Waste Electronic Manifest System (e-Manifest).
So, what are the differences between hybrid and fully electronic manifests? Let’s compare the distinctions and explore some of the benefits that electronic manifests can offer.
What’s a hybrid manifest?
EPA initially established the hybrid manifest for generators that couldn’t fully participate in electronic manifests when the e-Manifest launched in 2018. The hybrid manifest combines paper and electronic manifests, allowing generators that aren’t registered in e-Manifest or don’t have an EPA identification (ID) number to sign printed copies of electronic manifests.
Here’s the general hybrid manifest process:
- The first transporter initiates an electronic manifest in e-Manifest. A hard copy of the electronic manifest is printed out, and the generator and initial transporter sign the paper copy.
- The generator keeps a signed paper copy on-site. The transporter keeps a signed paper copy with the shipment until it’s delivered to the receiving facility.
- From that point forward, the initial transporter and all subsequent waste handlers track the shipment in e-Manifest (using electronic signatures and electronic transmissions).
- The manifest is complete when the receiving facility or exporter electronically signs it on e-Manifest.
What’s a fully electronic manifest?
The fully electronic manifest is tracked completely online. All handlers — generators, transporters, and receiving facilities or exporters — must have an EPA ID number and be registered in e-Manifest to use the fully electronic manifest.
The entire process is conducted on e-Manifest:
- The manifest is created electronically in e-Manifest.
- All handlers electronically sign the manifest in e-Manifest.
- The manifest is complete when the receiving facility or exporter electronically signs it on e-Manifest.
What benefits do electronic manifests offer?
Regardless of whether EPA’s rule is finalized as is, electronic manifests offer hazardous waste handlers a range of benefits. Consider the following potential perks.
Compliance with existing regulations
Many handlers are already required to embrace electronic manifesting. In July 2024, EPA finalized the e-Manifest Third Rule, which requires:
- Large quantity generators and small quantity generators to register for e-Manifest,
- Exporters to submit manifests and continuation sheets to e-Manifest (and pay the associated fees), and
- Waste handlers to submit manifest-related reports and data corrections to e-Manifest.
Streamlined recordkeeping for generators
Hazardous waste handlers using e-Manifest automatically meet the recordkeeping requirements to maintain records of manifests (paper or electronic) since the manifests are retained electronically in the system.
This eliminates the need to keep hard copies. It also provides a centralized place where handlers can access these documents at any time.
However, the provision doesn’t apply to generators using hybrid manifests; they must keep the initial paper copies of the electronic manifest for 3 years.
Reduced costs
Embracing electronic manifesting removes the costs associated with printing paper manifests from EPA-approved sources.
Keep in mind, there’s an unavoidable cost for receiving facilities and exporters. These entities have to pay user fees for each manifest they submit to e-Manifest.
Proactive preparation
EPA’s proposed Paper Manifest Sunset Rule would prohibit the use of paper manifests 2 years after the publication of a final rule. Hazardous waste handlers who transition to using only electronic manifests now will be better prepared to comply with future regulations. It gives businesses time to coordinate resources and address any unexpected issues.
Key to remember: Do you know the differences between hybrid and fully electronic hazardous waste manifests? The distinctions could be the difference between compliance and noncompliance.
Most Recent Highlights In Human Resources

NewsIndustry NewsIndustry NewsToxic Substances Control Act - EPAToxic Subtances Control Act - EPATSCA ComplianceEnvironmental Protection Agency (EPA)EnvironmentalEnglishFocus AreaUSA
2026-04-27T05:00:00Z
EPA publishes first round of expiring TSCA CBI claims
The Environmental Protection Agency (EPA) published the first list of expiring Confidential Business Information (CBI) claims for information submitted under the Toxic Substances Control Act (TSCA). The list covers CBI claims that expire from June 22, 2026, to July 31, 2026.
What are expiring CBI claims?
The Frank R. Lautenberg Chemical Safety for the 21st Century Act (which became law in June 2016) set an automatic 10-year expiration for most CBI claims made under TSCA. The first round of expiring claims starts in June 2026.
EPA allows businesses to request extensions of CBI protection for up to another 10 years.
How do I know if my CBI claims are expiring?
EPA will notify businesses of expiring CBI claims directly through the Central Data Exchange (CDX).
The agency will also release public lists of upcoming expiring CBI claims monthly on the “CBI Claim Expiration” webpage. The agency encourages businesses to review the lists to verify whether any of their claims are included.
How do I request an extension of expiring CBI claims?
Businesses seeking to extend a CBI claim beyond its expiration date must submit an extension request at least 30 days before the claim expires using the newly launched TSCA Section 14(e) CBI Claim Extension Request application in EPA’s CDX.
Here’s the general process:
- EPA notifies the business of an expiring CBI claim directly through CDX and via the public lists on the “CBI Claim Expiration” webpage.
- The business submits a request for extension through EPA’s CDX at least 30 days before the CBI claim expires. Requests must comply with the substantiation requirements at 40 CFR 703.5(a) and (b).
- EPA reviews the submission and either grants or denies the request.
What are the possible results?
If EPA approves the extension request, the information in the CBI claim will remain protected for up to another 10 years.
If EPA denies the extension request, the agency can publicize the information in the claim 30 days after notifying the submitter in CDX. Further, if a business doesn’t submit an extension request at least 30 days before the expiration date, EPA may publicize the information without notifying the submitter.
Key to remember: EPA published the first round of expiring CBI claims for information submitted under TSCA. Businesses must submit extension requests to keep the information protected.
NewsChange NoticesAboveground Storage TanksChange NoticeEnvironmentalStorage TanksFocus AreaEnglishNorth DakotaTank Systems
2026-04-24T05:00:00Z
North Dakota establishes AST regulations
Effective date: April 1, 2026
This applies to: Owners and operators of aboveground storage tanks (ASTs) and liquid fuel storage tanks
Description of change: The Department of Environmental Quality adopted technical standards and corrective action requirements for ASTs. The department also approved amendments to the registration dates and fee categories of the Petroleum Tank Release Compensation Fund for liquid fuels storage tanks.
Related state info: Aboveground storage tanks (ASTs) state comparison — ASTs
NewsWater PermittingPublicly Owned Treatment WorksChange NoticesChange NoticeOhioWater ProgramsEnvironmentalWater ProgramsEnglishFocus AreaCWA Compliance
2026-04-24T05:00:00Z
Ohio finalizes sewage sludge amendments
Effective date: March 1, 2026
This applies to: Facilities regulated by the sewage sludge program
Description of change: The Ohio Environmental Protection Agency finalized changes to the sewage sludge program through its 5-year review of the regulations. The approved amendments:
- Add professional operator of record requirements for privately owned treatment works;
- Increase and add isolation distances for facilities;
- Prohibit beneficial use of biosolids within a vulnerable hydrogeological setting;
- Remove dioxin monitoring requirements; and
- Add requirements for beneficial user certification (including the application and examination process, recordkeeping requirements, and reasons for suspending or revoking a certification).
NewsNew MexicoNew Mexico Environment Department (NMED)Change NoticesChange NoticeMobile Emission SourcesCAA ComplianceEnvironmentalFocus AreaEnglishAir Programs
2026-04-24T05:00:00Z
New Mexico adopts Clean Transportation Fuel Program rules
Effective date: April 1, 2026
This applies to: Transportation fuel produced in, imported into, or dispensed for use in New Mexico
Description of change: The New Mexico Environment Department finalized regulations to implement the Clean Transportation Fuel Program (CTFP) to reduce the carbon intensity of transportation fuel (including gasoline and diesel). The program covers transportation fuel producers, importers, and dispensers.
The CTFP:
- Establishes annual statewide carbon intensity standards that apply to transportation fuel (e.g., gasoline and diesel) produced, imported, and dispensed for use in New Mexico;
- Allocates credits and calculates deficits for regulated entities based on the fuel’s carbon intensity; and
- Sets up a marketplace for selling and purchasing credits to comply with the carbon intensity standards.
The first compliance period runs from April 1, 2026, to December 31, 2027. The first compliance period report is due by April 30, 2028. Annual compliance reports will be due by April 30 for the previous calendar year.
NewsRecyclingChange NoticesChange NoticeMaineSustainabilityProduct StewardshipSustainabilityWaste MinimizationEnvironmentalEnglishSustainabilityFocus Area
2026-04-24T05:00:00Z
Maine lists materials covered for packaging stewardship program
Effective date: March 3, 2026
This applies to: Entities subject to the Stewardship Program for Packaging Regulations
Description of change: The Maine Department of Environmental Protection’s amendments to the Stewardship Program for Packaging Regulations (06-096 C.M.R. Chapter 428) include:
- Aligning the rules with changes made by An Act to Improve Recycling by Updating the Stewardship Program for Packaging (L.D. 1423), and
- Adding Appendix A — The Packaging Material Types List to the Stewardship Program for Packaging Regulations.
L.D. 1423:
- Excludes certain commercial, cosmetic, medical, environmental, dangerous, hazardous, and flammable product packaging from the program requirements;
- Excludes packaging of products related to public health and water quality testing from the program requirements;
- Requires the department to adopt a process for approving a producer payment system; and
- Updates definitions for clarity.
Appendix A defines packaging material and designates the material types readily recyclable as applicable. It may also designate materials as compostable or reusable.
New Network Poll


No active poll
Please come back soon!
Most Popular Highlights In Environmental

NewsIndustry NewsWaste GeneratorsWaste IdentificationWaste/HazWasteWasteEnvironmentalIn-Depth ArticleSolid WasteEnglishFocus AreaUSA
2025-09-22T05:00:00Z
The new rules of waste: How 2025 legislation is reshaping corporate environmental compliance
In 2025, sweeping changes to waste laws across the U.S. are forcing companies to rethink packaging, disposal, and reporting practices. From statewide bans on single-use plastics to expanded Extended Producer Responsibility (EPR) programs and chemical recycling reclassification, these updates carry significant compliance implications for corporate Environmental Health and Safety (EHS) teams.
Single-use plastics: New bans and restrictions
Several states have enacted new bans on polystyrene foam containers, plastic straws, and produce bags:
- California SB 1046: As of January 1, 2025, expanded polystyrene (EPS) food containers are banned unless they meet a 25% recycling rate. Pre-checkout bags must be compostable or made of recycled paper.
- Delaware SB 51: Foam containers and plastic stirrers are banned unless requested by the customer.
- Oregon SB 543: Bans EPS containers and food packaging with intentionally added PFAS.
- Virginia: No food vendor may use EPS containers starting July 1, 2025.
Compliance tip: Audit your packaging inventory and supplier certifications. Ensure alternatives meet compostability or recyclability standards.
Extended producer responsibility (EPR): Expanding nationwide
EPR laws now apply in several states. These laws require companies to help pay for recycling and report packaging data.
- Maryland SB 901: Allows multiple Producer Responsibility Organizations (PROs) and mandates cost-sharing for recycling.
- Washington SB 5284: Targets consumer packaging with compliance deadlines starting in 2028.
- Colorado: Unregistered producers are banned from selling covered products as of July 1, 2025.
- California SB 54: Revised draft rules released in May 2025 include new compliance dates and exemptions.
Compliance tip: Register with your state’s PRO, submit packaging data, and prepare for fee schedules. Track deadlines and exemptions closely.
Chemical recycling: Regulatory reclassification and impacts
States like Texas and Pennsylvania now classify chemical recycling as manufacturing, not waste management. This shift encourages investment but also changes permitting and emissions reporting obligations.
Compliance tip: If your facility uses or contracts chemical recycling, review air and water permits. Ensure alignment with manufacturing regulations.
Per and polyfluoroalkyl substances (PFAS): Phase-outs and hazardous waste updates
More states are banning PFAS in packaging and cookware:
- Minnesota, Oregon, Rhode Island, and New Mexico have banned or phased out PFAS in consumer products.
- Illinois SB 727: Aligns PFAS limits with EPA standards.
Compliance tip: Update product safety data sheets (SDS) and conduct PFAS audits. Prepare for new reporting under TSCA Section 8(a)(7), including data on manufacture, use, and disposal.
Circular economy and composting: Recent mandates
States are setting zero-waste goals and requiring composting:
- Hawaii HB 750: Launches a statewide recycling needs assessment.
- Maine LD 1065: Requires large food waste generators to compost by 2030.
Compliance Tip: Evaluate organics diversion programs and infrastructure. Consider partnerships with composting facilities.
EHS teams: What to do now
- Map your regulatory exposure: Identify which state laws apply to your operations.
- Engage with PROs: Register, report, and participate in rulemaking.
- Train staff: Ensure procurement, operations, and legal teams understand new requirements.
- Audit packaging and waste streams: Replace banned materials and optimize recycling.
- Monitor emerging legislation: Stay ahead of new bills and compliance deadlines.
Key to remember: Staying compliant in 2025 means more than avoiding fines. EHS teams must lead efforts to meet new waste laws and support sustainability goals.

NewsGreenhouse GasesIndustry NewsIndustry NewsAir ProgramsEnvironmental Protection Agency (EPA)CAA ComplianceEnvironmentalFocus AreaEnglishVolatile Organic CompoundsAir ProgramsStationary Emission SourcesUSA
2026-04-10T05:00:00Z
EPA amends specific oil and gas emission standards
On April 9, 2026, the Environmental Protection Agency (EPA) published a final rule that makes technical changes to the emission standards established in March 2024 (2024 Final Rule) for crude oil and natural gas facilities. This rule (2026 Final Rule) amends the requirements for:
- Temporary flaring of associated gas, and
- Vent gas net heating value (NHV) monitoring provisions for flares and enclosed combustion devices (ECDs).
Who’s impacted?
The 2026 Final Rule affects new and existing oil and gas facilities. Specifically, it applies to the regulations for the Crude Oil and Natural Gas source category, including the:
- New Source Performance Standards at 40 CFR 60 Subpart OOOOb, and
- Emission guidelines at 60 Subpart OOOOc.
These emission standards are commonly referred to as OOOOb/c.
What are the changes?
The 2026 Final Rule implements technical changes to the temporary flaring and vent gas NHV monitoring requirements set by the 2024 Final Rule.
Temporary flaring
The rule extends the baseline time limit for temporary flaring of associated gas at well sites in certain situations (like conducting repairs or maintenance) from 24 to 72 hours. Owners and operators must stop temporary flaring as soon as the situation is resolved or the temporary flaring limit is reached (whichever happens first).
It also grants allowances beyond the 72-hour limit if exigent circumstances occur (such as severe weather that prevents safe access to a well site to address an emergency or maintenance issue) and there’s a need to extend duration for repairs, maintenance, or safety issues. Owners and operators must keep records of exigent circumstances and include the information in their annual reports.
NHV monitoring
For new and existing sources, the 2026 Final Rule exempts all flare types (unassisted and assisted) and ECDs from monitoring due to high NHV content, except when inert gases are added to the process streams or for other scenarios that decrease the NHV content of the inlet stream gas. In these cases, EPA requires NHV monitoring via continuous monitoring or the alternative performance test (sampling demonstration) option for all flares and ECDs.
Other significant changes include:
- Replacing the general exemption from NHV monitoring for associated gas for any control device used at well site affected facilities with NHV monitoring requirements,
- Granting operational pauses during weekends and holidays for the consecutive 14-day sampling demonstration requirements (limiting it to no more than 3 operating days from the previous sampling day), and
- Permitting less than 1-hour sampling times for twice daily samples where low or intermittent flow makes it infeasible (as long as owners and operators report the sampling time used and the reason for the reduced time).
The 2026 Final Rule takes effect on June 8, 2026.
Key to remember: EPA’s technical changes to the emission standards for oil and gas facilities apply to temporary flaring provisions and vent gas NHV monitoring requirements.

NewsClosuresIndustry NewsIndustry NewsWaste/HazWasteWasteEnvironmental Protection Agency (EPA)Waste ManagementEnvironmentalSolid WasteEnglishFocus AreaUSA
2026-04-16T05:00:00Z
EPA proposes major changes to coal combustion residuals rules
The Environmental Protection Agency (EPA) published a proposed rule on April 13, 2026, to revise the existing regulations governing the disposal of coal combustion residuals (CCR) in landfills and surface impoundments as well as the beneficial use of CCR.
Who’s impacted?
The proposed rule affects coal-fired electric utilities and independent power producers subject to the CCR disposal and beneficial use regulations at 40 CFR Part 257.
What are the changes?
Significant changes the EPA proposes include:
- Adding an option for facilities to certify the closure of legacy CCR surface impoundments by CCR removal that were closed before November 8, 2024, under regulatory oversight;
- Expanding the eligibility criteria for facilities to defer CCR closure requirements until site-specific determinations are made for legacy surface impoundments that were closed before November 8, 2024, under regulatory oversight;
- Exempting CCR dewatering structures (used to dewater CCR waste for the disposal of CCR elsewhere) from federal CCR regulations (Part 257);
- Rescinding all CCR management unit (CCRMU) requirements or revising the existing CCRMU regulations;
- Allowing permit authorities to make site-specific determinations regarding certain requirements during permitting for CCR units complying with federal CCR groundwater monitoring, corrective action, and closure requirements under a federal or an approved-state CCR permit; and
- Revising the beneficial use requirements by:
- Removing the environmental demonstration requirement for non-roadway use of more than 12,400 tons of unencapsulated CCR; and
- Excluding these beneficial uses from federal CCR regulations (Part 257):
- CCR used in cement manufacturing at cement kilns,
- Flue gas desulfurization (FGD) gypsum used in agriculture, and
- FGD gypsum used in wallboard.
Key to remember: EPA plans to make significant amendments to the coal combustion residuals requirements.

NewsAir QualityIndustry NewsIndustry NewsAir ProgramsEnvironmental Protection Agency (EPA)Hazardous Air PollutantsCAA ComplianceEnvironmentalFocus AreaEnglishAir ProgramsStationary Emission SourcesUSA
2026-04-02T05:00:00Z
EPA releases final NESHAP for chemical manufacturing area sources
The Environmental Protection Agency (EPA) published a final rule on April 1, 2026, amending the National Emission Standards for Hazardous Air Pollutants (NESHAP) for Chemical Manufacturing Area Sources (CMAS). The NESHAP controls hazardous air pollutant (HAP) emissions from facilities that manufacture a range of chemicals and products, such as inorganic chemicals, plastics, and synthetic rubber.
Who’s impacted?
The final rule applies to nine area source categories in the chemical manufacturing sector that are regulated by the CMAS NESHAP (40 CFR 63 Subpart VVVVVV).
What are the changes?
EPA’s final rule:
- Establishes leak detection and repair requirements for equipment leaks and heat exchange systems in organic HAP service,
- Adds detectable emissions monitoring standards for pressure vessels in organic HAP service and emission management practice standards for pressure relief devices (PRDs) in organic HAP service,
- Prohibits closed vent systems in organic HAP service from bypassing an air pollution control device (APCD), and
- Requires recurring performance testing of non-flare APCDs to demonstrate compliance with process vent and storage tank provisions.
The final rule also mandates electronic reporting for notifications of compliance status (NOCs), performance test reports, and periodic reports. Facilities must submit these reports through the Compliance and Emissions Data Reporting Interface (CEDRI) on EPA’s Central Data Exchange.
What didn’t change?
Significantly, the final rule doesn’t add previously proposed regulations for area sources that use ethylene oxide (EtO) to produce materials described by code 325 of the North American Industry Classification System (NAICS).
EPA states that it intends to address the regulation of EtO from area sources and major sources in one final action.
What are the compliance timelines?
Existing facilities must comply with the amendments by April 1, 2029.
New facilities (those that begin construction or reconstruction after January 22, 2025) have to comply with the changes by April 1, 2026, or upon startup, whichever is later.
Additionally, facilities must start electronically submitting:
- Performance tests by June 1, 2026;
- NOCs by August 31, 2026; and
- Periodic reports by April 1, 2029.
Key to remember: EPA’s final HAP emissions rule for chemical manufacturing area sources adds new requirements for certain processing equipment and systems.
NewsGreenhouse GasesWaste/HazWasteToxic Substances Control Act - EPASafe Drinking WaterWater AnalysisWater ProgramsWater QualityMaximum Contaminant LevelsWalking Working SurfacesMonthly Roundup VideoCAA ComplianceSolid WasteCWA ComplianceLaddersEnglishUSAHeat StressIndustry NewsHeat and Cold ExposureSafety & HealthGeneral Industry SafetyWasteMaritime SafetyEnvironmentalFocus AreaWater MonitoringVolatile Organic CompoundsAir ProgramsStationary Emission SourcesVideo
EHS Monthly Round Up - April 2026
In this April 2026 roundup video, we’ll review the most impactful environmental health and safety news.
Hi everyone! Welcome to the monthly news roundup video, where we’ll review the most impactful environmental health and safety news. Let’s take a look at what happened over the past month.
OSHA revised its National Emphasis Program on heat-related hazards. Going forward, the agency will prioritize inspections in 55 high-risk industries in indoor and outdoor work settings. The program remains in effect for 5 years from its April 10 effective date.
An OSHA proposed rule seeks to eliminate the November 18, 2036, deadline in the Walking-Working Surfaces standard that would require all fixed ladders extending more than 24 feet above a lower level to be equipped with personal fall arrest systems or ladder safety systems. OSHA also seeks feedback on nine specific questions related to the proposal, with comments due on June 5.
On April 17, OSHA revoked its House Falls in Marine Terminals standard at 1917.41. The agency said that because most cargo has been containerized and is moved by cranes, the standard is no longer necessary to protect employees.
Turning to environmental news, an EPA final rule further delays the submission period for the one-time PFAS report required of manufacturers. It pushes the start of the submission period to either 60 days after the effective date of a future final rule updating the PFAS Reporting Rule or January 31, 2027, whichever comes first.
An EPA final rule makes technical changes to the emission standards established in March 2024 for crude oil and natural gas facilities. The changes take effect June 8.
EPA published the draft 6th Contaminant Candidate List for the next group of contaminants to be considered for regulation under the Safe Drinking Water Act. The proposed list designates microplastics and pharmaceuticals as priority contaminant groups for the first time.
And finally, EPA plans to make significant changes to coal combustion residuals requirements. A proposed rule published April 13 would revise the regulations governing the disposal of coal combustion residuals in landfills and surface impoundments, as well as the beneficial use of coal combustion residuals.
Thanks for tuning in to the monthly news roundup. We’ll see you next month!

NewsIndustry NewsIndustry NewsToxic Substances Control Act - EPAToxic Subtances Control Act - EPATSCA ComplianceToxic Substances - EPAEnvironmental Protection Agency (EPA)EnvironmentalEnglishFocus AreaUSA
2026-04-13T05:00:00Z
EPA delays TSCA Section 8(a)(7) PFAS reporting timeline again
On April 13, 2026, the Environmental Protection Agency (EPA) published a final rule that further delays the submission period for the one-time report required of manufacturers on per- and polyfluoroalkyl substances (PFAS) by the PFAS Reporting and Recordkeeping Rule (PFAS Reporting Rule).
This final rule pushes the starting submission period to either 60 days after the effective date of a future final rule updating the PFAS Reporting Rule or January 31, 2027, whichever is earlier.
Who’s impacted?
Established under Toxic Substances Control Act (TSCA) Section 8(a)(7), the PFAS Reporting Rule (40 CFR Part 705) requires any business that manufactured (including imported) any PFAS or PFAS-containing article between 2011 and 2022 to report. Covered manufacturers and importers must submit information on:
- Chemical identity, uses, and volumes made and processed;
- Byproducts;
- Environmental and health effects;
- Worker exposure; and
- Disposal.
What’s the new timeline?
The opening submission period was moved from April 13, 2026, to either 60 days after the effective date of a future final PFAS Reporting Rule or January 31, 2027, whichever is earlier.
Most manufacturers have 6 months to submit the report. Small manufacturers reporting only as importers of PFAS-containing articles have 1 year.
| TSCA Section 8(a)(7) PFAS Reporting Rule submission period | ||
|---|---|---|
| Start date | End date | |
| Most manufacturers | 60 days from effective date of final PFAS Reporting Rule or January 31, 2027 (whichever is earlier) | 6 months from start date or July 31, 2027 (whichever is earlier) |
| Small manufacturers reporting solely as PFAS article importers | 60 days from effective date of final PFAS Reporting Rule or January 31, 2027 (whichever is earlier) | 1 year from start date or January 31, 2028 (whichever is earlier) |
Why the delay?
In November 2025, the agency proposed updates to the PFAS Reporting Rule. EPA has delayed the reporting period to give the agency time to issue a final rule (expected later this year).
Key to remember: EPA has delayed the starting submission deadline for the TSCA Section 8(a)(7) PFAS Reporting Rule from April 2026 to no later than January 2027.
Most Popular Highlights In Transportation

NewsIndustry NewsMedical review officer (MRO) - Motor CarrierFleet SafetyDrug testing - Motor CarrierDrug and Alcohol Testing - DOTFocus AreaIn-Depth ArticleEnglishTransportationUSA
2026-05-14T05:00:00Z
Excuses that won’t make the cut for failed drug tests
Medical review officers (MROs) hear some wild excuses from drivers regarding failed DOT drug tests.
Some excuses may be valid and investigated by the MRO during the verification process. For example, a driver may refer the MRO to a family physician about a legally prescribed medication that showed up in the drug panel.
However, some explanations provided by drivers aren’t viewed as reasonable under the regulations. Consider the following commonly used excuses that MROs aren’t permitted to entertain.
Tested in error
- Drivers may claim that their employer initiated a test that shouldn’t have been done, such as: Requesting a post-accident test when the criteria in 382.303 weren’t met,
- Misidentifying a driver as the subject of a random test, or
- Sending a driver for a reasonable suspicion test without grounds.
MROs are told in 49 CFR 40.151(c) that it’s not their role to determine whether the test should have occurred. A positive test result stands for anyone holding a commercial driver’s license (CDL), even if the employer made a mistake in sending them for the collection.
Drugged by someone
In some instances, the driver doesn’t contest the lab result. They just claim they unknowingly were exposed to the drug, and it’s not their fault.
Stories might include:
- Someone slipped a drug into a drink at a party,
- The driver ingested a marijuana brownie without realizing it, or
- The driver traveled in a closed car with several people smoking drugs.
Stories of passive or unknowing ingestion can’t be verified. Even if true, they don’t present a legitimate medical explanation, so the MRO can’t deem the test negative.
Was set up
Drivers may claim that the specimen isn’t theirs, or someone tampered with it at the clinic.
For example, there may be allegations made by the driver that the collector left the area or left open specimen containers where others could access them.
The regulations are clear: It’s not the MRO’s role to investigate claims that collection procedures weren’t followed by the clinic. The MRO only works with what is reflected in the chain of custody form, and all other accusations will be dismissed.
Took a second test
Some drivers take it upon themselves to take a second drug test outside of DOT to prove their innocence. For example, a driver tells the MRO that a personal physician performed a urine drug test that was sent to a lab, and it came back negative. The MRO must ignore this second test result. It isn’t evidence to sway the result.
Exposed to a cleaning product
An adulterated test result is often the result of soap, bleach, or disinfectant used to tamper with a urine specimen. A driver might claim the chemicals wound up in the urine through exposure to cleaning products (e.g., absorbed through the skin or inhaled). According to the regulations, there are no physiological means through which these substances can enter a specimen.
Key to remember: MROs won’t consider tall tales when verifying failed drug tests. They are given specific instructions by DOT: Only consider valid medical explanations — no matter how convincing the driver’s story might be.

NewsIndustry NewsFleet SafetyWeights and dimensionsFocus AreaIn-Depth ArticleEnglishSize and Weight LimitsTransportationUSA
2024-01-29T06:00:00Z
Don’t drive high in Canada: Know the height of your load!
Knowing the height of the load being hauled seems straightforward enough for an enclosed trailer unit; however, what about flatbed load heights when the loading was done before your driver arrived to pick it up?
Ensuring your drivers are aware and familiar with height limits is very important; if a load is over-height, drivers are at risk of hitting awnings, overpasses, and bridges. This becomes even more critical to know if the driver wasn’t involved in loading. In addition, the vehicle height could easily change depending on what load is being carried and could change if your drivers are picking up multiple loads throughout their shift.
The consequences for having an over-height truck in Canada may vary depending on the province or territory where the violation occurs but could result in a fine, being ordered to unload excess cargo, or even being denied access to certain routes.
Are you too high?
Overhead clearance has become such a problem in Canada that some jurisdictions have started to report bridge strike incidents to the public.
The British Columbia Transportation Ministry for example made the announcement recently that fines will quadruple to $575 for drivers that have over-height loads and violations can be stacked to take that total much higher.
This could also include the cancellation of a carrier’s safety fitness certificate, which would effectively prevent the company from operating in the province.
The standard height of a semitrailer in Canada is 4.15 meters; however, the maximum height of a vehicle may vary depending on the jurisdiction and the type of load. Some bridges or overhead structures may have a lower clearance than the legal limit. Drivers should also check the signs on the edge of trailers or the labels on the equipment to verify the height of the vehicle. If drivers are unsure, they need to measure or get out and look before driving.
Knowing the low-down and what to do.
There are several possible reasons why trucks keep hitting overhead structures, bridges, etc., such as your drivers using unapproved transport routes or not following the signs for low clearances.
Perhaps your drivers are not measuring their loads or knowing the exact height of their vehicles in both metric and imperial units, especially if they cross the border between Canada and the U.S, or not receiving adequate guidance from the shippers, receivers, or regulators on how to safely transport over-sized loads.
Once finding that a vehicle/load is over-height, you or your drivers can obtain over-height permits for vehicles that exceed the maximum height limits; however, this does change the fact that the height of the load will still be restricted.
These restrictions vary by province and territory; be sure to check the specific regulations and your permits for your destination before you travel. Some of the common restrictions include:
- Road Safety. You may need to use escort vehicles, warning signs, flags, or lights to alert other drivers of your over sized load.
- Infrastructure Considerations. You may not be allowed to drive on certain roads, bridges, or tunnels that cannot support the height of your over sized load.
- Time of Day. You may only be allowed to drive during certain hours of the day, depending on the dimensions of your over sized load.
The stakes are high.
Height limits are in place to protect the safety of others on the road and to prevent damage to infrastructure and other property. Fines, safety fitness certification cancellation, and bad public perceptions are just a few of the major consequences of operating with over-height loads.
Key to remember: At the end of the day, your drivers are ultimately responsible and need to know how to properly measure loads, plan for trips (including permits if needed), and know whether loads will easily clear the height clearances on a route.
NewsEnglishFleet SafetyChange NoticesChange NoticeDrug and Alcohol Testing - DOTDrug testing - Motor CarrierOffice of the Secretary of TransportationFocus AreaAlcohol testing - Motor CarrierTransportationUSA
2026-05-11T05:00:00Z
DOT Final Rule: Procedures for Transportation Workplace Drug and Alcohol Testing Programs
The U.S. Department of Transportation revises its drug and alcohol testing procedures to require a directly observed urine collection in situations where oral fluid tests are currently required but cannot be conducted because oral fluid testing is not yet available. The rule also updates terminology in these procedures consistent with Executive Order (E.O.) 14168, Defending Women from Gender Ideology Extremism and Restoring Biological Truth to the Federal Government.
DATES: This rule is effective on June 10, 2026. Published in the Federal Register May 11, 2026, page 25507.
View final rule.
| §40.65 What does the collector check for when the employee presents a urine specimen? | ||
| (d) | Added | View text |
| §40.67 When and how is a directly observed urine collection conducted? | ||
| (g) | Revised | View text |
| (h) | Revised | View text |
| §40.69 How is a monitored urine collection conducted? | ||
| (c) | Revised | View text |
| (d) | Revised | View text |
| §40.145 [Amended] | ||
| (h)(1)(ii) | Revised | View text |
Previous text
§40.67 When and how is a directly observed urine collection conducted?
* * * *
(g) As the collector, you must ensure that the observer is the same gender as the employee.
(1) You must never permit an opposite gender person to act as the observer.
(2) The observer can be a different person from the collector and need not be a qualified collector.
(3) If a same gender collector cannot be found or in circumstances of nonbinary or transgender employees:
(i) If the employer has a standing order to allow oral fluid testing in such situations, the collector will follow that order;
(ii) If there is no standing order from the employer, the collector must contact the DER and either conduct an oral fluid test if the collection site is able to do so, or send the employee to a collection site acceptable to the employer for the oral fluid test.
(h) As the collector, if someone else is to observe the collection (e.g., in order to ensure a same gender observer), you must verbally instruct that person to follow procedures at paragraphs (i) and (j) of this section. If you, the collector, are the observer, you too must follow these procedures.
§40.69 How is a monitored urine collection conducted?
* * * *
(c) As the collector, you must ensure that the monitor is the same gender as the employee, unless the monitor is a medical professional (e.g., nurse, doctor, physician’s assistant, technologist, or technician licensed or certified to practice in the jurisdiction in which the collection takes place). The monitor can be a different person from the collector and need not be a qualified collector.
(d) As the collector, if someone else is to monitor the collection (e.g., in order to ensure a same gender monitor), you must verbally instruct that person to follow the procedures of paragraphs (d) and (e) of this section. If you, the collector, are the monitor, you must follow these procedures.
§40.145 On what basis does the MRO verify test results involving adulteration or substitution?
* * * *
(h)(1)(ii) Assertion by the employee that his or her personal characteristics (e.g., with respect to race, gender, weight, diet, working conditions) are responsible for the substituted result does not, in itself, constitute a legitimate medical explanation. To make a case that there is a legitimate medical explanation, the employee must present evidence showing that the cited personal characteristics actually result in the physiological production of urine meeting the creatinine and specific gravity criteria of §40.88(b).

NewsTransportationUSAHR ManagementEnglishDriver recruiting and retentionDriver recruiting and retentionTalent Management & RecruitingAssociate Benefits & CompensationDiscriminationGender DiscriminationDiscriminationIndustry NewsIndustry NewsRecruiting and hiringRecruiting and hiringHR GeneralistFleet OperationsApplications/ApplicantsAssociate RelationsFocus AreaHuman Resources
2026-05-18T05:00:00Z
Trucking company to pay $5.5M for not hiring qualified female drivers
A nationwide trucking company will pay $5.5 million to settle a sex discrimination claim for refusing to hire qualified female drivers for the past 10 years. The U.S. Equal Employment Opportunity Commission (EEOC) announced the resolution in a May 15 press release. The money will go to the four original complainants and a class of other qualified female truck drivers who applied but weren’t hired.
The EEOC lawsuit alleged that the trucking company, based in Michigan, repeatedly passed over qualified female truck driver applicants throughout the U.S. Instead, the company often hired male truck drivers, many of whom were less qualified or had less experience. Many female applicants reported that company personnel across the country subjected them to different hiring procedures than those used for male applicants.
Several female driver applicants also saw the trucking company throwing their job applications in the trash at local truck terminals, according to the lawsuit. Further, at a West Virginia truck terminal, the dispatcher informed a female applicant that corporate offices had instructed him not to hire any female truck drivers.
In addition to monetary relief, the company must allow affected applicants to apply for positions and take part in the company’s recruitment and hiring processes free from sex-based discrimination and retaliation for participating in the lawsuit.
The company will also:
- Hire an outside consultant to review its hiring policies, practices, and procedures to ensure full compliance with Title VII of the Civil Rights Act of 1964;
- Institute training on its anti-discrimination policies, including training on its recordkeeping obligations and the filing of EEO-1 reports as required by current law; and
- Appoint someone to review and verify the implementation of the settlement terms, and report on compliance to the EEOC.
Key to remember: It’s illegal for employers to reject qualified women for jobs based on their sex. A trucking company now owes steep fines because of such violations.

NewsIndustry NewsHazmat SafetyHazmatIn-Depth ArticleFocus AreaUSAEnglishTransportationHazmat Rulemaking procedures
2026-05-13T05:00:00Z
A close look at PHMSA's plans for class 9
If you’ve spent any time working with hazmat regulations, you know Class 9 has always been a bit of a mixed bag. It covers a wide range of materials, from lithium batteries and dry ice to environmentally hazardous substances and safety devices. At this year’s Council on Safe Transportation of Hazardous Articles (COSTHA) conference, PHMSA made it clear they think that grouping has run its course.
During their briefing, PHMSA shared early details on an idea they have been developing internationally. The proposal would keep Class 9 intact but divide it into four clearer subdivisions. Their goal is to improve hazard communication and create a system that better reflects real risks during transportation.
Pushing for change
PHMSA first raised the idea of dividing Class 9 during the 66th and 67th UN Sub-Committee of Experts on the Transport of Dangerous Goods meetings in mid and late 2025. According to PHMSA, the initial response from other countries was positive. That feedback encouraged them to continue developing the concept and bring a more defined proposal to the UN session planned for June 2026.
The main issue is that Class 9 covers too many unrelated hazards under a single label. While that flexibility has worked historically, PHMSA sees an opportunity to add structure without completely overhauling the system or creating unnecessary burdens for shippers.
Four proposed subdivisions
PHMSA outlined four subdivisions that would sit under the existing Class 9 umbrella. Each one groups materials with similar risk characteristics.
Division 9.1: Environmentally hazardous materials These materials already rely on established criteria, including marine pollutant concepts. PHMSA emphasized that this subdivision would build on existing systems and could potentially integrate environmental hazard information into the current Class 9 label, rather than creating something entirely new.
Division 9.2: Energy storage devices This subdivision would be dedicated to items like lithium batteries and other energy storage technologies. The intent is to improve hazard awareness and allow flexibility as technology changes over time.
Division 9.3: Low hazard energetics This category would organize materials with energetic properties that do not rise to the level of other hazard classes. PHMSA described this as a way to better recognize existing Class 9 assignments while allowing room for future criteria development.
Division 9.4: Other miscellaneous dangerous goods This final group would capture all remaining Class 9 materials that do not fit into the other subdivisions. PHMSA indicated no major changes are expected for this category.
What this means going forward
At this stage, the subdivision of Class 9 is still a concept, not a regulation. With that said, the fact that PHMSA has already raised it at multiple UN meetings and plans to continue the discussion in 2026 signals that this idea has momentum.
For shippers, carriers, and compliance professionals, this is worth watching. Breaking Class 9 into subdivisions could eventually affect labeling, training, and how hazards are communicated across all modes of transportation. Even if changes are still years away, understanding where regulators are heading helps organizations avoid being caught off guard.
Key to remember: Class 9 has always been a necessary catch-all. PHMSA’s proposal suggests the future of hazmat classification may focus less on convenience and more on clearly communicating risk.

NewsTraining & DevelopmentIn-Depth ArticleUSAHR ManagementEnglishTalent Management & RecruitingAssociate Benefits & CompensationDiscriminationGender DiscriminationDiscriminationTitle VII (The Civil Rights Act of 1964)Industry NewsRecruiting and hiringRecruiting and hiringInterviewingHR GeneralistFocus AreaFleet OperationsAssociate RelationsTransportationHuman Resources
2026-05-05T05:00:00Z
Stinky hiring process soils waste management company’s efforts to fill garbage truck driver role
When a hiring manager tells a qualified female job applicant to “think carefully” and “talk to her husband” before accepting a job as a garbage truck driver, it stinks of sex discrimination.
The U.S. Equal Employment Opportunity Commission (EEOC) responded by dumping a lawsuit on the employer. In April 2026, the EEOC announced that a nationwide waste management company will pay $200,000 to settle a sex discrimination in hiring lawsuit.
According to the EEOC’s lawsuit, in May 2020, the female job candidate applied to work for the company as a garbage truck driver based out of Springfield, Missouri. During the interview, company managers told the applicant that female drivers hadn’t worked out in the past. They went on to say she should carefully consider whether she wanted the position because the company would have to build a locker room with a shower for female drivers if she were hired.
The EEOC alleged that when the applicant followed up and said she wanted the job, the company rejected her application and hired a less-qualified male for the position.
The company didn’t have any female drivers at the time. The suit also alleged that since at least March 2020, the company routinely failed to hire qualified female applicants for driver positions because of their sex.
“When employers make hiring decisions based on sex, rather than qualifications, both the employer and the applicants suffer,” said Andrea G. Baran, regional attorney for the EEOC’s St. Louis District.
This alleged conduct violated Title VII of the Civil Rights Act of 1964, which prohibits sex discrimination in employment.
Where did this company go wrong?
The company had a history of not hiring female employees — a practice not looked kindly upon by the EEOC. The waste management company also made several key errors during the hiring process, such as:
- It assumed household gender roles by telling the female applicant to “talk to her husband” about her job possibility. That line of thinking is not only archaic; it violates Title VII by making sex-based assumptions.
- The managers implied that creating a shower space for her would be a burden to the company wreaks of discriminatory language. It basically says hiring a female would be a problem.
- Hiring a less-than-qualified male applicant made it implicit that she wasn’t hired because of her sex.
What should other employers do?
While it’s important to learn about a prospective employee, companies could face liability if they ask the wrong questions during an interview. Before conducting interviews, employers should have a script of safe questions. Asking the same questions of all candidates not only helps to compare them equally, it also minimizes the possibility of slipping up and saying something improper.
Interviewers can ask general questions to help determine if a candidate can perform the essential functions of a particular job, such as:
- What kind of job experience do you have?
- What aspects of your current job or previous jobs do you consider most crucial?
- Of all the work you’ve done, what have been your biggest successes?
- What would you change about your current job?
- What aspects do you like best about your current job? Least?
- What are you looking for in your next job?
Key to remember: Employers must dump off-limit topics, questions, and “trashy” comments during the interview process, or they could find themselves hauled into court.
Most Popular Highlights In Human Resources

NewsIndustry NewsIndustry NewsHR GeneralistFamily and Medical Leave Act (FMLA)Family and Medical Leave Act (FMLA)USAHR ManagementEnglishFocus AreaHuman Resources
2023-09-06T05:00:00Z
Appellate court sided with employee's (almost) 3-year-delayed FMLA claim
Back in October 2018, Laffon had a medical emergency and needed some time off under the federal Family and Medical Leave Act (FMLA).
Her leave lasted until November 15. Ten days after she returned to work, on November 26, her employer terminated her.
She sued, arguing that the employer retaliated against her because of her FMLA leave.
The catch? She didn't bring the suit until almost three years later.
No link between leave and termination
In court, the employer argued that there was no causal link between Laffon taking FMLA leave and her termination. Although the court documents aren't robust, they do reveal that the employer indicated that Laffon's allegations didn't show that her taking FMLA leave was a factor in the decision to terminate her. The documents showed only that the termination chronologically followed her leave.
The court agreed with the employer. It also agreed that Laffon failed to allege a willful violation of the FMLA, which would allow her to benefit from the FMLA's three-year statute of limitations.
Laffon appealed the case to the Ninth Circuit.
Statute of limitations
Under the FMLA, employees have two years from the date of the last event constituting the alleged violation for which they can bring a claim.
Those two years are extended to three years if the employer's actions were "willful." This means that an employee must show that the employer either knew or showed reckless disregard for whether its conduct violated the FMLA.
Ruling overturned
Fast forward to August 2023, when the Ninth Circuit reversed the lower court's decision. It indicated that, based on Laffon's amended complaint and liberally construing the law, her allegations establish that her leave was causally connected to her termination and that the employer's action (her termination) was willful.
Glymph v. CT Corporation Systems, No. 22-35735, Ninth Circuit Court of Appeals, August 22, 2023.
Key to remember: Terminating an employee soon after returning from FMLA leave is risky, unless there is a clear, well-documented, non-leave-related reason. Case documents did not show such a clear reason, which can also increase the risk of a willful finding. Employees have time to file claims, even years.

NewsHuman Resource ManagementHuman Resource ManagementEmployee RelationsFamily and Medical Leave Act (FMLA)In-Depth ArticleFamily and Medical Leave Act (FMLA)HR ManagementEnglishHuman ResourcesIndustry NewsEmployee RelationsHR GeneralistAssociate RelationsCommunication ToolsFocus AreaUSA
2026-05-12T05:00:00Z
What does your FMLA process look like?
Administering employee leave under the federal Family and Medical Leave Act (FMLA) basically involves a process that starts when an employee puts the employer on notice of the need for leave and (hopefully) ends when the employee returns to work.
Beyond the compliance requirements, employers can help make the FMLA process more or less challenging for employees and for themselves. If, for example, a process involves handing an employee 40 pages of FMLA-related documents without any explanation, it might be overwhelming for the employee and inefficient in the long run for the employer.
8 steps to help smooth out the FMLA process
Employers might look at their FMLA process and see if there’s room for improvement. Ideas can include the following:
- Walk through the process. Talk with the employee so they know what to expect and when. Have conversations and ask if the employee has any questions. It never hurts to ask, “What can we do to help?” or something to that effect along the way.
- Consider the factors of each situation. Employees who need leave are usually in a stressful situation, even if the reason for leave is happily welcoming a new child. They often aren’t familiar with the nuances of the FMLA, so it’s new territory for them. A bit of empathy goes a long way.
- Follow through. Provide employees with answers to any questions or glitches in the process. While employees might have 15 days to gather a certification, for example, meeting that deadline can be challenging in some situations. If it’s missed, talk to the employees so they understand why.
- Provide gentle reminders. While it’s not technically required, if deadlines are coming up, gently remind employees.
- Use technology to your advantage. If your system enables employees to access the process and its parts from their mobile device, all the better; if that’s how an employee would prefer to proceed, great!
- Overcommunicate rather than under-communicate. It’s better to say more than less when it comes to explaining how the FMLA process works and what’s expected. Ask employees which method they prefer to receive information. If, for example, you prefer to make phone calls, but an employee seldom accepts phone calls, both you and the employee can be frustrated.
- Have templates for letters and forms. Using templates makes it easier to recognize and review information or explain something to the employee. This can also help ensure you treat all similarly situated employees equivalently.
- Document the process. Write down the FMLA process and share it with managers, at least at a high level. Managers don’t need to become FMLA experts, but they might not realize all that’s involved in the FMLA process, and things might get a little easier once they understand. Employees can benefit from such a document, as well.
Because FMLA leave is very personal, employees who have a bad leave experience might consider changing employers or sharing their experience with coworkers, making recruiting and retention more challenging.
Key to remember: Taking a few steps beyond compliance in FMLA leave management can help make the process easier for both employers and employees.

NewsIndustry NewsAssociate RelationsHR GeneralistFamily and Medical Leave Act (FMLA)In-Depth ArticleFamily and Medical Leave Act (FMLA)HR ManagementEnglishUSAFocus AreaHuman Resources
2026-05-14T05:00:00Z
How much FMLA leave do employees get when they go from full- to part-time work?
Eligible employees get 12 of their workweeks of job-protected unpaid leave in a 12-month leave year under the federal Family and Medical Leave Act (FMLA). When employees take that leave intermittently or on a reduced schedule, employers like to look at the 12 weeks as 480 hours. This is fine as long as the employee works 40 hours per week.
If employees switch from full-time to part-time work, employers might wonder how that affects the 480 hours of FMLA leave.
The change details are key
How much FMLA leave employees get when their schedule changes will depend on:
- Who made the change,
- Why they made the change, and
- When they made the change.
If, for example, an employee normally worked 40 hours per week, but is now moving to a 24-hour per week schedule, that change would result in the employee having 288 hours of FMLA leave, not 480 hours. The employee still gets 12 FMLA weeks, though.
The FMLA regulations say that, if the employer has made a permanent or long-term change in the employee's schedule (for reasons other than FMLA, and before the notice of need for FMLA leave), the hours worked under the new schedule are to be used for making this calculation.
Therefore, if all of the following are met, the employer could use the new, 24-hour workweek (288 hours of leave) as a basis for how much FMLA leave the employee gets:
- The employer made the change to shorten the employee’s schedule,
- The decision had nothing to do with FMLA leave, and
- The change was made before the employee needed FMLA leave.
If, however, the schedule change was because of FMLA leave, and it was made after the employee began taking FMLA leave, the employer must use the old schedule of 480 hours of FMLA leave.
Employers and employees might agree to make a schedule change, and that would be fine, as long as the employer ends up making the employee’s desired change.
If an employee has been taking FMLA leave and subsequently wants a shorter schedule, the employer may not decrease the employee’s hours of FMLA leave. The employer would need to use the old schedule.
New leave year reset
When a new 12-month leave year begins, and an employee first puts the employer on notice of the need for leave, the employer would treat it as a new leave request. At that time, one could argue that the schedule change was made before the employee asked for leave.
Key to remember: Whether employers may reduce the amount of FMLA leave employees get when they reduce their schedules will depend on who made the change, why, and when.

NewsIndustry NewsEnglishHR GeneralistIn-Depth ArticleEmployee Mental HealthAssociate RelationsWellnessWellnessHR ManagementFocus AreaUSAHuman Resources
2026-05-15T05:00:00Z
Laughter beats LOL: Face-to-face communication brings mental health benefits
Employees may not be excited about commuting to work, but may be heartened to know that there are mental health benefits to gathering with others in the workplace.
Video calls, texting, and other communication technology make it easy to “socialize alone,” or connect with others when you’re by yourself. While this is better than nothing, it doesn’t measure up to meeting face-to-face.
Research published recently in Perspective on Psychological Science looked at more than 1,000 communication studies and found that when people communicate over technology, they:
- Are less engaged, and
- Don’t have the same positive emotional responses.
“Electronic communication is here to stay, so we need to learn how to integrate it into our lives,” Roy Baumeister, professor of psychology at the University of Queensland and the study’s lead author, noted in a news release. “But if it replaces live interactions, you’re going to be missing some important benefits and probably be less fulfilled.”
The researchers couldn’t find health benefits to typing “LOL” into a text, Baumeister pointed out, while they found a lot of research pointing to the benefits of laughing out loud.
Mental health boost
Another study that looked at communication during the COVID-19 pandemic, published in the journal Nature, found that mental health was better on days when more time was spent communicating face-to-face.
This could be because in-person communication provides the opportunity to take in the nuances of body language, voice pitch, and eye gaze.
While videoconferencing also offers the opportunity to see those cues, researchers found it can be taxing because of prolonged eye contact, a focus on appearance, and larger faces due to screen size.
An impact on learning
Another drawback to socializing alone is that information isn’t processed as thoroughly as it is in face-to-face situations, Baumeister’s study found. This may make an impact on decision-making and learning in online groups.
In addition, although shy people may prefer typing their comments into a chat, some people may be more likely to say something harmful when communicating online.
Motivation, participation help
The study found two qualities that improve the impact of online communication:
- Motivation to be engaged and
- Full participation with each other.
For example, researchers found high levels of engagement in workers who were highly committed, as well as people in online psychotherapy sessions and people who were romantically involved.
While technology offers more opportunities for interaction, and can be an effective way to communicate when people are highly motivated to meet, it often lacks the benefits of being physically present with the people you’re talking to.
“Humans were shaped by evolution to be highly social,” Bushman added. “But many of the benefits of social interactions are lost or reduced when you interact with people who are not present with you.”
Key to remember: Face-to-face interactions at work support engagement and boost mental health.

NewsIndustry NewsAssociate Benefits & CompensationHR GeneralistFamily and Medical Leave Act (FMLA)In-Depth ArticleFamily and Medical Leave Act (FMLA)Associate RelationsEnglishHR ManagementFocus AreaHuman ResourcesUSA
2025-03-27T05:00:00Z
Who can fill out FMLA forms? The answer might surprise you
One of the most common questions involving the federal Family and Medical Leave Act (FMLA) that we see is: “Can ________ fill out the medical certification?”
This question stumps a lot of HR people and can be a little confusing.
It might be easier to start with who CAN’T fill out an FMLA certification. That includes your coworker, best friend, neighbor, or pet.
Jokes aside, often (but not always) a doctor fills out the FMLA certification, and since March 30 is “Doctors’ Day,” this is a great time to discuss this topic.
FMLA certification basics
Employers aren’t required to use certifications, but if they do, the U.S. Department of Labor (DOL) has five different certification forms to use for various FMLA leave situations.
The forms are as follows:
- Certification of Health Care Provider for Employee's Serious Health Condition,
- Certification of Health Care Provider for Family Member's Serious Health Condition,
- Certification of Qualifying Exigency for Military Family Leave,
- Certification for Serious Injury or Illness of a Current Servicemember for Military Family Leave, and
- Certification for Serious Injury or Illness of a Veteran for Military Family Leave.
Let’s focus on the first two, as these are the most common ones HR administrators use.
Who can fill out an FMLA certification?
The FMLA regulations describe the person who has the authority to fill out a certification as a “health care provider.” The good news is, the regulations include a lengthy list of medical professionals who fit this role.
Under the FMLA, a health care provider includes:
- A doctor of medicine or osteopathy,
- A podiatrist,
- A dentist,
- A clinical psychologist,
- An optometrist,
- A chiropractor (limited to manual manipulation of the spine as demonstrated by X-ray),
- A nurse practitioner,
- A nurse midwife,
- A clinical social worker,
- A physician assistant,
- A Christian Science practitioner, and
- Any health care provider from whom the employer or the employer's group health plan's benefits manager will accept a medical certification to substantiate a claim for benefits.
To be qualified to fill out FMLA forms, medical professionals must be authorized to practice in the state and perform within the scope of their practice. This means that the provider must be authorized to diagnose and treat physical or mental health conditions.
What about doctors in a foreign country?
If an employee or an employee's family member is visiting another country, or a family member resides in another country, and a serious health condition develops, the employer must accept a medical certification from a health care provider who practices in that country. This includes second and third opinions.
If a medical certification from a foreign health care provider is not in English, the employee may be required to provide a written translation of the certification.
Key to remember: The FMLA regulations spell out which medical professionals can fill out certification forms.

NewsHuman Resource ManagementHuman Resource ManagementUSAHR ManagementEnglishAssociate Benefits & CompensationDiscriminationIndustry NewsDiscriminationIndustry NewsHR PoliciesAudits - HRGovernment contractsHR GeneralistEEO-1 ReportingAssociate RelationsFocus AreaHuman Resources
2026-05-19T05:00:00Z
Future of EEO reporting uncertain
On May 14, the Equal Employment Opportunity Commission (EEOC) submitted a proposal to rescind Equal Employment Opportunity (EEO) workforce data filing and reporting requirements.
The rule, titled “Recission of EEO-1, EEO-2, EEO-3, EEO-4, EEO-5, And Reporting Requirements Under Title VII, the ADA, GINA, and the PWFA,” is a proposal at this time. Employers should be aware that it doesn’t have an immediate impact on existing data collection or reporting processes.
Reporting requirements
The EEO-1 Component Data Collection (Employer Information Report) requires private employers with 100 or more employees and federal contractors with 50 or more employees that meet certain criteria to report employees’ race/ethnicity, sex, and job category. EEO-2 is a consolidated report for certain multi-establishment employers.
Other EEOC data collections are as follows:
Local referral unions with 100 or more members (EEO-3);
State and local governments with 100 or more employees (EEO-4); and
Public elementary and secondary school systems, and school districts with 100 or more employees (EEO-5).
The EEOC’s proposal raises questions about the future of EEO reporting. Since 1966, aggregated data supplied by these reports have provided worker population data as well as trend data used to interpret the effectiveness of anti-discrimination laws and their enforcement.
The proposal to rescind these reporting requirements was submitted to the Office of Information and Regulatory Affairs and must undergo procedural review before a final rule can be published in the Federal Register, with a comment period to follow. Thus, the proposal is far from being finalized. In the meantime, the EEOC hasn’t yet announced the 2026 filing deadline and notes that it will publish updates to the 2025 EEO-1 Component 1 data collection on its website when they become available.
Employer action items
Until decisions are finalized, employers should:
- Continue collecting workforce demographic data,
- Follow the rulemaking process,
- Watch for the 2026 filing deadline, and
- Plan for continued local reporting requirements.
Key to remember: Although a proposal to rescind requirements has been submitted, employers should continue collecting workforce demographic data and plan to report 2025 data by the 2026 reporting deadline when it’s announced.
Most Popular Highlights In Safety & Health

NewsIn-Depth ArticleEnglishHeat StressIndustry NewsHeat and Cold ExposureSafety & HealthConstruction SafetyGeneral Industry SafetyAgriculture SafetyMaritime SafetyExtreme Temperature PreparationHeat and Cold ExposureMine SafetyFocus AreaUSA
2026-05-13T05:00:00Z
How does wet-bulb globe temperature work?
As you prepare for heat injury and illness prevention regulations, are you leaning toward Heat Index simply because you don’t understand WetBulb Globe Temperature (WBGT)? Don’t sweat it! We will cool your anxiety as you read on.
What is WBGT?
Developed by the US military in the 1950s to prevent heat-related deaths in training camps, WBGT is a measure of the heat stress in direct sunlight. It takes into account more than just temperature, including considerations for humidity, wind speed, cloud cover, and even sun angle.
The Heat Index, on the other hand, considers only temperature and humidity for shady areas. So, if employees are working in direct sunlight, the WBGT may be the better way to monitor.
How does WBGT work?
WBGT calculates three key measurements into one equation:
- Air temperature – measured with a standard outdoor thermometer to show the actual temperature of the air. This gives a baseline for how hot the environment is without the effects of humidity, wind, or radiant heat (sunlight).
- Natural wet bulb temperature – measured using a thermometer wrapped in a wet cloth to simulate the cooling effect of evaporating sweat. Readings can be strongly influenced by wind and humidity, and because the thermometer is exposed to sunlight, it also reflects solar heat.
- Black globe temperature – measured with a thermometer inside a black globe to represent how hot human skin and clothing “feels” in direct sunlight. Readings are of radiant heat that air temperature alone wouldn’t capture.
In layman’s terms, as the water evaporates from the wet, wrapped bulb, the bulb is cooled which pushes the wet-bulb temperature down. Added air moisture (humidity) means less water evaporates and cooling is not as effective. This means the WBGT is high.
Mathematically, here’s how the measurements are used to calculate WBGT:
WBGT = (10% × Air Temp) + (70% × Wet Bulb Temp) + (20% × Black Globe Temp)
For a simplified example, if the air temperature is measured at 80°F, the relative humidity is 80%, and the globe temperature is 80°F, the WBGT would be calculated as follows:
WBGT= (0.1 × 80) + (0.7 × 80) + (0.2 × 80)
= 8 + 56 + 16
= 80°F
This result is a WBGT of 80°F which is a relatively high level of heat stress.
To put this into perspective, studies show that a WBGT of around 87.5°F is nearing the maximum temperature that a healthy worker can handle. Though the number seems palatable, this level of heat with humidity can be stifling and deadly.
OSHA’s proposed Heat Rule update
OSHA held an informal public hearing over multiple days in June and July 2025, concluding on July 2nd. A final ruling has not yet been published to the Federal Register. OSHA’s Rulemaking Process can take between 24 and 60 months to review feedback, analyze the record, and develop a final rule.
In the meantime, employers should comply with their State plan state requirements or OSHA’s National Emphasis Program (NEP) on Outdoor and Indoor Heat-Related Hazards. The federal NEP was recently revised and became effective April 10, 2026, with updates including the removal of outdated background information, reorganization of appendices information and citation guidance, and the addition of inspection triggers.
Key to remember: The weighted approach of WBGT factors in temperature, direct sunlight, humidity, wind, and cloud cover, all of which have an impact on the body’s ability to cool itself.

NewsIndustry NewsSafety & HealthConstruction SafetyGeneral Industry SafetyAgriculture SafetyMaritime SafetyIn-Depth ArticleHazard CommunicationHazCom Written ProgramEnglishFocus AreaUSA
2026-05-06T05:00:00Z
Got chemicals? You may need a written HazCom program
What triggers the need for a written Hazard Communication (HazCom) program? The answer to this popular Expert Help question depends on certain requirements, definitions, and exceptions within the standard at 29 CFR 1910.1200. Simply put, if all four of the following statements apply, you must develop, implement, and maintain a written HazCom program at each workplace:
- Your organization is an employer. OSHA defines “employer” at 1910.1200(c) as “a person engaged in a business where chemicals are either used, distributed, or are produced for use or distribution, including a contractor or subcontractor.”
- The HazCom standard applies. If you’re an employer, the standard applies if you have any hazardous chemical that’s known to be present in the workplace in such a manner that employees may be exposed under normal conditions of use or in a foreseeable emergency. “Hazardous chemical” means any chemical which is classified as a physical or health hazard, simple asphyxiant, combustible dust, or hazard not otherwise classified (HNOC).
- At least one area/operation of the workplace where hazardous chemicals are present is covered by 1910.1200 and not simply exempted under paragraph (b)(3) or (b)(4). According to these paragraphs, OSHA does not require a written HazCom program to be developed for:
- Laboratories [Note: See our Lab applicability FAQ for details on when a laboratory is covered by 1910.1450 or 1910.1200.], or
- Work operations where employees only handle chemicals in sealed containers that are not opened under normal conditions of use, such as those found in marine cargo handling, warehousing, or retail sales.
It should be noted, however, that these operations do have other obligations under the HazCom standard, outlined at 1910.1200(b)(3) and (b)(4).
- At least one hazardous chemical in the workplace is covered by the standard and is not exempted under 1910.1200(b)(6). (Paragraph (b)(6) exempts certain substances from coverage by the HazCom standard.)
What information must the written program include?
Paragraph (e) of 1910.1200 outlines written program requirements. Although the program doesn’t need to be lengthy or complicated, it must include enough detail to explain how your organization is complying with the HazCom standard. There are specific elements OSHA will look for to ensure compliance:
- A list of the hazardous chemicals known to be present in the workplace that matches the identifier on the container label and the safety data sheet (SDS).
- The designation of person(s) responsible for ensuring labeling of in-house containers and the person(s) responsible for ensuring labeling of shipped containers (if any).
- A description of any in-house labeling system(s) and any labeling alternatives used in the facility (if applicable).
- A description of HazCom training provided to employees.
- Procedures to review and update label information when necessary.
- Methods used to inform employees of the hazards of non-routine tasks, such as cleaning reactor vessels, and the hazards of unlabeled pipes in their work areas.
- An explanation of how the employer will comply on multi-employer worksites. Employers on multi-employer worksites who do not use hazardous chemicals, but whose employees are exposed to the chemicals used by other employers on the worksite, are required to have a program and train their employees on the hazards of the chemicals in the work areas.
Key to remember: If you’re covered by the HazCom standard, you may need a written program. It must include specific elements listed in 1910.1200(e).
NewsIndustry NewsSafety & HealthGeneral Industry SafetyMachine GuardingIn-Depth ArticleEnglishMachine GuardingFocus AreaUSA
2026-05-18T05:00:00Z
Addressing machine hazards: Common questions answered
When workers operate or work around machinery, employers are often faced with practical safety questions that aren’t directly addressed in OSHA’s regulations. Common issues such as loose clothing, long hair, guard openings, and control devices like foot pedals are not always covered by the regulatory text. The following questions and answers clarify what OSHA requires when protecting workers from common machine-related hazards.
Can we prohibit loose clothing, long hair, or jewelry for workers operating machinery?
OSHA doesn’t specifically address this in its machine guarding regulation (29 CFR 1910.212). However, agency guidance clearly recognizes these items as hazards around moving machinery:
- Safeguarding Equipment and Protecting Workers from Amputations (OSHA 3170) advises employers to instruct workers not to wear gloves, jewelry, or loose-fitting clothing when operating grinding machines and to secure long hair.
- OSHA’s woodworking eTool similarly states, “Do not allow workers to wear loose clothing or long hair. Loose clothing or long hair can be easily caught up in rotating parts.”
Employers are expected to address recognized hazards in their workplace. As a result, many employers adopt policies restricting loose clothing, long hair, or jewelry when working near machinery. OSHA may issue citations under the General Duty Clause (Section 5(a)(1) of the OSH Act) or the machine guarding standard if workers are exposed to entanglement hazards.
Is there a maximum opening size before a machine guard is required?
OSHA’s machine guarding standard doesn’t specify a maximum opening size before a guard is required. Instead, it requires that the guard be “in conformity with any appropriate standards” and designed and constructed to prevent operators from having any part of their body in the danger zone during the operating cycle.
OSHA refers to the following “appropriate standards”:
- ANSI B11.0, Safety of Machinery
- ANSI B11.19, Performance Requirements for Risk Reduction Measures: Safeguarding and other Means of Reducing Risk
- NFPA 79, Electrical Standards for Industrial Machinery
Additionally, there are several machine-specific ANSI B11 series standards, all of which can be viewed here. These standards provide detailed guidance on guard openings, reach distances, and risk reduction methods.
Must foot pedals used to operate machinery be guarded or have a cover?
If unintentionally pressing on a foot pedal exposes workers to a hazard, OSHA expects employers to implement protective measures, such as guarding or covering the pedal. Although there are no foot pedal requirements in OSHA’s machine guarding standard, its Mechanical Power Presses standard (29 CFR 1910.217) offers some, such as:
- The pedal must be protected against accidental operation (e.g., from falling objects or unintended contact).
- The pedal must have a nonslip contact surface.
- Return springs must be designed to prevent failure.
- Counterweights must have enclosed travel paths.
Key to remember: Even in situations where OSHA does not provide detailed regulatory requirements, recognized hazards like entanglement or unintended machine activation must still be controlled.

NewsDrug and Alcohol TestingDrug and alcohol policy - Motor CarrierDrug and Alcohol TestingDrug and Alcohol Testing - DOTDrug testing - Motor CarrierDrug and alcohol training - Motor CarrierIn-Depth ArticleUSAHR ManagementEnglishIndustry NewsFleet SafetySafety & HealthGeneral Industry SafetyFocus AreaPre-employment drug testing - Motor CarrierSafety-sensitive function - Motor CarrierTransportationHuman Resources
2023-09-28T05:00:00Z
Canada’s drug testing rules will leave you in a haze
Ever since Canada legalized recreational cannabis back in 2018, it has left many motor carriers wondering if they can drug test their drivers. Impairment from cannabis use is a safety risk, and for most employers, performing drug tests to manage the risk is not an option. Where do motor carriers and drivers fit in, and what are their options?
Submitting employees to drug tests
Can motor carriers drug test their drivers? The short answer is no. Canada does not have a federal regulation that requires drug testing for drivers. However, this does not mean that Canadian motor carriers cannot implement and enforce a drug and alcohol policy for their drivers. In fact, many carriers have developed successful policies that minimize the risk of getting in trouble with the law and ensure the safety of their drivers and the public.
For the most part, drug testing not only violates the Human Rights Code, but it is also a gross infringement on an individual’s reasonable right to protection of privacy. Motor carriers operating in Canada need to make sure they consider the human rights and privacy rights of their drivers when implementing any type of drug testing program and policy.
Motor carriers have the right to expect their drivers to arrive at work fit for duty and remain that way throughout the duration of their shift. Communicating this expectation to them is important and, at a minimum, should be communicated by implementing a ”fit-for-work” policy that makes your expectations around impairment of any kind clear.
When drug testing may be permissible
There are some circumstances in which drug testing is allowed, though they are rare and very specific.
1. Safety-sensitive positions: Universal random drug testing would be acceptable in workplaces that can be shown to be extremely dangerous and where a worker’s impairment would likely result in catastrophe. Based on this definition commercial truck drivers would be considered to be in a safety-sensitive position.
2. Reasonable suspicion of impairment: If an employee appears to be obviously impaired, drug testing may be permissible, especially if they’re involved in a collision and there is reasonable suspicion that they are under the influence of drugs.
3. As part of a rehabilitation/return-to-work program: A driver with substance abuse disorder may be subject to unannounced drug testing to be carried out as part of a rehabilitation program and return-to-work program.
Unlike in the United States, pre-employment drug testing is generally not permitted in Canada, except in limited circumstances. Each Canadian province has its own legislation regarding testing for drugs. In Alberta, the courts have been less protective of individual privacy rights and have allowed drug testing in the oil and gas sector. Most companies in Ontario and British Columbia opt not to test for drugs, adhering to human rights legislation and privacy concerns.
Policies must be clear
Motor carriers must inform their drivers about the drug and alcohol policy and unlike U.S. testing programs, are required to obtain their consent before conducting any test. By working together, motor carriers and drivers can create a safe and healthy work environment for everyone involved.
Carriers should update their policies addressing drug and alcohol use at least once per year. Carriers must pay close attention to:
- Permissible testing for the jurisdictions they operate in, including if they cross the border into the United States;
- Frequent reminders for drivers on their obligations under the policies; and
- Training for managers and supervisors on detecting impairment through physical symptoms.
Key to remember: Drug testing in Canada is legal but not regulated, so carriers must exercise caution when implementing a drug testing policy. There’s a fine line between allowable testing and human rights/employee privacy violations.
NewsSafety Data SheetsIndustry NewsIndustry NewsEnglishHazard ClassificationsSafety & HealthGeneral Industry SafetyOccupational Safety and Health Administration (OSHA), DOLHazard CommunicationHazard CommunicationHazcom LabelingFocus AreaUSA
2026-05-12T05:00:00Z
First HazCom compliance date almost here!
OSHA’s revised Hazard Communication (HazCom) standard, which took effect in July 2024, includes staggered compliance dates stretching into 2028. The first of these is just around the corner. By May 19, 2026, chemical manufacturers, importers, and distributors evaluating substances must be in compliance with all modified provisions of the standard. (“Substance” is defined in 1910.1200(c).) This means manufacturers and importers must reclassify aerosols, desensitized explosives, and flammable gases under the new criteria in Appendix B to 1910.1200 and make corresponding changes to safety data sheets (SDSs) and labels.
Additionally, these manufacturers, importers, and distributors must comply with changes to the following elements, as applicable:
- Labels for packages released for shipment, bulk shipments, and small containers;
- SDS subsections; and
- Trade secrets.
Downstream users of substances that are aerosols, desensitized explosives, or flammable gases will start to see updated SDSs and labels on shipped containers of hazardous chemicals (if they haven’t already). For more information, see our related FAQ.

NewsMine SafetyForklifts and Powered TrucksTraining & DevelopmentOccupational Safety and Health Administration (OSHA), DOLPIT Training RequirementsIn-Depth ArticleUSAEnglishIndustry NewsSafety & HealthForklifts and Powered TrucksConstruction SafetyGeneral Industry SafetyAgriculture SafetyMaritime SafetySafe Operation of PITsFocus AreaHuman Resources
2023-07-06T05:00:00Z
Commonly asked questions about forklift licensure and certification
Are your forklift operators certified? Do they need a state driver’s license? Are they physically able to operate forklifts? All are commonly asked questions — so, let’s make sure you're compliant.
The intent of the standard
OSHA’s powered industrial truck (PIT) standard (29 CFR 1910.178) is intended to ensure the safe use of fork trucks, tractors, platform lift trucks, motorized hand trucks, and other specialized industrial trucks powered by electric motors or internal combustion engines. The standard outlines requirements for operational permits and certification.
And, though not specified in the standard itself, PIT operators must be at least 18 years old per federal child labor regulations.
License and certification Q&A
The OSHA PIT standard clearly defines requirements for training and certification. However, some licensing and certification information isn’t as clear. Here are some clarifications:
Q: Who can train, evaluate, and certify PIT operators?
A: OSHA requires in 1910.178(l)(2)(iii) that, “All operator training and evaluation shall be conducted by persons who have the knowledge, training, and experience to train powered industrial truck operators and evaluate their competence.” The OSHA standard doesn’t further define this requirement or set any specific or additional certifications.
Q: Does OSHA require PIT operators to have a valid driver's license?
A: Federal OSHA has no requirement that a forklift operator has a valid motor vehicle driver's license. Some states are more stringent, so check your local and state requirements to confirm.
Q: Does OSHA have regulations that impact an employee’s ability to operate PITs if they’ve received a DUI or suspended license?
A: Because OSHA doesn't require a valid motor vehicle driver's license, the status of that license doesn’t impact PIT operator permitting. Individual states or the employer may have policies that dictate otherwise.
Q: Are PIT drivers required to have their license on them when they are working?
A: Federal OSHA doesn’t require PIT operators to have a license or permit. However, some states such as Michigan do require this. Typically, in states that require a permit or license, the license must be “readily available.” Companies have the option to require the permit or license be carried with the operator.
Q: Are operators required to be trained on each manufacture of PIT model?
A: A June 15, 1999, OSHA letter of interpretation (LOI) clarifies that operators are to be trained and evaluated in the safe operation for the type of truck they’ll be assigned. Operators wouldn’t need additional training for same truck types but would need additional training when truck- or workplace-related training topics are different.
Q: Do PIT operators need to be recertified if they move from one state to another with the same company?
A: In an LOI dated October 1, 1999, OSHA states, "As long as the employer has a reasonable basis to believe that the third-party trainer is qualified and has a program that meets the requirements of the standard, it can rely on that trainer to conduct the training and evaluation of employees and can certify that these employees have been trained. However, the employer may need to provide additional training on site-specific or truck-specific matters." This shouldn’t require retraining for the same type of forklift as already certified; however, workplace conditions or other factors of the new work location may require training for forklift operation in the other state(s).
| Interested in information on how material handler training can help forklift operators? See our Compliance Network article "To improve forklift safety, train material handlers." |
Operator Impairments
In addition to being properly trained and evaluated, OSHA expects employers to ensure physical capabilities. OSHA references the American National Standards Institute (ANSI) Standard B56.1-1969. Section 6 clarifies that, “Operators of powered industrial trucks shall be physically qualified. An examination should be made on an annual basis and include such things as field of vision, hearing, depth perception, and reaction timing."
Employers should consider OSHA PIT regulations and the General Duty Clause, ANSI standards, and the Americans with Disabilities Act (ADA) requirements when evaluating physical qualifications. In short, if a worker demonstrates the visual, auditory, and mental ability to safely operate PITs, he or she is permitted to operate them.
Keys to Remember
OSHA requires employers ensure the safe use of forklifts and other powered industrial vehicles. Employers must ensure operators have the knowledge, skills, and physical ability to safely operate PITs.
Saved to my EVENT CALENDAR!
View your saved links by clicking the arrow next to your profile picture located in the header. Then, click “My Activity” to view the Event Calendar on your Activity page.
OK
J. J. Keller is the trusted source for DOT / Transportation, OSHA / Workplace Safety, Human Resources, Construction Safety and Hazmat / Hazardous Materials regulation compliance products and services. J. J. Keller helps you increase safety awareness, reduce risk, follow best practices, improve safety training, and stay current with changing regulations.
Copyright 2026 J. J. Keller & Associate, Inc. For re-use options please contact copyright@jjkeller.com or call 800-558-5011.