Compliance Just Got Easier: Stay ahead of regulatory changes with instant notifications on updates that matter.
['Safety and Health Programs and Training']
['Safety and Health Programs and Training']
06/01/2025

Copyright 2026 J. J. Keller & Associate, Inc. For re-use options please contact copyright@jjkeller.com or call 800-558-5011.
:
focus-area/safety-and-health/safety-and-health-programs-and-training
555327045
Safety and health programs and training
A safety and health program provides systematic policies, procedures, and practices that are adequate to recognize and protect employees from occupational safety and health hazards. An effective safety and health program includes provisions for the systematic identification, evaluation, and prevention or control of general workplace hazards, specific job hazards, and potential hazards that may arise from foreseeable conditions. To be effective, the program will also look beyond specific Occupational Safety and Health Administration (OSHA) regulations and seek to address hazards and prevent injuries and illnesses whether or not compliance is at issue.
The term, “safety and health program” is synonymous with other terms, such as, but not limited to, “safety and health management systems,” “injury and illness prevention program” (or I2P2), and “accident prevention program.” Whatever the name, the common goal of these approaches is to help employers reduce workplace injuries, illnesses, and fatalities through a systematic process that proactively addresses workplace safety and health hazards.
Scope
- There is no requirement for a formal safety and health management program at the federal OSHA level.
- Some state agencies may be more stringent than federal OSHA.
At the federal Occupational Safety and Health Administration (OSHA) level, there is currently no requirement for employers to have a formal safety and health management program or system. However, some state workplace safety or workers’ compensation agencies may be more stringent than federal OSHA and, in fact, require some form of safety and health program. Check state workplace safety or workers’ compensation laws and regulations for requirements, if any.
While not specifically required by federal OSHA, all employers covered by the Occupational Safety and Health (OSH) Act could benefit from implementing a safety and health program. The program would apply to hazards covered by the General Duty Clause, or 5(a)(1) of the Act, and by OSHA standards. For “multi-employer” worksites, programs should be coordinated and communicated to ensure that the host employer and contractor, subcontractor, or temporary staffing agency understand their respective responsibilities for controlling hazards.
Based on the growing support for safety and health programs, OSHA issued its first “Safety and Health Program Management Guidelines” in January 1989. In 2015, OSHA updated the 1989 guidelines with two new publications and quickly revised them again in 2016. They include OSHA 3885, “Recommended Practices for Safety and Health Programs,” and OSHA 3886, “Recommended Practices for Safety & Health Programs in Construction.” These publications are not standards or regulations, nor do they create an obligation under the OSH Act.
In 2026, OSHA launched its Safety Champions Program, a voluntary cooperative program that aims to encourage participating employers to develop and/or improve safety and health programs through collaboration. The program supports alignment with OSHA's 2016 Recommended Practices and is one of many voluntary approaches to reducing the risk of occupational injuries, illnesses, and fatalities.
Implementing the program
- Designate one or two point persons for the safety and health management system.
A safety and health management system cannot be implemented in a day. It takes time and hard work. But the good thing is, it doesn’t need to be done overnight. And all the little steps taken will give immediate results. To start a program, it’s usually a good idea to designate one or two point persons. This will usually be the safety and health manager or perhaps the safety committee. Everyone needs to be involved in the process, but typically a point person is needed to coordinate and drive the program.
When it is start time, survey employees as a first step. Find out where they think the safety effort is currently, what they’d like to see, how they’d like to be involved, and so on. Also, create a schedule. Don’t try to do all of this at once. Take it a piece at a time and set a date for completion of the tasks. And recognize those milestones along the way. Boast about the improvements made and tangible results or cost savings. Also, keep the program adaptable to future changes. For example, the company may start with a safety and health program, but perhaps later the company wants to go for an environmental/ International Organization for Standardization (ISO) system — the groundwork will already be present. Similarly, if the company already has a quality or environmental system in place, then they can piggy-back off that to start their safety program; many of the elements may be in place.
Tips for getting employees more involved
A common challenge for safety professionals is getting employees and supervisors more involved in safety. They may not understand the value or they may focus on production. Perhaps the question should not be, “how do we get everyone to participate?” but rather, “how can we get them to CHOOSE to participate?”
Employers commonly offer incentives like a pizza party, prizes, or similar methods to get employees more involved. Those efforts can help demonstrate that the company values safety. Unfortunately, some employees return to the job without increasing their involvement. Consider showing them how safety impacts them personally.
The company might pay the cost of injuries, but workers pay the price, and you don’t want them getting hurt. To help everyone choose to support safety, they need to understand how safety benefits them. Let employees know, “We do this for you!” Show workers how safety benefits them, not just the company’s bottom line.
Encouraging safe behaviors may require encouraging everyone to think about the consequences. That means not only describing what could happen, but explaining the impacts on their lives. Even minor injuries can impact their personal lives.
Help workers find their motivation
If you spend time correcting employees who violate safety rules, try to identify employees who always work safely and ask them to share the motivation for their choices. Hearing those personal experiences and motivations should encourage others to make better choices. Also, coworker feedback is usually more effective than expectations handed down from management. When employees find their own motives, they’ll choose to stay safe, which makes the safety manager’s job easier.
One safety manager asked every employee to bring in a family photo and added the caption, “this is why you stay safe.” Employees posted the photos where they’d see them every day. Years later, employees still report that looking at a family photo every day makes them think about safety and use a bit more caution on the job. Some of the most effective incentives cost almost nothing. Once employees discover their own motivation, they’ll choose to stay safe for their own benefit.
Encourage active participation
A successful program requires employee participation. As one step, give workers “to do” items rather than “do not” items. Minor changes in how you express the rules and expectations can increase their “to-do” items. For example, instead of saying, “Do not block the exit door,” try saying, “Make sure the exit route is always clear of obstructions.” Get as specific as possible, so instead of saying, “Keep the workplace clean,” try saying, “Immediately clean up any trash or spills that you notice.”
By giving action items and pointing out how these rules benefit them, you can hopefully encourage them to take a more active role in their own safety. The goal is getting everyone to continually watch for hazards, support one another’s efforts, and immediately address or report any problems.
Voluntary industry standards
OSHA’s 2016 voluntary "Recommended Practices for Safety and Health Programs" publication is to be used in a wide variety of small and medium-sized business settings. It presents a step-by-step approach to implementing a safety and health program, built around seven core elements that make up a successful program. The guidelines follow the same general approach as discussed in the Everyday OSHA Safety and Health Management manual (i.e., management leadership; employee involvement; hazard identification and assessment, hazard prevention and control; education and training; program evaluation and improvement; and coordination on multi-employer worksites).
OSHA Recommended Practices for Safety and Health Programs
The main goal of safety and health programs is to prevent workplace injuries, illnesses, and deaths, as well as the suffering and financial hardship these events can cause for workers, their families, and employers. The recommended practices use a proactive approach to managing workplace safety and health. Traditional approaches are often reactive — that is, problems are addressed only after a worker is injured or becomes sick, a new standard or regulation is published, or an outside inspection finds a problem that must be fixed. These recommended practices recognize that finding and fixing hazards before they cause injury or illness is a far more effective approach.
The idea is to begin with a basic program and simple goals and grow from there. If you focus on achieving goals, monitoring performance, and evaluating outcomes, your workplace can progress along the path to higher levels of safety and health achievement.
The Recommended Practices are not a standard or regulation and do not create any legal obligations or alter existing obligations created by OSHA standards or regulations. However, they show what OSHA considers to be a sound system, which can help employers in many situations, such as joining an OSHA voluntary program like the Safety and Health Achievement and Recognition Program (SHARP) and demonstrating good faith in the event of a citation.
Other industry standards
There are two major voluntary industry standards that employers may utilize in designing and implementing a safety and health management system:
- ISO 45001, Occupational Health and Safety Management Systems — Requirements with Guidance for Use
- ANSI/ASSP Z10.0, American National Standard for Occupational Health and Safety Management Systems
ISO 45001
Most companies realize that if they don’t put out a quality product, they won’t be in business long. That’s why for years many organizations have turned to the International Organization for Standardization’s (ISO) 9000 series of standards to implement their quality management systems. Those businesses can align their quality, and other management systems, with a worker safety and health management system, thanks to the first-ever international standard for occupational safety and health management systems — ISO 45001.
ISO 45001, Occupational Health and Safety Management Systems — Requirements with Guidance for Use, is a standard for the implementation and maintenance of occupational safety and health management systems. It guides companies in taking a systematic and proactive approach to worker safety, giving safety an equal “seat at the table,” alongside other management systems, such as environmental, quality, IT and data security, and product safety, all of which have had international standards for a while.
It shares a common structure, and many of the same definitions, as other ISO standards.
The standard, like other management systems standards, reduces risk and increases performance. In the case of ISO 45001, the risk is to worker safety and health. By using sophisticated and forward-thinking, proactive measures, the standard provides a framework for companies to systematically improve safety and their business processes at the same time. The standard requires companies to use concepts and techniques such as the hierarchy of controls, risk assessment, and root-cause analysis, along with significant input and participation from workers. While these techniques clearly help reduce injuries and illnesses, they also improve the business performance.
The standard has other benefits as well, some obvious, such as reduction of injuries, some not so obvious, such as impact on investors. Various investment entities are looking at sustainable companies. This will likely drive many employers to ISO 45001 usage, as it is expected to be adopted heavily across the globe. Investors will likely feel more confident in an ISO 45001-certified company because they’ve shown they are actually identifying and managing the risks.
From a day-to-day safety standpoint, ISO 45001 enables companies to improve performance by:
- Creating and implementing a safety and health policy, as well as objectives that align with the business strategies.
- Assessing processes for risk.
- Using a hierarchy of controls for hazards.
- Increasing awareness of the occupational health and safety risks the business faces.
- Actively involving workers in the system.
- Continually improving the company’s performance with regard to occupational safety and health.
The indirect benefits will also be vast, including recognition for achieving an international benchmark, lowering costs, reducing turnover and lost time, and reducing equipment and process downtime.
Summary of requirements
- Determine readiness to become ISO-certified for having a safety management system in place.
- Show a collective commitment to safety by the entire organization.
- Perform a risk assessment to identify hazards and determine program strengths, weaknesses, opportunities, and threats.
- Evaluate legal and regulatory requirements and identify who is responsible for ensuring compliance.
- Develop a written plan for achieving workplace health and safety management program objectives.
- Engage employees in developing and ensuring occupational health and safety objectives.
- Ensure safety is fully integrated into daily operations and behaviors.
- Support employees at all levels of the organization to ensure they are competent to handle their roles in the safety management system.
- Implement documentation procedures for controlling policy versions, retention procedures, and access control.
- Train workers in the requirements and benefits of ISO certification.
ANSI/ASSP Z10.0
The ANSI/ASSP Z10.0 standard is an American industry standard originally released in 2005. The standard aligns more with traditional ANSI standards in terms of its numbering scheme/structure and definitions. In addition, like most other ANSI standards, ANSI/ASSP Z10.0 is “self-certifying” in that there is not necessarily a requirement for a third-party auditor to conduct a conformance assessment. A company can purchase the standard and implement it with no assistance from a third party.
The ANSI standard follows the same general principles as OSHA’s Recommended Practices, however it provides much more guidance and tools, covering such topics as management leadership, employee involvement, hazard identification/prevention/control, training, and evaluation. It contains tools such as job hazard analysis guidance and risk matrices.
The standard is currently overseen by the American Society of Safety Professonals (ASSP), and it is expected that it will continue to be supported despite the ISO 45001 publication. It’s likely the standard will become enhanced beyond ISO 45001 in some elements, particularly those related to human error and out-of-the-ordinary operations. For that reason, some companies may choose to achieve certification to ISO 45001, but implement additional elements from ANSI/ASSP Z10.0.
Deciding on a standard
So, which if either of these should you use? It depends on what you hope to accomplish and also what your stakeholders or customers are asking for. In certain industries, it may be more common for suppliers/potential contracts to ask for one of the standards over the other.
If your sole goal is improving your internal system, you could pursue whichever you feel most comfortable with. It is advisable to talk with some organizations who have utilized these systems to find out pros and cons.
For more information on ANSI/ASSP Z10.0, visit www.assp.org/standards/standards-topics/osh-management-z10. For more on ISO 45001, visit www.iso.org/iso/home/standards/management-standards/iso45001.htm.
Management leadership
- There are four elements that indicate solid management leadership for safety and health.
The first core element to most effective safety and health programs is management leadership. There are many elements that can indicate solid management leadership for safety and health. Four of the more common and important ones are:
- Establishing a safety policy statement,
- Setting goals and objectives and creating an action plan,
- Displaying visible top management involvement, and
- Placing safety as a line function.
Safety policy statement
- A company should have a clearly stated policy on safety.
Obviously, management commitment to safety is crucial. But what does this mean in practical terms of implementing a program? First, it means that the organization has a clearly stated policy on safety. This policy statement serves as the foundation of safety and health management. It communicates the value that safety has in the organization. This policy should be the basic point of reference for all decisions affecting safety and health. So, when it comes down to a situation where there’s debate about whether to spend money on a certain hazard control, the safety professional can point to this policy to remind everyone of safety’s stated place in the company.
Further, the simple act of working on the policy, approving the policy, etc., will typically get upper management involved, and that’s an important aspect of the policy statement.
Goals, objectives, and action plan
- Construct measurable goals and objectives to make the safety policy more specific.
In order to make the safety policy more specific, employers need goals and objectives, as well as an action plan. These should be communicated so that everyone understands the direction of the organization. The goals and objectives set will be a reflection of where the company currently is with the safety program and where they want to get to. The goals and objectives should be measurable as well as attainable.
Goals
- Consider two basic types of goals: numerical and descriptive.
A goal is a broad statement of something a company wants to accomplish, for example:
“To have a comprehensive safety program that assesses all existing and known potential hazards and prevents or controls these hazards.”
Optionally consider at least two basic types of goals: numerical and descriptive.
Numerical goals
- Numerical goals are easy to measure, but struggle to be attainable and comprehensive enough.
Numerical goals have the advantage of being easy to measure. However, it is difficult to set a numerical goal that is both attainable and comprehensive enough to be helpful. Consider these examples:
- Setting a goal of zero hazards at any time may be so difficult to reach that employees will become disillusioned long before reaching the destination.
- Setting a goal of a certain number of injuries. This may sound reasonable, but it ignores both illnesses and those existing hazards that have not yet resulted in an injury.
- Setting a goal of a certain number of injuries and illnesses may not be feasible. Illnesses often are difficult to recognize until long after employees’ exposure to hazards that could have been prevented or better controlled. As with the previous example, this goal does not address hazards that have not yet resulted in injury or illness.
Descriptive goals
- A descriptive goal should be inclusive and attainable.
No numerical goal can be sufficiently inclusive and still attainable. Therefore, the Occupational Safety and Health Administration (OSHA) has recommended that companies adopt a broad, descriptive safety and health goal, such as: A comprehensive program that assesses all existing and known potential hazards of the worksite and prevents or controls these hazards. Such a goal is neither as succinct nor as easily measurable as a numerical goal. But it is attainable. Further, this goal will be helpful in setting objectives. And it should not be difficult to evaluate objectives and program results against this goal.
Objectives
- Objectives are short-term, positive steps on the way to a company’s goal.
- Objectives do not contain a description of how they should be accomplished.
Companies should also set objectives — which aim at specific areas of performance that can be measured and verified, for example:
- “Start a program of weekly inspections”
- “Ensure hazards found are corrected within one day”
- “Reduce noise levels to below 85 A-weighted decibels (DBA) in the machine shop”
Objectives are short-term, positive steps along the way to the company’s goal. Workplace objectives for safety and health are similar to those set for other business functions such as sales or production. They identify What? When? and How much? They do not include a justification for why they should be done; such justification properly belongs in the policy statement. Nor do they contain a description of how they should be accomplished; those details belong in the action plan.
Identify objectives
- Selected objectives should be consistent with the basic safety and health policy.
Anything can become an objective — from creating a safety and health committee to investigating accidents to developing an orientation program for new employees. Decide which activities are most important to the program goal, and which will help to create an effective overall safety and health program. The objectives selected should be consistent with the basic safety and health policy. And they should be part of the normal business of the company, rather than special projects added to the normal workload.
Set objectives
- Objectives should be understood by all those directly involved and be achievable with available resources.
- Objectives should be realistic and attainable but should still present a significant challenge.
Objectives should be based on performance measures, that is, indicators that tell the company whether they did or did not perform as expected. When setting objectives, keep the following points in mind:
- Objectives should relate to some part of the overall goal.
- Example: “Develop and carry out a program to train and license forklift truck drivers.” This objective relates to the part of the goal to ensure that all employees understand the hazards and potential hazards of their work and how to protect themselves and others.
- Objectives should aim at specific areas of performance that can be measured or verified.
- Example: “Improve safety and health performance next month” is too general an objective to be useful. Better to say, “Make weekly inspections and make certain all hazards found are corrected within 24 hours.”
- Objectives should be realistic and attainable but should still present a significant challenge.
- Example: “Reduce recordable injuries in the upcoming year by 100 percent.” This objective may be unattainable because of the extent and complexity of the measures needed to prevent all injuries. An objective well beyond reach can soon create a defeatist attitude among all those working toward its achievement. On the other hand, “Reduce recordable injuries by five percent in the next year” can destroy employee interest by presenting too small a challenge. To set a realistic injury reduction goal, examine the pattern of injury rates for the last three years, and set a goal related to improving the best point in that pattern. For example, if there were injury rates of 5.8, 5.6, and 5.7 for the past three years, the goal for the next year could be, “Reduce recordable injury rate to 5.0.” But always remember that the Occupational Safety and Health Act was passed to prevent the first accident and strive to eliminate all injuries and illnesses from the workplace.
- When setting objectives, solicit input from as wide a range of employees as practical. The ideas already may strongly influence supervisors. Nonetheless, safety and health objectives are most effective when discussed beforehand with supervisors or employees. At the least, secure their agreement or cooperation. People who feel they have helped set an objective will be most motivated to achieve that objective.
- Objectives should be understood by all those directly involved. Use terms that have a clear meaning to all concerned supervisors and employees. Leave no doubt about what is to be accomplished.
- Example: “Determine the cause(s) of all accidents and incidents” may be too abstract to be understood (and therefore accomplished) by those with responsibility. Be clear and specific: “Investigate all accidents and incidents at once to determine all contributing causes and take corrective action within 24 hours of completing the investigation.”
- Objectives need to be achievable with available resources. An objective that requires a large outlay of money or an increase in staff during a budget crunch probably won’t be achieved. Setting such an objective is a waste of time and effort. However, do not discard this objective. Postpone it. For the present, create an intermediate objective of working to produce the needed resources. Remember, travel toward the goal one step at a time. The objective achieved this year may enable the company to tackle a larger objective next year.
Action plans
- Create a plan of action after establishing goals and objectives.
After establishing goals and objectives, it is time to create a plan of action. The action plan should address:
- What activities will be undertaken;
- Who has responsibility;
- When the action realistically should be accomplished;
- What resources are needed, for example, people, time, dollars, equipment; and
- How the action will be tracked and evaluated.
The development of the action plan presents another opportunity for employee involvement. Managers and other employees can play an important role in mapping out the details they will be expected to accomplish.
Visible management involvement
- Management should allocate resources for safety and health protection.
While some of the top management involvement will be evident by the fact that the company has a policy and goals that incorporate safety, actions speak louder than words. If top management gives high priority to safety and health protection in practice, others will see and follow. If not, a written or spoken policy of high priority for safety and health will have little credibility, and workers will not follow it.
Plant managers who wear required personal protective equipment in work areas, perform periodic “housekeeping” inspections, and personally track performance in safety and health protection demonstrate that involvement. Another important component is for management to allocate resources. This means giving safety a budget and giving those with safety responsibilities time to do what they need to do. Supervisors need to be trained, and in turn, the supervisors need to have the time to train their workers.
Also, managers and supervisors need to be given the authority to carry out any responsibilities they are given for safety. This means discipline, ordering safety items, or otherwise making changes.
Safety as a line function
- Management should allow safety to be a line function.
Another common element of a safety and health program is for management to allow safety to be a line function. This means giving supervisors and managers the authority they need to oversee that work is done safely. Often safety is structured as just a staff function, which means the safety manager is responsible and accountable for safety but has no real authority to carry out the duties. What the company wants to work towards in most cases is a line from top management down to carry out the safety function. That does not mean there should NOT be a safety director or manager position. Quite the contrary. But that person needs to be a resource to the company, not necessarily the performance overseer.
Administration/supervision
- Management should designate individuals to carry out various safety tasks.
A sub-component of management leadership is administration/supervision. This means that management has designated individuals to carry out the various safety tasks that need to be carried out. Obviously, the responsibilities need to be communicated to those individuals. And, very importantly, there needs to be some sort of agreed-upon accountability measures. This could be regular meetings, memos, reports, emails, whatever works — but it should be consistent with other measures used for production and quality tasks, though.
A key is not to confuse this with the notion that management ultimately is responsible, nor should it be confused with every employee’s individual responsibility. This accountability refers to specific tasks and responsibilities for those tasks. In this case, if everyone is responsible, then it’s likely no one is doing it.
Communication of changes
- Personnel with safety and health responsibilities need to be notified ahead of time if there will be significant workplace changes.
It would seem to go without saying that those personnel with safety and health responsibilities need to be notified ahead of time and involved if there are going to be significant workplace changes, but in many companies, there is a disconnect. The operations personnel decide on the change based on operational needs and then safety personnel find out about it later and must adjust — and the result are machines that raise the noise level to the point hearing protection is needed, or dangerous chemicals that could have been substituted. The safety input needs to be considered early on.
Authority
- Employers must hold supervisors and managers accountable for enforcing health and safety rules.
Another element of administration/supervision is to ensure that those with safety and health responsibility or accountability can enforce the rules and of course that rules are established.
Take for example the situation of employees eating and drinking in a work area where there are hazardous chemicals. About the only way to control this hazard once the company has trained employees is with a rule against bringing the food in and then having supervisors enforce the rule. If the supervisors don’t enforce it? There will be rampant food and drink in the area. It may start out with one person, but it won’t take long before it spreads and becomes the culture.
Employers must hold supervisors and managers accountable for enforcing the rules. Managers and supervisors, rather than the safety director, should enforce safety and health rules. The department managers then need to enforce that the supervisors are enforcing the rules. Again, it’s that top-down line.
Recognition
- Recognize good safety behaviors in the workplace.
It can’t all be about rules, though, when it comes to a safety culture. Mix in some recognition of the behaviors you want to encourage in the workplace. Recognition programs motivate companies, teams, and people to work safely. For example, when someone helps a coworker lift a heavy item, it's reflective of a good safety culture. That is the type of behavior that should be fostered in the workplace. Have supervisors recognize those behaviors. It doesn’t have to be an elaborate celebration, but if the employer can get employees doing these things, eventually it will carry over into the culture.
One way to show your workers that you appreciate and value their contributions to a safer and healthier workplace is by creating a Safety Wall of Fame. Showcase your exemplary employees and display their achievements. You can even show off your Safety Wall of Fame on social media.
Directing safety
It is one thing to have a plan for how you want safety to be carried out in the workplace — it is another matter when it actually comes to managing the day-to-day safety responsibilities, getting buy-in for your programs, etc.
Introduction
This section serves as a foundation for helping you ensure that what you want to happen in terms of safety happens.
The information in this section will provide tools and concepts that you can use to steer your company’s overall safety program in a positive direction.
Management support/buy-in
In order for a safety program to run efficiently, management has to buy in, be involved, and provide continuing support. But, how do you get management to buy in? Tying safety to the bottom line is usually the way to go. No manager wants to see employees injured, but there is often a disconnect when it comes to understanding the safeguards and resources that are actually necessary to ensure worker safety, and in some cases really understanding what is going on in the workplace. For that reason, safety managers have to stress the monetary impact of safety, both direct and indirect costs.
Beyond educating management on the “Why” of safety, it is important that management be involved. Certainly, upper management needs to be involved in setting the safety philosophy statement and providing overall support, but they also need to have a good idea of the hazards and safeguards in the company. Some ways to accomplish this include:
- Having management participate in audits/inspections (at the least, they should receive inspection reports).
- Giving department or area management responsibility for at least one specific safety program in their area, for example, lockout/tagout or hazard communication. That way, the managers get a real understanding of safety and health issue, are held accountable for it, but yet are not overloaded with technical topics. The more management understands what is involved with safety and OSHA compliance, the more likely they will be to support the efforts.
- Ensuring managers follow the same rules as employees, for example wearing required PPE in hazardous areas.
- Inviting managers to speak regularly at safety committee meetings.
- Encouraging managers to incorporate safety into supervisor performance evaluations.
The human aspect of safety
Nearly three million workers are injured on the job each year, according to data released by the Bureau of Labor Statistics (BLS). That’s three million fathers, mothers, brothers, sisters, sons, daughters, spouses, coworkers, and friends who were injured, in many cases severely enough that they couldn’t go to work for a period of time.
That’s the human aspect of the data.
In fact, one could argue that if three million workers were actually injured, at least double that number of people were impacted. When a wife is injured on the job, the kids and the husband suffer, too.
And, so do employers.
In many cases, when an experienced worker is off work because of an injury, a less-experienced worker must take over. This can lead to a noticeable drop in production — not to mention any OSHA recordability or workers’ compensation issues that arise from the injury.
The numbers, overall, have stagnated after several years of decreases.
“Stagnant injury rates are unacceptable and a clear call to employers nationwide to take a harder look at their approach to workplace safety and health,” said ASSP President Diana Stegall, CSP, CFPS, ARM, SMS, CPCU. “Incidents that harm workers are occurring far too often in every industry. Most occupational injuries and illnesses are preventable given today’s technologies and proven safety and health strategies.”
Former OSHA leader, and current Professor at the George Washington School of Public Health, Dr. David Michaels, also expressed concern over the current numbers.
“I am concerned about the injury numbers — the overall high numbers should be unacceptable to the nation,” he said. “We know the figure of three million injuries annually is an underestimate. We should be doing more to lower the rate, but instead it is rising — that is deeply concerning.”
Dr. Michaels points to a series of studies commissioned by the BLS, which have concluded that injuries reported by employers do not match up to data in workers’ compensation and other systems, leading to a “significant portion” of injuries that aren’t counted in the BLS data.
This does not mean that employers are willingly under-reporting to the BLS, however. The agency notes that there are many potential causes, including confusion around the different systems that are in place, such as workers’ compensation and OSHA recordability. Further, as an annual survey, the BLS data may also fail to capture injuries or illnesses with a long onset or latency period.
But, what we know for certain is that overall injury rates stalled recently.
Of particular concern, are the rates in the retail industry. Rather than simply stagnate, the injury rate in that industry actually increased — for the first time since BLS began collecting this series of data in 2003.
“Retail was a surprise,” according to former OSHA area director, John Newquist, “I think the newer employees are older. They are more easily subject to ergo injuries.”
Lack of focus on ergonomic issues may be partly to blame for the overall injury numbers.
Stegall suggests that a lot of processes currently in place have been aimed at typical serious injuries, such as those from caught-in and struck-by hazards. These are areas where OSHA has standards. However, that may mean some hazards are being overlooked.
“All of those are important and we have regulations related to those. But, when you look at more of the injuries these days, they are soft tissue,” Stegall says. “We’re not addressing those because there’s no regulation.”
In fact, sprains, strains, and tears accounted for almost 31 percent of all the cases with days away from work from 2023 to 2024. Bruises, contusions, carpal tunnel, and tendinitis and related injuries made up another nine percent.
To ensure all injury causes are accounted for, Stegall suggests that employers look not only at hazards and compliance, but also at the risks that are present.
This is something that was a noticeable point of emphasis with the publication of the ISO 45001, Occupational Health and Safety Management Systems — Requirements with Guidance for Use, the first-ever international standard for managing safety systems. Before that, most existing industry standards, such as the OHSAS 18001 standard, focused on identifying and controlling “hazards.” The ISO 45001 standard, as well as ANSI/ASSP Z10.0, American National Standard for Occupational Health and Safety Management Systems, place a heavy focus on “risk.”
This means, among other things, that employers should proactively look at what’s actually going on in the workplace.
“We only see the work as we’ve imagined it should be, not necessarily as it’s performed,” Stegall says. “We’re not getting the feedback from the workers who do the work day-in and day-out.”
She notes that even in incident investigations, often, employers stop once they figure out what went wrong. Rather than asking the worker to “help me understand what was going on — help me understand the decision that you made,” employers often only see things from one perspective.
“It’s really easy to look back after the fact and say, ‘we should have done X, Y and Z,’” Stegall says. However, she says many employers stop short of actually getting to the heart of why the worker made the decision they did. She suggests asking questions to get information from the worker’s perspective on what was going on and why they made the decision they did based on the information they had available at the time.
Another potential cause for the high injury numbers may be lack of a dedicated safety professional.
“I am seeing HR trying to handle safety without basic safety training like an OSHA 511 class,” said Newquist.
Additionally, employers sometimes have programs that are not implemented fully — they are made for compliance, but not necessarily for the way the work needs to be done.
Further, employers must ensure that the programs that are implemented are maintained.
“Anything from a safety perspective should be living and breathing — it’s never just a one and done,” Stegall says.
“The world of work is changing so quickly, we can’t just say ‘it’s done; it’s on the shelf.’ We have to look at that again. It really should be taking a look at things on a regular basis.”
She recommends employers regularly look at such things as the following for potential changes requiring program updates:
- Equipment
- Processes
- Chemicals
- Employee-base
Even something as simple as a PPE program can be overlooked, which can lead to improper protection, Stegall notes.
“Are we buying personal protective equipment that properly fits the people that we have in our worksite currently — versus 5 or 10 years ago (when the assessment was done)?”
ASSP, which represents more than 39,000 occupational safety and health professionals worldwide, recommends that employers implement safety and health management systems and adopt strategies to better protect worker well-being on and off the job. Both can help companies create true safety cultures by shifting from compliance-based approaches to risk-based programs.
In addition, organizations should use next-generation approaches such as Total Worker Health (a term created by NIOSH) to move beyond traditional wellness initiatives and take a broader view of worker well-being.
“There are widespread benefits when a business makes occupational safety and health a priority,” Stegall said. “Not only do workers return home safe to their loved ones, but quality and productivity flourish, helping organizations achieve sustainable growth, meet social responsibilities, and be viewed as employers of choice.”
“We want to send them home BETTER than when they showed up”
One thing Stegall urges employers to think about is that when they hire an employee they aren’t just hiring “one part” of the worker — they are hiring the total worker. If an employee is already susceptible to back problems from an off-the-job issue, putting in ergonomic aids makes sense — not only will it prevent the worker’s back from becoming more of a problem for the company and the worker, but it likely will lead to better productivity and, through training and other techniques, possibly a better home life for the worker, which will ultimately benefit the company.
When employers can help an employee improve his health, the benefits reach far beyond the workplace, which is the theory behind the Total Worker Health movement. It’s also a perfect example of the positive side of the human aspect of workplace safety.
Employers pay the cost of injuries but workers pay the price
Safety professionals know that injuries cost a lot of money. Between medical bills, workers’ compensation, and other expenses, the National Safety Council estimates that employers collectively spent more than $160 billion on injuries in 2020.
OSHA offers an Individual Injury Estimator to help you find out how much a specific injury or illness could cost your business in direct and indirect costs. See www.osha.gov/safetypays.
Unfortunately, prevention isn’t cheap either, and resources (such as time and money) are always in limited supply. Safety professionals may need to create a business case showing the benefits to get approval for a new engineering control or safety modification. Even when showing a positive return, the change might not get approved for a year or more due to initial investment costs.
When evaluating these costs, remember that while the company pays the costs of injuries (or injury prevention), the employees pay the price. Cuts and scrapes may not impact workers too significantly, but many workplace hazards (especially those that would be expensive to eliminate with engineering controls) have the potential to literally change employee’s lives.
Conditions such as permanent hearing loss from noise exposure, amputations from machinery, back injuries that require surgery, or eye hazards that cause blindness are all potentially life-changing incidents.
When making a case for an investment that would eliminate or significantly reduce worker exposure to a hazard, try pointing out that direct and indirect costs might be easily quantifiable, but the price that employees pay cannot be assigned a dollar value. The employer should take all reasonable steps to protect workers from paying that price.
Supervisor involvement
While getting upper management involved is crucial, chances are many of your day-to-day safety challenges will center around line supervisor involvement. Line supervisors are the safety professional’s link to workers. They are the go-between. In a good system, supervisors will deliver and reinforce your message to employees. And, they deliver employees’ feedback to you. Just think about this — is it easier for you to tell 100 employees about the new policy regarding personal protective equipment violations, or, is it easier for you to communicate with four supervisors and let them tell their employees? Along that same line, would you rather be bombarded with the same question from 100 employees about why protective equipment is necessary when they’re walking through the machine shop, or the same question once from 4 supervisors?
Another thing to remember is that line supervisors are key to the minute-to-minute and day-to-day activities of workers. If you stop to think about it, have you ever noticed that employees often change their behavior when the safety manager is around? Well, supervisors are around ALL the time and usually get a true sense of what’s going on. In that respect, they have an advantage over the safety professional.
Supervisors are your eyes and ears out there on the floor. They are going to see Bob and Mark racing their forklifts. Or Mary working without her safety glasses. They are also going to be able to bring employees’ information to you. And, really, if you think about it, employees have critical information you need. They know the specific tasks, the times when the tasks are most dangerous, and, they can likely provide some valuable solutions. Without supervisor involvement, it’s going to be difficult for you to get this feedback from employees.
But, we have to remember also that supervisors (or Team Leaders, Group Leaders, or whatever your company calls them) do have other responsibilities besides safety. They deal with production rates, quality control, scheduling, and a host of other issues that are unique to your operations. That being said, safety must be a PART of everything that a supervisor does.
Supervisor perception
In many cases, the real problem is perception. Supervisors often see safety managers as safety cops rather than safety partners. And, the last thing most supervisors want is someone telling them or their workers how to do their jobs, or getting them in trouble for doing a poor job. One of the things you can do to help overcome the perception problem is to change your attitude. It’s very difficult — if not impossible — to change someone else’s attitude. But, you can change your own. You may not intend it, but it is possible that supervisors perceive you as thinking that your job is more important than theirs, or that you “know it all.” This perception can really get under their skin and affect your attempts at partnership.
One of the gang
Something else you can do to help with positive perception is to become “one of the gang” at least to some extent. While in some work cultures it may be different, in many, it’s still an “us versus them” attitude between management and workers. And safety professionals are usually seen as management. Now, of course you can’t shun management, but you do need to develop a rapport with workers and supervisors. One way to help with this is to ask each supervisor if you can spend part of a day or two in his or her area, learning about their jobs. This will not only show supervisors that you care, it will help you actually learn what they do, the hazards they face, and glimpse inside the culture. And, it will help you in the long run as you communicate with your supervisors. The more you know about their jobs — and their personalities — the better you will be able to speak their language. There’s nothing that turns off a supervisor faster than if he or she thinks you don’t know what it’s really like out on the floor or what the work processes actually involve.
Educate supervisors on the “why’s”
It’s possible that you will have supervisors who sincerely want to follow and enforce safety procedures, but they just don’t know how. They may have risen through the ranks and have no formal training. They might follow the safety rule but not understand WHY it’s in place. This can lead to serious issues, as the language of policies and procedures isn’t always enough to ensure safety. So, don’t just provide them with steps to take, without educating them on why the steps are being taken. Also, you have to remember that a supervisor may not realize that a job is hazardous. He may have been working a job for 10 years and never seen an employee get injured. This is where you as a safety professional can put your expertise and experiences to work. You will likely have seen or heard of an injury, maybe even at another company, regarding a similar type of work. If you can bring in these “personal stories” they will likely be effective at reaching supervisors.
Supervisor accountability
We mentioned earlier that you are going to need to get upper management to buy in to safety before you can get line supervisors to buy in. You are also going to need upper management’s support to hold supervisors accountable for safety, which is key to getting them onboard. It’s safe to say that if a department doesn’t meet production goals, the supervisor will hear about it. But, what about safety? It should be no different. Supervisors need to be held accountable for their responsibilities, just as we all do. And that means there need to be specific and identified consequences tied to those responsibilities. There are a couple of approaches to this accountability: One is a positive incentive for carrying out safety responsibilities, for example including safety in the year-end performance evaluation/bonus. The other is some sort of negative action or discipline for failing to perform these responsibilities.
In terms of evaluating supervisors on their safety responsibilities and roles, there are many approaches you can take. You may look at measures such as the number of safety walkthroughs the supervisor does, injury/illness OSHA recordable rates in the department, the number of learning or training opportunities completed, and number of maintenance requests for safety improvements. Note: These are great for measuring some aspects of safety — the more quantitative items. But, they don’t really capture the soft measures (the qualitative side). One safety professional from a utility company stresses improvements in the “unseen” things — those that reflect positive safety culture changes, such as the way employees take pride in their work, the employee morale, and the union-management openness to communicate and make positive changes.
Another thing you can do to help get supervisors on board with safety is to talk production and quality. This can be difficult, but it is possible. For instance, when you sit down and review with a supervisor how many accidents or incidents that have occurred over a given period, he may say, “Well, that’s just the nature of the work. Some incidents are gonna happen.” You as a safety manager have to impress upon supervisors that incidents are NOT acceptable. Try telling supervisors to compare the incidence rate to the scrap rate. Would it be acceptable? The answer, of course, is no. Also, impress upon supervisors the impact that accidents have on machine and equipment downtime. This can be a real motivator for the supervisor. Also, when an employee is injured, it impacts the morale of other workers, may create a shortage of manpower, and causes a host of other problems.
Supervisors may also respond to information on the bottom-line impacts of safety. Take for example workers’ comp. If you can stress to supervisors that fewer accidents lead to lower workers’ comp costs and higher profit margins — and thus a better chance for the company to be competitive in the marketplace, you may get a better buy-in.
Best practice
Something else you can do is to hold special supervisor-only safety meetings. You hold employee training and safety meetings all the time. And safety committee meetings are commonplace in most workplaces. Why not hold supervisor-only safety meetings? Giving supervisors a forum to express their unique experiences and challenges both to the safety manager and their peers can be helpful all the way around. It can also ensure consistency among supervisors. No company wants 10 supervisors doing the same job 10 different ways. This is confusing for workers. And it won’t help you when OSHA comes around either.
Selling safety and getting buy in
Convincing others to support your initiatives is called getting “buy in” because you are selling your ideas and asking others to “buy” them. To improve your sales technique, think about successful salespeople, or even a personal experience like the last time you bought a car or other major purchase. Most successful sales approaches involve the following steps:
- Prepare in advance. Workers won’t be impressed by a disorganized presentation of ideas. Creating an outline or script helps ensure a logical flow of information, and helps you cover all the major points.
- Anticipate objections. A good salesperson knows that buyers will have objections, but have a plan to address them and overcome them. Develop responses for likely complaints, and address those issues even if workers don’t raise them immediately.
- Personalize the approach. Selling requires trust, and building relationships is an ongoing process. Personalizing a sales pitch also means answering the “what’s in it for me?” question that buyers will be asking themselves. Ideally, your pitch will offer a positive outcome (“it’ll save you time”) rather than simply avoiding a potential negative outcome (“you’re less likely to get hurt”).
- Follow-up. You need buy in because you’re asking others to make changes. Managing that change means going back later to ask for feedback, then making adjustments based on feedback. Following up also helps you verify that workers implemented the new information. In addition, addressing feedback builds the trust and rapport you’ll need when you make your next request.
Getting others to do what you ask is a skill, and requires more than simply delivering information. Successful sales people build relationships with customers because once you start getting buy in, it should be easier to get that buy in the next time around.
Motivating employees
It would be great if the employer could just tell workers to “do the job safely” and they would. Unfortunately, not everyone has the same view of what it means to “do the job safely.” We all have different backgrounds and experiences that influence how we perform our jobs. And, there are constant pressures (for example, family issues, illnesses, and production or other company demands) that impact our attention level and actions each day.
Much of the motivation from employees will come from the supervisor, e.g., corrective and complimentary feedback and enforcement of work rules. But, employers may want to add additional motivational means.
Behavioral influence on safety
Unfortunately, we often let factors — whether outside or internal — influence our behavior in a negative way. Where safety is concerned, this can be fatal.
Take for example the case of John, a maintenance worker at a manufacturing facility. John hadn’t got much sleep the night before because he was up late with his sick child. It was nearing 3:30 in the afternoon, and John really wanted to go home. He just had one quick job to finish up. It was an easy one — one he’d done many times before. So, he decided to save some time and skip the company’s procedure to lock out the energy source on machinery before working on it. Unfortunately, the machine cycled, and John lost his left arm.
Employees must stay diligent in using safe behaviors at work; they shouldn’t pick and choose when to use safe behaviors. Regardless of the outside or internal influences, employers must ensure employees follow proper safety procedures and policies.
Why we choose unsafe behavior
Why would anyone ever want to not use safe behaviors? The answer is that it helps us do something quicker or easier and often we aren’t injured as a result of the unsafe behavior.
Take for example speeding. How often do you exceed posted speed limits? Most of us do at some point. After all, it does help us get where we need to go faster!
And most times, nothing bad happens, at least not on an individual basis. We may speed 1,000 times without ever getting a speeding ticket or having an accident.
But, it only takes one traffic ticket for our insurance rates to increase, or, worse, for us to have an accident.
And, what about all of the other drivers who are speeding at a given time, say, at 5:00 p.m. on a Friday afternoon? It is unrealistic to think none of them had an accident or a speeding ticket on that occasion.
Safe behaviors at work
Safe behaviors become more critical in the workplace, where there is more than one person who could perform an unsafe behavior. The odds are against companies in that regard. That is why everyone must focus on safe behaviors at work — all the time!
But, just what are those safe behaviors workers are responsible for while on the job?
There are a few of them, including:
- Complying with company safety rules
- Reporting injuries immediately
- Reporting hazards
- Making suggestions
- Getting involved in safety activities
Get support by showing positives, not sharing frustrations
Managers sometimes have to support policies they don’t agree with. Employees might not support every rule either, but usually follow them (most of the time). This reluctant agreement to follow rules can increase the challenge of getting support for change. In some cases, resistance to change is simply a knee-jerk reaction to rules written by someone who “doesn’t know the job.”
A supervisor or safety manager ideally builds a cooperative (not combative) relationship with employees. Unfortunately, some supervisors bond with workers by sharing frustrations. Even if supervisors don’t support a rule, they should never criticize it; instead, they should highlight the benefits. If management shares frustration about a change, employees might assume they won’t enforce it. This may create awkward situations if discipline is imposed, with questions like, “But you said it’s pointless, so why are we here?”
Acknowledge objections
If workers object to a change, you need to acknowledge their objections. This does not mean validating objections, but it does mean addressing them. For example, if someone complains that a new step will add time, you might say, “The company understands that this might take longer, but it’s still required.” Ideally, follow up by describing some benefits or expected outcomes.
The key is to empathize, yet still support the change. You could even express uncertainty such as, “This is new to me also, but we all need to make it work.” That’s much better than saying, “I understand your frustration and agree that this seems pointless.”
Essentially, make your approach along the lines of, “We’re all in this together.” A management job requires implementing policies and imposing discipline for violations. You can avoid discipline if you have employee cooperation. In short, ask for support by pointing out that:
- Your job includes supporting policies, and this is not optional;
- Their job includes following policies, and that is not optional;
- You’re all in the same boat and you’d prefer to work together.
Even if you’ve previously made the mistake of sharing frustrations, you can still ask for help. If needed, admit that following the rules is your job also, and you made a mistake by not supporting a policy. Acknowledge their objections to show that you value their opinions, but also explain that you need their cooperation to avoid confrontations that neither of you wants.
Training tip - Training blueprint: Safe behaviors
The following training blueprint can help you inform your workers on their safety responsibilities and why these are important. Use these to combat the many “reasons why not” to safety.
Complying with company safety rules is a major responsibility. The rules are put in place for your safety. And, just because you have done a job a thousand times without getting injured, it doesn’t mean the job is any less hazardous. You need to be alert and follow safe procedures EVERY time; it only takes one time to cause a severe injury. So, follow established safety rules. And, if you have questions about a rule, ask your supervisor for clarification.
Reporting injuries immediately is another major responsibility you have. If you hide injuries, you are jeopardizing safety in numerous ways.
First, you are not getting the medical treatment or diagnosis that you may need.
Second, you are not bringing to light a potentially unsafe situation that the company should address, which could lead to further injury to you or a coworker.
And, lastly, you are putting the company at risk of violating OSHA injury recordkeeping and reporting laws.
Just as you need to report injuries timely, you also need to report any hazardous situations that you see. It’s easy to assume that someone else will report it, or “it’s not my job!” but the fact is, someone else may not see it or report it, and it is YOUR job. It’s EVERYONE’S job to report hazards.
For example, a maintenance employee notices that a parts cleaner is not labeled. He knows what’s in the container, and figures it isn’t his job to report it to the safety department. Unfortunately, a newer employee working in the area was injured because he didn’t think the container was hazardous.
Another responsibility you have is to make safety suggestions. It is the people on the frontline — who know the job better than anyone else — who can make the best safety improvements. When you see something you think could be done differently or made better, bring it to your supervisor’s attention, or the safety department’s.
For example, if you’re talking to your coworker on a different shift or a friend at another company, maybe they tell you about something they do regarding a particular job that you could bring back to our job.
You also are responsible for being involved in safety activities. Whether it’s mandatory training, or voluntary participation on a safety committee, or attending a voluntary safety talk, make sure you get involved. The more you learn about safety and the more you are exposed to safety information, the better your safety mindset will be.
Another area where you can get involved in safety is participating in job observations or job safety analyses when you have the chance. It’s an excellent way to learn about safety. Compliment a coworker who’s working safely — “Hey Bobby, I see you’ve got that guard on the table saw. Good job!”
In fact, it is this type of observation that is the cornerstone of behavior-based safety.
Poor attitude is a symptom, not a cause of safety non-compliance
Safety professionals may have to deal with employees (or even supervisors) who have a negative attitude toward safety. You might have had discussions about a need for “attitude adjustments.” In many cases, attitude is a manifestation of a deeper issue, and the solution requires addressing those underlying reasons. Instead of thinking that you need to change attitudes, start thinking about changing the issues causing those attitudes.
Employees may have a number of reasons for negative attitudes. Maybe they don’t see the value of safety. Maybe they’re rebelling against authority. Maybe they think that safety procedures just slow things down. Maybe they gave in to peer pressure from a few negative workers. Until you address those underlying reasons, you won’t be able to change attitudes.
Your approach depends on the specific underlying reason, but a few approaches could cover a variety of issues. Possible approaches might include pointing out that:
- Safety procedures protect employees, and employees pay price for non-compliance, so ignoring safety literally hurts them most.
- Productivity is a priority, but productivity decreases if the line stops for an injured worker or when a worker has restrictions from an injury.
- Productivity drives profits, but the costs of injuries directly reduce profits.
Rather than focusing on the attitude, address the reasons that employees ignore safety. If you can change their perspectives, the attitude adjustment will follow.
Manager support
All levels of management must support safety. If a supervisor is lax about promoting safety, that attitude will filter down to workers. Worse, if upper management doesn’t address a supervisor’s refusal to actively promote safety, they implicitly approve the lax attitude.
To help gain support from upper management, consider pointing out that a supervisor’s refusal to enforce safety has no consequences — for the supervisor. However, employees face consequences when they get injured, and the company faces consequences in higher workers’ compensation rates, increased risk of OSHA inspections, decreased productivity, and decreased employee morale that can affect productivity and turnover.
Enforcing safety is part of every supervisor’s job, and refusing to perform that function should have consequences. When upper management delivers supervisor performance reviews, the review should reflect any failures to enforce safety. At the very least, supervisors should understand that they aren’t doing workers any favors by ignoring safety. Sooner or later, a serious injury will occur that might have been prevented if the supervisor had been more diligent.
Safety incentive programs
Many employers choose to complement their other motivational means with the use of safety incentives.
The pros and cons
There definitely are pros and cons when it comes to implementing a safety incentive program.
Arguments for safety incentives
- A study completed in 2001 showed that tangible incentives do increase work performance. It was also discovered that programs aimed at teams had a greater impact in terms of performance than did those aimed at individuals.
- In many cases, where incentive programs have been implemented, the result has been a lower incidence of injuries and lower costs to the company, fewer employee injuries, and less absenteeism.
- Incentive programs tend to enhance team building efforts, create a sense of unity, and help build stronger working relationships among employees.
- Incentive programs may also foster a better working relationship between management and the workforce.
- The possibility of earning a reward puts the emphasis on safety, causing employees to think about it, and may help make safer work practices become second nature.
Arguments against safety incentives
- Incentive programs can be costly in terms of time and money.
- If the program is competitive, it may create dissatisfaction among employees or teams who worked hard but were not the “winners.”
- Employees may experience a negative impact if incentives are discontinued. This could lead to a decline in efforts to maintain a safe workplace. During the length of the program, employees may come to have a sense of entitlement to a reward.
- Rewards may only motivate people to get the reward — not to work more safely.
- Everyone is innately motivated to work safely. No one wants to get injured. Outside motivators should not be necessary.
- Employees do not need to be compensated for something they are supposed to do as part of their job.
- Instead of incentives, the emphasis should be placed on greater education and training.
Approaches to incentive programs
There are two main approaches to safety incentive programs. The first approach bases incentives on a specific goal, most commonly the number of days without a lost-time accident, and rewards a group at various intervals during that time period. This is called a reactive approach.
The other approach emphasizes behavior-based actions. This program rewards employees for demonstrated acts of safe behavior, taking the reward off the goal, and putting it on the process instead. This is called a proactive approach.
The reactive approach
Safety incentive programs that are based on outcomes (such as reduced injuries) are easy to administer and are a popular choice. With these programs, injury statistics generally decrease, sometimes markedly.
Critics of this approach argue that statistics improve dramatically because employees are under-reporting or hiding injuries. No one wants to be the one to ruin the “zero lost-time” record and force the company or the department to start over. Individuals critical of this approach believe that it places too much emphasis on the goal, and not enough on the process.
The reactive approach may also result in unintended consequences. An injured employee could find himself subject to pressure from coworkers and even his spouse not to report the injury for fear of losing the “prize.” Some companies have experienced incidents of coworker intimidation and harassment related to hiding injuries. An atmosphere of fear and pressure is not what a safety incentive program is intended to evoke.
The proactive approach
A reward given on the basis of generally positive behavior — not tied to a specific goal, such as zero lost-time accidents — places the emphasis on safe behavior. This approach removes the direct link between the reward and the goal-oriented outcome so that injury-hiding is avoided. It emphasizes the process, not the goal.
Incentives based on rewards
Instead of incentives for achieving zero lost-time injuries, this type of program awards incentives on different criteria. In this model, prompt injury reporting is encouraged or required. Some programs even reward workers for reporting near-misses as well. This is designed to create a mindset in the employees for reporting everything that may impact safety.
Employees are rewarded for specific incidents of safe behavior and for taking a proactive approach by pointing out risky behavior to coworkers and bringing suggestions to management about how to make the workplace safer.
Points-based programs allow an employee or a team to earn a reward once a certain milestone is reached. Points may be awarded for safety meeting attendance, submitting suggestions on how to improve workplace safety, conducting safety audits, participating in safety training, serving on a safety committee, or wearing the required PPE consistently over a certain period of time.
Employees may be rewarded for coming up with ideas to save the company money, either through cost saving methods or process improvement. Switching to recycled copy paper and identifying ways to make product packaging more earth-friendly are some examples.
Incentives based on contests
Programs or contests that reward one lucky employee or only a few (such as in a raffle) may demoralize the rest who have worked hard to maintain safety but look like “losers” in the end (not to mention the poor morale if the winning employee is not necessarily known on the team as a safe employee!). When this is the case, an employee may feel like the odds are stacked against him and he may get discouraged if it is too difficult to obtain a reward for his effort. He may feel it is not worth it if the efforts made are never recognized.
It is a good idea to see that everyone who meets certain criteria or who participates receives something, even if it is something inexpensive like a t-shirt or coffee mug. It still recognizes each employee for his or her individual effort.
Did you know?
Monetary bonuses or rewards are generally taxable. Employers can either take the taxes out of workers’ checks, or the employer can “gross up” the amount of the award to cover the cost of the taxes. This could be a significant amount, depending on the amount of the collective awards. Even things that are not immediately thought of as “cash” incentives are taxable, such as gift certificates that convert to cash if the entire amount is not used.
It is advisable to consult with a tax professional on these types of issues.
Large vs. small rewards
Rewards can be large or small. An employer can choose to give out only small rewards — either by choice, or if the budget does not allow for large rewards. Or, an employer can choose to give out small rewards throughout the course of the year and one or more grand prizes at the end of the quarter or year. Presenting a large reward as an incentive may prompt employees to work more safely throughout the year. They are likely to keep the reward in mind.On the other hand, if rewards are large, employees may risk hiding an injury so as not to lose the reward; but if it is small, there is less incentive for an employee to hide an injury.Large rewards may send the wrong message. The emphasis is then placed on the reward itself, rather than trying to change the underlying attitudes and behaviors to be more safety-conscious.
Money vs. non-monetary rewards
Money given as a reward tends to end up in an employee’s bank account and be used to purchase groceries, fix a car, or be added to a savings program. Money is not always an exciting reward that every employee values. It may be received simply as additional income and treated as such. An employee who receives numerous awards in this manner could come to expect it as an entitlement. This mindset would make it more difficult to take away if the incentive program should change or end.
Non-monetary awards have an unknown value, so the value may be perceived to be greater than the actual cost of the item. Non-cash rewards have a “trophy” value placed on them. Ask employees what they did with the $50 they received six months before for a safety incentive reward, and they may not remember. But they can point to a plaque on the wall which serves as a reminder of their achievements — not only to them, but to others as well.
OSHA’s viewpoint on incentives
Safety incentive programs OSHA’s viewpointIn an October 2018 memorandum, OSHA says that incentive programs can be an important tool to promote workplace safety and health. While the agency scrutinizes programs that could lead to “injury hiding,” the Agency says most programs are acceptable.
Essentially, OSHA breaks incentive programs into two categories. The first category covers programs based on reporting near-misses or hazards, and that encourage employee involvement in safety and health. These are always permissible under OSHA regulations.
The second type of program are rate-based programs that focus on reducing the number of reported injuries and illnesses. This type of program typically rewards employees with a prize or bonus at the end of an injury-free month or evaluates managers based on their work unit’s lack of injuries. In the memorandum, OSHA says that rate-based incentive programs are also permissible under the Recordkeeping Rule’s anti-retaliation rule, as long as they are not implemented in a manner that discourages reporting. Thus, if an employer takes a negative action against an employee under a rate-based incentive program, such as withholding a prize or bonus because of a reported injury, OSHA would not cite the employer under the anti-retaliation provisions of the Recordkeeping rule as long as the employer has implemented adequate precautions to ensure that employees feel free to report an injury or illness.
But what are adequate precautions?
OSHA says that a statement that employees are encouraged to report and will not face retaliation for reporting may not, by itself, be adequate to ensure that employees actually feel free to report, particularly when the consequence for reporting will be a lost opportunity to receive a substantial reward. An employer could avoid any inadvertent deterrent effects of a rate-based incentive program by taking positive steps to create a workplace culture that emphasizes safety, not just rates. For example, any inadvertent deterrent effect of a rate-based incentive program on employee reporting would likely be counterbalanced if the employer also implements elements such as:
- An incentive program that rewards employees for identifying unsafe conditions in the workplace;
- A training program for all employees to reinforce reporting rights and responsibilities and emphasizes the employer’s non-retaliation policy;
- A mechanism for accurately evaluating employees’ willingness to report injuries and illnesses.
Giving positive feedback
Employers with safety incentive programs should use positive feedback as part of the program. The term “incentive” makes many people think of a bonus or reward, but an incentive is really anything that motivates people to take an action or follow a behavior, like always wearing personal protective equipment.
Although telling everyone “good job” does deliver positive feedback, it can grow old and begin to sound like a half-hearted effort. Also, positive feedback that is personalized will have a greater impact. One option is recognizing a positive attitude, like saying “I really appreciate your can-do attitude.” Another is recognizing someone who made a good decision, like thanking an employee for stopping work because something looked unsafe (even if the employee was wrong and there was no hazard).
Helping a coworker, finishing a difficult job, or taking on an extra task are great things to recognize, especially if the worker remained safety-conscious. Simply showing employees that they are trusted can be huge. Instead of saying “good job” the supervisor could say, “I knew I could count on you to get it done” or something similar. This feedback can be used for safety situations as well.
Watch for hidden messages
A statement like “Work as quickly and safely as possible” sounds neutral and seems like it should promote safety. But at some point, employees might think they have to choose between speed and safety. You’ve expressed two expectations, and employees might not see them as compatible. If they have to choose only one, which choice will they make?
Nearly any statement or instruction can communicate something unintended. For example, if a supervisor yells, “Get this truck loaded quickly!” that will communicate an expectation. The incentive is to keep the boss happy, and that might motivate employees to take shortcuts. Supervisors should consider the potential underlying messages of work instructions. It’s not just what they’re saying, but what the employees are hearing and what incentives are created.
Positive or negative
Incentives can be positive, like rewarding employees, or they can be negative, like disciplining them. Yelling at employees to work faster provides a negative incentive. Supervisors should consider how employees might respond. We don’t want employees thinking about gaining a reward or trying to avoid a punishment. We want them to make a safer choice.
Giving positive feedback provides a reward and creates an incentive to continue that behavior. Employers sometimes have to impose discipline, but positive reinforcement should be delivered far more frequently. Supervisors may need training on this, or at least given some ideas on how to deliver reinforcement with some example phrases to use other than “good job.”
To improve safety, focus more on ‘average’ workers
Every supervisor needs to focus on rewarding top performers and addressing the problems of bottom performers. Unfortunately, this can result in a failure to focus on anyone else. To get the most return on your safety efforts, increase your company’s focus on the “average” workers who make up the majority of the workforce.
A workforce often gets sorted into three groups:
- The top performers (10 to 15 percent),
- The bottom performers (10 percent or less), and
- The “average” workers (the remaining 70 to 80 percent).
The best workers have the highest output and probably the lowest injury rates; they likely get the most recognition. The bottom workers are least productive and may have a lax attitude toward safety; they are usually the focus of improvement efforts.
Since time and resources are limited, the middle group might not receive recognition or encouragement to improve — yet a small improvement among so many individuals can substantially increase your overall results.
The forgotten middle
Workers who don’t stand out as exceptional or troublesome may get taken for granted. The result can be that a majority of workers may feel overlooked, ignored, unappreciated, and unmotivated to improve.
Not everyone can be a top-performer, but most could be more involved in safety efforts. Consider the effects if that middle 80 percent increased productivity or safety by just a few points. Even a relatively small increase in their knowledge of safety and their ability to recognize hazards would add dozens of eyes and ears to your safety efforts. And unlike workers in bottom group, the “average” workers won’t push back against your efforts; they may even welcome the attention.
Ask supervisors to consider where they focus the majority of their attention. If the “average” employees haven’t been getting much attention, increase efforts to recognize their contributions and help them feel appreciated. This might include:
- Encouraging them to identify and report hazards,
- Recognizing their successes,
- Getting them involved in safety committees (or at least asking for feedback), and
- Showing appreciation for following safe work practices.
This will require finding time for the renewed focus, but the results will be worth the effort.
Workplace rules
The safety professional should spearhead the establishment and communication of sound, fair, and enforceable work rules. But, as noted in the Safety and Health Management chapter, it is usually best if supervisors enforce the rules.
The safety and health rules that you develop and make part of your overall workplace rules are an important component of your hazard prevention and control program. These rules play a major part in identifying acceptable and unacceptable behavior. For example, you may have rules outlawing horseplay or violent behavior on company property, or requiring your employees to wear personal protective equipment. Safety and health rules are most effective when they are written, posted, given to all affected employees, and discussed with them. Many employers emphasize the link between safety and health rules and the consequences of breaking them by reviewing the rules with their employees. They then ask the employees to sign a statement at the bottom of the list: “I have read the rules, I understand them, and I have received an explanation of the consequences of breaking them.”
Some employers ask their employees to help develop the workplace rules and then to help revise them as needed. When employees play a role in formulating the rules, they are more likely to understand and follow them.
Best practice
It is useful to make a list of the kinds of violations that are considered major or serious and a second list of other types of behavior that, while not as serious, are still not acceptable. The following suggested rules can be a starting point, but should be tailored and expanded based on your work operations and culture.
Major offenses:
- Failure to follow rules for use of company equipment or materials
- Horseplay in work areas or otherwise creating unsafe conditions
- Tampering with machine safeguards or removing machine tags or locks
- Not wearing required PPE
- Provoking or engaging in an act of violence against another person on company property
- Using or being under the influence of alcohol or illegal drugs on the job
- Major traffic violations while using a company vehicle
- Violations of lockout/tagout procedures
- Other major violations of company rules or policies
General offenses:
- Minor traffic violations while operating company vehicles
- Poor housekeeping habits
- Unauthorized use of company property
- Other violations of company policy and rules
- Failure to document properly
Link each type of offense to a structured procedure or corrective action. Your goal is to make sure that the corrective action is appropriate to the seriousness of the violation; that employees are given the opportunity to correct their own behavior; and that the system is workable, and consequently, used and useful.
Purpose of discipline
The goal of discipline is to address and correct misconduct and to modify unacceptable behavior. The goal is not to punish the employee. Discipline should usually be progressive, beginning with the minimum discipline necessary to correct the offense. In addition, consequences should be reasonably consistent with those imposed on other employees for similar offenses. Importantly, never discipline an employee simply for reporting an injury or being injured — doing so could lead to violations of OSHA’s injury and illness recordkeeping requirements or the OSH Act’s whistleblower laws.
The word “discipline” comes from a Latin word meaning “to teach.” It doesn’t mean “to punish.” Keeping this in mind may help in evaluating disciplinary measures.
It is important, however, to give managers some flexibility where discipline is concerned. Some situations will require a certain form of discipline, regardless of whether the first step of progressive discipline has been taken. In other words, a very serious offense — even if it is an employee’s first offense — may require more serious consequences than a verbal warning; the discipline should match the offense.
Caution
Beware post-incident drug testing
OSHA has said that post-incident drug testing can be problematic under the anti-retaliation provisions of the Injury and Illness Recordkeeping regulation, resulting in discouraging workers from reporting injuries, or penalizing them for being injured. However, in a 2018 memorandum OSHA said it can be permissible to perform drug testing to evaluate the root cause of a workplace incident that harmed or could have harmed employees. If the employer chooses to use drug testing to investigate the incident, the employer should test all employees whose conduct could have contributed to the incident, not just employees who reported injuries. In addition, OSHA says the following types of drug-testing programs are permissible:
- Random drug testing.
- Drug testing unrelated to the reporting of a work-related injury or illness.
- Drug testing under a state workers’ compensation law.
- Drug testing under other federal law, such as a U.S. Department of Transportation rule.
When to discipline
If faced with a situation where there is apparent employee misconduct, the first question to ask is whether any discipline is appropriate; that is, whether the misconduct is severe enough to warrant being addressed formally.
If discipline is appropriate, the next question to ask is, are there sufficient facts to justify the discipline. The key factors to consider include the following:
- Do the facts establish the employee did — or failed to do — the things claimed?
- Did the employee’s behavior violate an established rule, regulation, or requirement?
- Did the employee know — or should have known — of the rule, regulation, or requirement?
- Has the rule been enforced consistently?
Types of discipline
Most employers follow a policy of progressive disciplinary action. Repeated violations lead to increasingly severe corrective action, culminating in termination.
Consequences for misconduct can range from warnings (oral or written), to short suspensions (generally 14 calendar days or less), long suspensions (usually more than 14 calendar days), demotions, or termination.
Verbal or written warnings
Warnings are the most lenient form of progressive disciplinary action, in which the employee receives a verbal or written warning to stop the unacceptable behavior. The warning may list actions needed to be taken to correct the behavior and the consequences for repeated violations.
Document all verbal warnings and keep a copy for future reference. That document may be needed to clarify the exact date and the subject discussed if time passes before a second warning, or if a different manager takes over for the problem employee.
Suspension (with or without pay)
In some cases, it is in the company’s best interest to remove an employee from the workplace pending an investigation or as a corrective measure. When issuing a suspension, be sure to inform the employee of the reason for the suspension, the duration, the expected behavior following the suspension, and the consequences for repeated violations. Keep written documentation of all suspensions.
Referral to employee assistance program
An employee may be violating work rules because of personal problems. In some cases, the best form of disciplinary action is to refer the employee to an employee assistance program (EAP). It may be appropriate to use other forms of disciplinary action (warnings, suspensions, etc.) in conjunction with the referral.
Employers should maintain records of all referrals.
Transfer or reassignment
An employee’s behavior may improve through transfer or reassignment to a different work area. Other forms of disciplinary action may be used with the transfer.
Termination
The final step in progressive disciplinary action, or the result of a serious offense, is termination of employment, or discharge. It may be appropriate to terminate an employee for such things as theft, poor job performance, unexcused absences, harassment of others, violent threats or actions, or repeated unsafe behaviors.
Determining the consequence
Several factors come into play in determining an appropriate disciplinary action. Included among them are the basic concepts of corrective, progressive discipline. That is, penalties should be selected with the intent of applying the minimum discipline likely to be necessary to correct the offense. Second, fairness and consistency must be assessed.
Penalties should be reasonably consistent with the discipline administered in similar situations against employees with similar records. This means that employers should carefully weigh a number of things in determining how severe a disciplinary consequence should be, including:
- Nature and severity of the offense;
- Employee’s previous discipline record;
- Employee’s potential for improvement;
- Consequences imposed on other employees in similar situations; and
- Disciplinary guidelines or policy.
Verbal warnings and other informal discipline can usually be given without undue formality. For more serious discipline, formally notify (in writing) the employee of the discipline being proposed and the incident(s) or conduct upon which it is based.
Best practice
Tips for discipline
- Define who can administer discipline.
- Don’t look the other way. When discipline is first needed, administer it.
- When issuing verbal discipline, make it known to the employee that they are being disciplined.
- Ensure discipline is in-line with any collective bargaining agreements.
- Don’t discipline a legally-protected “whistleblower” or discipline an employee asserting a legal right.
- Document performance issues.
- Document feedback, counseling, and training.
- Use progressive discipline for most offenses.
- Be consistent.
| Source: Adapted from OSHA DRAFT publication, Managing Safety | |
| Verbal warning | First-time minor violation, e.g., not documenting equipment inspection No safety glasses (this could also be a written warning depending on the exposure) |
| Written Warning | Horseplay Unsafe work habits Violation of other safety or health rule or regulation |
| Suspension (8 hours without pay) | Three or more safety or health violations of the same type
General overall record of unsafe practices Refusal to follow safety and health guidelines or instructions Serious rule violation |
| Termination | Excessive and repeated safety and/or health violations
Purposely ignoring safety and/or health rules Unsafe actions that seriously jeopardize the safety or health of others General disregard for safety and health of self and others |
Consider all consequences when delivering safety reminders
When employees violate safety rules, they might need reminders or refresher training. For a first or second violation, make an effort to identify any barriers that could be addressed, such as uncomfortable PPE or ergonomic design problems. In some cases, however, you might find that an employee is deliberately ignoring the rules (violations continue even after a reminder) and discipline or even termination may be necessary.
Before delivering a reminder or reprimand about safety rules, consider two things:
First, consider the how to deliver the reminder. Your reaction could have either positive or negative consequences. There’s a significant difference between reminding employees to work safely so they don’t get injured, and simply yelling at them for breaking the rules. How you deliver the message will impact whether the employee recognizes the importance of (and reason for) a rule, or whether the employee feels resentful about the meeting. Delivering reminders (or disciplinary warnings) by highlighting the goal of injury prevention helps employees view safety as an objective. This affects whether they change habits to protect themselves, or whether they follow the rules so they don’t get fired.
Second, consider the consequences of your delivery on other employees, including those who consistently follow the rules. The employee given the reminder will likely talk to coworkers about the experience. When the story gets around, will other workers likely feel good that the company is genuinely concerned about keeping everyone safe? Or will they feel stressed about inadvertently breaking a rule and getting yelled at?
Related, what impact could that story have on their willingness to report problems in the future? Will it motivate them to continue following the rules? Or will they fear getting a similar reprimand in the future?
Actions have consequences
The consequences of delivering safety reminders extend beyond the individuals directly involved and create long-term impressions that influence the attitudes of many employees. When planning a potentially confrontational meeting like this, consider all the cascading consequences that could flow from that interaction. The impression you create could shape the perspectives of many employees.
Although delivering reminders can be uncomfortable, remembering that the goal is preventing injury may help reduce your anxiety. Prepare for these meetings by reminding yourself that the purpose is to protect all workers, not merely to assign blame or enforce rules. If discipline becomes necessary, it should be clear that the employee failed to improve after repeated opportunities, and that discipline was a final effort to protect the worker (and others) from injury.
OSHA viewpoint on discipline
OSHA recognizes that a disciplinary system for safety must be established. However, OSHA is increasingly concerned with any disciplinary programs that may penalize employers for exercising a legally protected right. OSHA inspectors will be scrutinizing such policies during inspections, in particular they will look at:
Discipline for injury no matter the circumstance
OSHA has received reports of employers who have a policy of taking disciplinary action against employees who are injured on the job, regardless of the circumstances surrounding the injury. Reporting an injury is always a protected activity. OSHA views discipline imposed under such a policy against an employee who reports an injury as a direct violation of the OSH Act’s whistleblower provisions. In other words, an employer’s policy to discipline all employees who are injured, regardless of fault, is not a legitimate nondiscriminatory reason that an employer may advance to justify adverse action against an employee who reports an injury. In addition, such a policy is inconsistent with the employer’s obligation to establish a way for employees to report injuries.
Discipline based on timing of report
OSHA is urging inspectors to scrutinize cases where an employee is disciplined for reporting an injury in violation of the employer’s rules for time/manner of reporting. For example, the work rules should not penalize workers who do not realize immediately that their injuries are serious enough to report, or even that they are injured at all. In investigating such cases, OSHA inspectors will look at factors such as the following:
- Whether the employee’s deviation from the procedure was minor or extensive,
- Whether the deviation was inadvertent or deliberate,
- Whether the employee had a reasonable basis for acting as he or she did,
- Whether the employer can show a substantial interest in the rule and its enforcement, and
- Whether the discipline imposed appears disproportionate to the asserted interest.
Again, where the employer’s reporting requirements are unreasonable, unduly burdensome, or enforced with unjustifiably harsh sanctions, they may result in inaccurate injury records. Safety rule violations
While OSHA encourages employers to maintain and enforce legitimate workplace safety rules, the Agency is concerned some employers may attempt to use a work rule as a pretext for discrimination against a worker who reports an injury. OSHA will look to see:
- Does the employer monitor for compliance with the work rule in the absence of an injury?
- Does the employer consistently impose equivalent discipline against employees who violate the work rule in the absence of an injury?
- Are the rules overly vague, e.g. “maintain situational awareness” or “work carefully”?
Can you fire someone who’s out for a work-related injury?
Many employers have wondered if they can fire an employee who is off work because of a work-related injury. The short answer is yes, but you’ll generally need to provide a legitimate reason for termination in order to avoid the appearance of retaliation. In many cases, you can even fire an employee for refusing a light duty offer.
Employees cannot be fired for reporting an injury or filing a workers’ compensation claim, but they can be fired for other valid reasons, even after reporting an injury or filing a claim. Most states allow you to fire an employee without giving a specific reason, but most employers won’t terminate someone without a reason.
However, laws that protect employees from discrimination or retaliation do not protect them termination, if you have a valid reason. For example, an employee cannot be fired because of race, gender, or national origin. However, any employee could still be fired for reasons like theft, workplace violence, or violating company policies.
For an employee who engaged in protected activity (such as filing a workers’ compensation claim), you’ll need to show that any employee would have been fired in that situation, and the protected activity was not a consideration.
Refusing light duty
If a doctor releases an injured employee to work with restrictions, and you offer work within those restrictions, you can expect the employee to show up for work. In many cases, refusal to report for light duty can be treated the same as a refusing to work any other shift; the employee can be fired or told that refusal is considered job abandonment.
If the employee is protected under the Family and Medical Leave Act (FMLA), however, then termination is not an option. The FMLA can apply to a workers’ compensation injury, and the FMLA gives the employee a right to leave until he or she can return to the former position (not merely to a light duty position).
Of course, if an employee refuses a light duty offer, the employer might lose wage replacement benefits under workers’ compensation. However, the employee is still entitled to take unpaid FMLA leave until he or she can return to the same or equivalent job, or until the 12 weeks of FMLA leave are exhausted.
Even employees protected by the FMLA could be fired for valid reasons, such as theft or violations of company policies. However, any termination of a protected employee should proceed with caution, and employers should consider consulting with an employment law attorney about the situation.
Employee participation
- Employees need to be involved in most every aspect of safety and health.
- Employees are more likely to support and use programs in which they have had input.
The second element of solid safety and health programs is having employee involvement. This is a thread that is in most every safety and health management program standard or specification. Employees need to be involved in most every aspect of safety and health. This means inspections, job hazard analyses, behavioral observations, etc. It means that management needs to communicate with employees, for example through bulletin boards, newsletters, and committees, and seek out workers’ input on changes or decisions that impact safety.
Line workers, for example, have a detailed knowledge of each operation and task at the workplace, and they have the most to gain from preventing or controlling exposure to hazards. And, just in general, workers are likely to go along with ideas and rules when they help develop and implement them. So, the more employees can get involved — and be given shared ownership — the better off the program will be.
Involving employees in a program that directly affects their safety and health is the right thing to do. It is also the smart thing to do. Here is why, according to the Occupational Safety and Health Administration (OSHA):
- Rank and file workers are the persons most in contact with potential safety and health hazards. They have a vested interest in effective protection programs.
- Experience has shown that line workers and other rank and file employees make highly valuable problem solvers.
- Group decisions have the advantage of the group’s wider field of experience.
- Employees are more likely to support and use programs in which they have had input.
- Employees who are encouraged to offer their ideas and whose contributions are taken seriously are more satisfied and productive on the job.
Fundamentals of employee participation
- Employees have an interest in working with their employers to improve safety and health.
Employees have an obvious interest in working with their employers to improve safety and health at their own establishments, since their very lives and livelihoods are at stake. Moreover, workers possess a keen awareness of the many hazards to which they are exposed during their operations. Many workplaces have tapped into this important resource and have achieved successful results with innovative approaches that involve safety and health programs and cooperative efforts between management and labor.
In an effective safety and health program, all workers:
- Are encouraged to participate in the program and feel comfortable providing input and reporting safety or health concerns;
- Have access to information they need to participate effectively in the program;
- Have opportunities to participate in all phases of program design and implementation; and
- Do not experience retaliation when they raise safety and health concerns; report injuries, illnesses, and hazards; participate in the program; or exercise safety and health rights.
What can employees do to be involved?
- Employees can do various actions to be involved in safety and health programs.
Examples of employee participation include:
- Developing the safety and health program and setting goals.
- Participating on joint labor-management committees and other advisory or specific purpose committees.
- Conducting site inspections.
- Analyzing routine hazards in each step of a job or process and preparing safe work practices or controls to eliminate or reduce exposure.
- Developing and revising the site safety and health rules and procedures.
- Training both current and newly hired employees.
- Developing, implementing, and evaluating training programs.
- Providing presentations at safety and health meetings.
- Conducting incident investigations.
- Participating in close call or near miss investigations.
- Reporting hazards.
- Fixing hazards within their control.
- Supporting fellow workers by providing feedback on risks and assisting them in eliminating hazards.
- Performing a pre-use or change analysis for new equipment or processes in order to identify hazards up front before use.
- Evaluating program performance and identifying ways to improve it.
- Taking part in exposure monitoring and medical surveillance related to health hazards.
- Sharing a photo (e.g., of a grandchild) and short caption (e.g., "I want to see my grandchildren grow up") that depicts why it's important for them to come home safely from work each day.
- Fill out a word bubble describing why safety and health matters to them and post it in a visible place.
Jump-starting safety
Safety professionals need to keep programs fresh, and safety at the top of employees’ minds. It can be a challenge, though. This section is all about providing fresh ideas to kick-start your safety effort. Some will be smaller activities to raise interest, some will be larger projects to make significant change.
Activities
Following are some activities that can assist you in your safety efforts.
Start a safety bulletin board
Safety bulletin boards can be great ways to showcase your safety efforts and to increase awareness of important safety issues. Here are some ideas for items to feature on a bulletin board:
- Injury rates, days without lost time, etc.
- Workers’ comp statistics
- List of safety committee members
- List of emergency responders
- Emergency information
- Training sign-up sheets
- New Safety Data Sheet updates
- Safety committee meeting minutes
- Cost of safety (Indirect and direct accident costs)
- Risk matrix
- Safety slogans
- Contests/winning entries
- “Caught in the act” (of working safely) (Can also ask employees to bring photos from home of something safety related they did, such as wearing PPE while mowing)
- Pamphlets/handouts (on pertinent safety topics)
- Small mirror with “We are all responsible for safety!” above it
- Cartoons
- Safety suggestion box/forms
- Stretching/exercise illustrations
- Seasonal safety information (e.g., summer = boating safety)
Use your smart phone for safety
With most smart phones these days coming equipped with digital cameras and computing capabilities, it’s a natural fit for safety professionals to utilize the devices on the job. There are countless uses for smart phones when it comes to safety, including:
- Photographing accident scenes;
- Documenting deficiencies during incidents/walkthroughs;
- Calculations/conversions;
- Noise-level measurement;
- Showing safety videos (if your phone has an output feature to a television or projector); and
- Accessing reference materials, to name a few.
Most smart phones will allow you to fairly easily upload your data and pictures to your computer or else access them through the “cloud,” making audit/inspection/investigation reports much easier to manipulate. There are also several apps (applications) pre-made to help you with various safety activities, including:
- NIOSH Ladder Safety app — The National Institute for Occupational Safety and Health (NIOSH) recently announced the availability of a new Ladder Safety smart phone app. This new app uses visual and audio signals to make it easier for workers using extension ladders to check the angle the ladder is positioned at, as well as access useful tips for using extension ladders safely. The app is available for free download for both iPhone and Android devices. The new smart phone app provides three methods for proper ladder setup:
- Measuring Tool — Actually uses the phone’s positioning capabilities to guide the user through beeps.
- Body Method — Provides instructions based on where the palms/shoulders should be relative to the ladder.
- 4:1 ratio — Provides instructions for using the 4:1 ratio of ladder setup. To learn more and download the Ladder Safety app visit www.cdc.gov/niosh/topics/falls/.
- Safe Lifting app from Oregon OSHA — If you’ve ever wondered “how much is too much” for a worker to lift, you’re not alone. Many supervisors and safety professionals have this same question. Given the frequency of lifting in workplace settings, it is surprising to many that OSHA does not set maximum weight limits or provide much guidance on what is a safe lift. To further complicate matters, many of the tools that have been available, such as the NIOSH Lifting Equation, can be complex. There is, however, a new tool developed by Oregon OSHA that allows users to quickly determine how much can be safely lifted. The tool walks users through an illustrated and interactive
3-step process:
- First, users select the beginning position of the lift;
- Next, users pick the lifts per minute and hours of lifting per day; and
- Finally, the results show the lifting weight limit (with an additional limit for more than 45 degrees of twisting during lifting.) To access the tool, visit https://osha.oregon.gov/OSHAPubs/apps/liftcalc/lift-calculator.html
- OSHA Heat Stress app — The app allows workers and supervisors to calculate the heat index for their worksite, and, based on the heat index, displays a risk level to outdoor workers. Then, with a simple “click,” you can get reminders about the protective measures that should be taken at that risk level to protect workers from heat-related illness — reminders about drinking enough fluids, scheduling rest breaks, planning for and knowing what to do in an emergency, adjusting work operations, gradually building up the workload for new workers, training on heat illness signs and symptoms, and monitoring each other for signs and symptoms of heat-related illness. To download the app, visit www.osha.gov/heat/heat-app.
Uncover your safety culture
As a safety professional, you may have a solid understanding of how your workers feel about the company’s safety program. But, are you certain?
If you really want to find out what people think, meet with workers (usually best if done by department) for a lively discussion on the safety culture. Consider some of these topics:
- Who is responsible for your safety: you, your coworkers, or your employer?
- What has top priority: safety, production, or quality?
- How should hazards be reported and corrected? How should suggestions for safety improvements be handled?
- What is the purpose for accident investigations: to find blame or to prevent recurrence?
- Who should enforce safety rules?
- Is safety training conducted to improve safety or to meet regulatory requirements?
- Should safety performance be included in performance reviews?
- Who should have the final word on safety: management, the safety department, the safety committee, or the employee?
The objectives are to share opinions, establish the current status of the safety program, and identify potential directions for future safety efforts. One goal is to explain why policies are set up the way they are. Policies and procedures are easier to accept when they’re fully understood.
Make it clear that the exercise is just a discussion and that there’s no guarantee that any policies will be changed. But, agree to tell management about any strong concerns that come up. You might get feedback for improving or adding safety programs. Employees may mention training needs, they may give you ideas for how to better recognize safety efforts, or they may identify previously unreported hazards.
Start a program of measuring leading indicators of safety
Measuring safety is always a challenge. Typically, companies look at lagging indicators, such as injury rates. There is a recent push to shift to leading indicators, which refer to ways to measure safety performance prior to or independent of an accident or injury actually occurring; for example, how many safety inspections have been conducted, how many training sessions have been held, or how many employees attended safety meetings. The theory is that if you only look at the incident rate (lagging indicator), you might see that your company has 0 injuries over a given period of time. But, does that mean there were no unsafe behaviors? Does that mean the company was committed to safety? It might. But, it could also just be luck. So, the lagging indicators don’t show you the complete picture.
But, where do you start? Following is a listing of leading indicators that some employers are using:
- Percent of departments conducting self-inspections
- Number of safety committee meetings/percent attendance
- Number of safety presentations
- Supervisor training sessions
- Time from hire to orientation/safety training
- Percent of company goals/objectives that incorporate safety
- Percent of purchasing contracts that include safety stipulations
- Number of behavior-based observations/percent employee participation
- Number of safety suggestions/percent employees
- Number of safety committee projects/successes
- Number of emergency drills/participation
- Audit findings/corrective action time
- Average time to act on safety suggestions
- Percent training on-time
Start a “caught in the act” or “caught working safely” program
When employees work safely, acknowledging it — and/or rewarding it — can reinforce the behavior. Many employers utilize “caught in the act” or “caught working safely” programs where supervisors or safety professionals stop/approach a worker who is exhibiting a safe behavior and issue them a card. The cards can simply be an acknowledgment of the act, or they can be coupons for local restaurants, etc., or worth points that ultimately end up in a raffle, or that can be accumulated and spent (there are several commercial programs of this nature) or turned into vacation time. In addition, some employers have success photographing workers working safely and posting them on a bulletin board, to further drive home the message. A few tips to keep in mind:
- Make the behaviors meaningful, not simply catching someone wearing required PPE. The behaviors should be those things that are above-and-beyond (that show a safety attitude) or that are problem areas that you are targeting (such as safe lifting or team lifting).
- Don’t be stingy with the cards; be on the lookout so all employees have an opportunity to be “caught.”
- It doesn’t have to come from the safety manager. Supervisors can play a great role in handing out the cards.
- Get permission before posting photos on a bulletin board. Some employees may be uncomfortable with the recognition.
Participate in national safety observances
There are many safety observances that can be great opportunities to get your employees involved in safety, as well as helping your company show commitment to safety. These include:
- North American Occupational Safety and Health Week (NAOSH) — Held in May each year; see https://nationaltoday.com/north-american-occupational-safety-and-health-week/.
- Workers’ Memorial Day — April 28 each year. Workers’ Memorial Day is observed every year on April 28. It is a day to honor those workers who have died on the job, to acknowledge the grievous suffering experienced by families and communities, and to recommit ourselves to the fight for safe and healthful workplaces for all workers. It is also the day OSHA was established in 1971.
- Workplace Eye Wellness Month — March each year. For more information, visit www.preventblindness.org.
- Drive Safely to Work Week — In early October each year. For more information, visit www.trafficsafety.org.
Following is a calendar (for quarters 1, 2, and 4 only) to help you track some of the more popular safety-related observances. Often, the sponsoring organization will provide handouts, posters, presentations, and talking points several weeks in advance; visit their website for additional details. These observances can tie in nicely with safety bulletin board set-up:
- January
- National Radon Action Month - www.epa.gov/radon/national-radon-action-month-information
- National Drug and Alcohol Facts Week - teens.drugabuse.gov/national-drug-facts-week
- February
- American Heart Month - www.cdc.gov/heartdisease/american_heart_month.htm/
- National Burn Awareness Week - https://ameriburn.org
- March
- National Nutrition Month® - www.eatright.org/NNM/
- National Sleep Awareness Week® - www.sleepfoundation.org
- National Poison Prevention Week - poisonhelp.hrsa.gov/
- Flood Safety Awareness Week - www.weather.gov/safety/flood
- April
- National Work Zone Awareness Week - www.ops.fhwa.dot.gov/wz/outreach/wz_awareness.htm
- Alcohol Awareness Month - https://recovered.org
- National Facial Protection Month - www.ada.org
- Air Quality Awareness Week - www.airnow.gov/aqaw/
- May
- Healthy Vision Month - www.nei.nih.gov/hvm/
- National Physical Fitness and Sports Month - https://odphp.health.gov/news/202505/help-make-america-healthy-again-during-national-physical-fitness-and-sports-month
- UV Safety Month - www.preventblindness.org
- North American Occupational Safety and Health Week - www.naosh.ca/
- National Hurricane Preparedness Week - www.nhc.noaa.gov/prepare/
- National Safety Stand-Down to Prevent Falls in Construction - www.osha.gov/StopFallsStandDown/
- Motorcycle Safety Awareness Month - www.nhtsa.gov/road-safety/motorcycles
- June
- National Safety Month - www.nsc.org
- National Lightning Safety Awareness Week - www.weather.gov/safety/lightning
- National Forklift Safety Day - www.indtrk.org/national-forklift-safety-day
- October
- Home Eye Safety Month - www.preventblindness.org
- Drive Safely Work Week - trafficsafety.org/dsww-site/safe-driving-is-serious-business/
- Respiratory Care Week - www.aarc.org/resources/programs-projects/respiratory-care-week/
- National Lead Poisoning Prevention Week - www.epa.gov/lead/national-lead-poisoning-prevention-week
- November
- Drowsy Driving Prevention Week - www.thensf.org/drowsy-driving-prevention/
- Great American Smokeout - www.cancer.org
- December
- Safe Toys and Gifts Month - www.preventblindness.org
- National Handwashing Awareness Week - www.henrythehand.com
Hold a safety fair
Safety fairs can be a great way to get employees across the company involved and excited about safety. Often held in conjunction with wellness fairs, these events give employees a chance to participate both in presenting/exhibiting and also as fair-goers. Here are some tips for hold a fair:
- Start early on with planning. You’ll want to allow at least six months, ideally a year. If possible, start a planning committee made up of department heads to get their buy-in.
- Have a few contests (e.g., slogan, poster) prior to the fair, so you can use the fair to announce/recognize the winners.
- Allow each department/team to come up with their ideas for the fair. Encourage them to make it safety related relative to what their department does.
- Bring in outside help. Medical professionals for blood pressure checks, flu shots, etc. Police for “drunk glasses” and self-defense demonstrations. Fire departments for home safety tips.
- Focus on wellness: blood pressure stations, scales, vision checks, etc., are all fairly easy to set-up.
- Give safety-related prizes for contests/games; for example, flashlights, vehicle emergency kits, fire extinguishers, smoke detectors, premium safety glasses, etc.
Start/revise your incentive programs
If you have been looking to start an incentive program related to safety, or if your current incentive program is heavily tied to the occurrence of injuries/illness, the following are some tips and ideas to consider.
- Focus on proactive measures NOT injury rates. OSHA looks unfavorably on incentive programs that could lead employees to hide injuries in an attempt to retain the incentive. OSHA prefers incentive programs that focus on employee involvement in safety activities, such as participation in a safety committee, attending safety training, or conducting inspections.
- Decide what you want to accomplish. Whether it be general awareness or focus a specific issue, it’s better to have a focus on mind rather than just starting a program just for the sake of starting one.
- Recognize all employees who meet the criteria. Random drawings can lead to bad feelings, particularly if an employee who generally isn’t regarded as caring much about safety wins the drawing. Also, when it comes to supervisor recognition (such as for “on the spot” recognition), make sure all employees who perform safely get recognized.
- Consider individual rewards before group rewards. Individual awards allow employees to control their own destiny so to speak. Group awards often result in either a few employees ruining it for the rest, or a few employees riding the coattails of the other employees and getting the goals.
- Stagger your rewards. It doesn’t have to be all or nothing. If an employee partly completes the objective (e.g., participates in 25 safety observations versus 30), give some reward.
- Remember being safe IS already expected. So, make your rewards focused on those who earn a reward by going above and beyond.
- Beware of the IRS! Incentive programs are likely considered taxable — particularly if you are dealing with monetary rewards, high-value personal property, or awards to a large percentage of employees. Consult with your payroll staff or tax professional. Also, consider reviewing the IRS publications 15-A, 15-B and Publication 525 (www.irs.gov).
What’s the prize?
When it comes to safety incentives, many employers choose to provide prizes. For reasons mentioned above, employers need to be very careful about this, as it can lead to under-reporting of injuries. However, there are many other options available to reward employees:
- Accumulate money and donate to the local fire/emergency responders (or charities).
- Give away safety-related items, such as fire extinguishers, car safety kits, etc.
- Purchase something for the entire department or company (such as new TVs in the break room). These “reminders” will be around much longer than a few dollars for each employee that will be spent quickly.
Get supervisors onboard with safety: Through their Bonuses
There are many reasons line supervisors need to be involved in safety. In many ways they are the ones who can most directly influence an employees’ safe behavior. But, how do you do that? It can be challenging.
One popular approach is to tie safety into supervisors’ bonuses — for example, the year end bonus. Safety should not be the sole criteria for bonuses, but it should be an equal part. (As noted above, anytime safety and incentives and bonuses are tied together it’s a tricky subject. It may be a little more tricky for employees than for supervisors, but still you want to make certain that the bonus/incentive program is actually promoting safety and not hiding injuries.)
One company had success with an approach of utilizing five criteria for forming the supervisors’ year-end bonus. Two of five criteria were safety-related activities (one was the injury rate and the other one was different each year, but was a proactive, forward looking, positive objective that everyone could understand and affect, like “do X number of Job Safety Analyses (JSA) for the year” or do “X number of Safety Notifications.”).
This was very effective at getting supervisor’s attention, as you can find supervisors in any organization that are motivated by money. The company utilized a graded scale — so a target may have been to get 200 JSA’s done for the year, and if the supervisor got 50 done, they would get a percentage of the goal.
The second part of that criteria — the job safety analysis criteria that supervisors were graded on — is key. It’s a positive influence. It is recommended that employers have at least one of these in any sort of bonus program. If an organization only has the injury rate — which really is shaped by negative influence s — it is setting itself up for troubles. For starters, there will be the temptation to hide injuries. But beyond that, with the injury rate, if the employer experiences an injury on January 1 of the year, in some systems the goal is already lost. To have supervisors accept failure early in the year, they can actually become a negative influence on safety. So in addition to not doing anything to promote safety, these types of things can actually negatively affect safety. So employers must be careful and add positive bonus criteria that have an equal weight as criteria such as injury rates.
Departmental “charge-backs”
On the opposite end of the spectrum, some companies utilize negative incentives. For instance, they charge-back costs of accidents to the department. This can be tricky to do — and do fairly — but some companies have figured out ways to do it. Basically, the employers “charge” the department when accidents take place, which in turn directly impacts that department’s budget. The theory is that if you can make any sort of connection between accidents and profits, the department will quickly become more interested in preventing accidents. And, when accidents do happen, they’ll be quick to try to figure out WHY. And, this doesn’t have to be charging them for the actual costs of the accident, but could be some sort of pre-determined charge. Also, by charging the department, you aren’t singling out a supervisor.
Start your library of industry standards
Industry standards, such as ANSI standards, can be invaluable to safety professionals. Unfortunately, most require purchase (though some are relatively inexpensive). However, there are a few — even some very useful ones — that are free to download and/or view online. Look for free-to-view ANSI standards at https://ibr.ansi.org/.
NFPA® standards
You may think of NFPA standards as being related to fire safety only. But the fact is, many provide insight into many issues in your workplace, including emergency stops for machinery (NFPA 79), and storage height for empty pallets (NFPA 13). The NFPA makes their standards available to view for free online (no printing/copying/downloading, however). For more information, visit www.nfpa.org.
ITSDF standards
The Industrial Truck Standards Development Foundation (ITSDF) is the secretariat for many industry standards related to powered industrial trucks, such as forklifts. They make many of their standards available for free download. For more information, visit www.itsdf.org.
Local OSHA Area Offices
Your local or regional OSHA office will also likely have copies of many industry standards. They probably will not let you take the materials offsite, but should allow you to view them — you can then determine if the standard would be a benefit to you before purchasing.
Find hidden hazards
Workers may be regularly exposed to, and accept as normal, certain situations as part of doing their routine jobs. No one really recognizes the situations as hazardous because they’ve become so ingrained in the normal procedures that everyone anticipates and puts up with them. For example:
- “When the machine cycles into the pressure release, it gets real loud for a little while;”
- “Sometimes you have to pick defects out of the product — you’ll probably get a few blisters, but you can’t work the tool if you’re wearing gloves;”
- “A lot of dust kicks up when we start filling a new bin;” or
- “The floor gets kind of slippery after the sprayer’s been running awhile.”
An internal safety inspection may acknowledge the situations as normal operating procedures and move on without a second thought. After all, the procedures are likely to be intermittent and of short duration; and “we’ve always done it this way.” It isn’t easy to identify something as hazardous when it’s an obvious part of the daily routine. The inspectors don’t want to be nit-picky, either; they’re out there to find the real problems — the ones that cropped up since the last inspection.
When a normal occurrence is identified as hazardous, it’s easy to think it presents a low risk of serious injury.
However, the hazards may actually present more risk than everyone realizes. Exposures may have cumulative effects.
How do you identify them? A job safety analysis process would help. Other resources could include injury and first aid reports, employee interviews (especially with employees newly assigned to a job), and even worker complaints.
Once identified, the hard work of finding ways to eliminate or control the hazards begins. There isn’t always an obvious quick fix for these problems. Since these hazards likely result from long-established procedures, you’ll have to change attitudes along with equipment, materials, and procedures. Brainstorm with everyone involved to come up with the best solutions. After you get some of the hazards under control, the rest of them should be easier to address; and you’ll find it easier to identify the hazards hiding in the obvious.
Occasionally ask workers about these types of issues and be on the lookout for machines that are constantly being re-started due to jams, etc. Better to intervene now than to risk an actual injury/illness down the road.
Give your supervisors safety tools — without breaking the bank!
It’s no surprise that supervisors play a key role in keeping workplaces safe. They are the ones who know the work best, know the workers best, and are in the best position to ensure employees follow company safety policies and procedures. Naturally, supervisors need safety training — not just on safety-related topics, but also on how to effectively supervise and lead. Holding regular supervisor meetings can be a great way to get them involved. But, you don’t have to stop with just holding the meeting — if you give the supervisors a “take away” tool, it can really reinforce your training and serve as a call to action.
The good thing?
The tools do not have to be expensive to be effective. Consider the following take-away tools for your supervisors.
Inexpensive safety “tools”
- Machine guard opening/distance-to-point-of-operation measuring tool/stick (these are available from many machine safeguarding suppliers/consultants)
- Electrical — GFCI tester, tic tracer
- Inspection checklist packet
- Wallet cards — GHS pictograms, ladder setup, emergency numbers, forklift operator safe behaviors, etc.
- Flashlight, smoke detector for home use
Review your PPE hazard assessment
If your facility has never conducted a baseline hazard assessment on the need for personal protective equipment (PPE) in your workplace, then certainly that should be a priority. But, even if there has been an assessment, if it has been many years since it was done, it may be a good idea to reassess to make sure changes in jobs or processes haven’t created new hazards for which PPE may be needed, OR to see if hazards have been eliminated over the years that would make PPE unnecessary for certain tasks.
How to do a PPE hazard assessment?
A baseline survey is a thorough evaluation of your entire workplace — including work processes, tasks, and equipment — that identifies safety and health hazards. A complete survey will tell you what the hazards are, where they are, and how severe a potential injury could be. Oregon OSHA provides the following suggestions for conducting your PPE hazard assessment:
- Use a safety data sheet (SDS) to identify chemical hazards. An SDS has detailed information about a hazardous chemical’s health effects, its physical and chemical characteristics, and safe handling practices.
- Review equipment owner and operator manuals to determine the manufacturer’s safety warnings and recommended PPE.
- Do a job-hazard analysis. A job-hazard analysis (JHA) is a method of identifying, assessing, and controlling hazards associated with specific jobs. A JHA breaks a job down into tasks. You evaluate each task to determine if there is a safer way to do it. A job-hazard analysis works well for jobs with difficult-to-control hazards and jobs with histories of accidents or near misses. JHAs for complex jobs can take a considerable amount of time and expertise to develop. You may want to have a safety professional help you.
- Have an experienced safety professional survey your workplace with you.
It is also a good idea to involve your employees, particularly for hazards they may be aware of, such as atypical jobs, that you might not catch on a regular walkthrough. In addition, employees can provide great input on how the PPE they are currently using works with the various tasks, as well as comfort. The PPE review should not only focus on whether PPE has been identified for a hazard/task, but also whether the current PPE is the correct PPE for the hazard and the best choice for the job.
PPE policies are often handed down from safety professional to safety professional, with the original baseline having been done decades ago. If that may be the case in your facility, it might be wise to conduct a comprehensive reassessment.
Caution — When hazard assessments are not done
The following provided courtesy of Oregon OSHA:
A worker died from complications resulting from severe burns on his face and hands when he tried to remove the bottom of a 55-gallon drum, which contained traces of motor oil, with a plasma cutter. The drum exploded. He shouldn’t have been using a plasma cutter on an oil drum until it had been cleaned and decommissioned; however, he might have survived with less severe burns if he had been using a face shield and appropriate protective gloves. He was wearing gloves, but they were made with fabric that melted on his hands from the heat of the explosion. His employer had not done a PPE hazard assessment.
In this example, the worker was using a plasma cutter without a face shield and synthetic gloves to cut open a 55-gallon metal drum that had not first been properly cleaned or decommissioned. An effective PPE hazard assessment would produce the following information for the task of using a plasma cutter:
- Task: Using a plasma cutter.
- Hazards: The plasma-cutting arc produces hot metal and sparks, especially during the initial piercing of the metal. It also heats the work piece and the cutting torch. Never cut closed or pressurized containers such as tanks or drums, which could explode. Do not cut containers that may have held combustibles or toxic or reactive materials unless they have been cleaned, tested, and declared safe by a qualified person.
- Likelihood of injury without PPE: High
- Severity of a potential injury: Life-threatening burns
- PPE necessary for the task:
- Body: Dry, clean clothing made from tightly woven material such as leather, wool, or heavy denim
- Eyes and face: Safety glasses with side shield or face shield
- Feet: High-top leather shoes or boots
- Hands: Flame-resistant gloves
Start a hazard mapping process
Note: The following is adapted, with permission, from: Systems of Safety and Hazard Communication, First Edition – Written and Produced by The Rutgers Occupational Training and Education Consortium (OTEC) and New Labor (For the University of Medicine & Dentistry of New Jersey (UMDNJ), School of Public Health, Office of Public Health Practice).
A Hazard Map is a visual representation of the workplace that identifies where there are hazards that could cause injuries. For example, a hazard map might look at the following:
- Physical hazards
- Frequency of exposures
- Levels of exposures
- A specific chemical
- Specific workers or job classifications most likely to be exposed
Hazard maps and worker experiences
Hazard mapping draws on what workers know from on-the-job experience. The hazard mapping approach works best when conducted by a small group of workers from the same department or work area.
Why hazard map?
Hazard mapping can help you identify occupational safety and health hazards. If your workplace has other ways or approaches for identifying hazards, they can be included in your hazard map.
The point of hazard mapping is to gather the knowledge about hazards from co-workers so you can work together to eliminate and/or reduce the risks of accidents and injuries.Hazard mapping respects the vast array of skill, experience and knowledge that workers have about their jobs.
Hazard mapping requires working together to identify, prioritize and solve problems.
One of the main components of hazard mapping is the system of codes/colors to be used when designating the identified hazards on the illustrated layout/representation of the area or facility. Following is a sample “hazard code key.” Note that the key is typically color-coded. In the print version of this manual, descriptors are shown alongside the circles indicating the color represented.
Hazard mapping labels
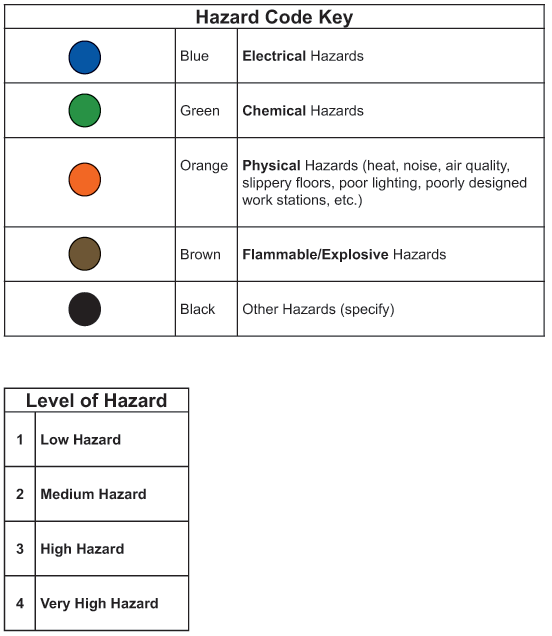
Examples of hazard mapping labels
Earlier in this section, a hazard code, as well as a "level of hazard" key was shown. Following is the combination of the two elements, which reveals how the hazard mapping process comes together. The numbers merge with the colored circles to have a specific meaning, e.g. "Electrical — Medium hazard" because of a blue circle (electrical) with a rating of "2" (Medium hazard).
Later in this section a sample layout using the code is applied to a home setting, which most are familiar with — it provides an easy way to illustrate the hazard mapping process.
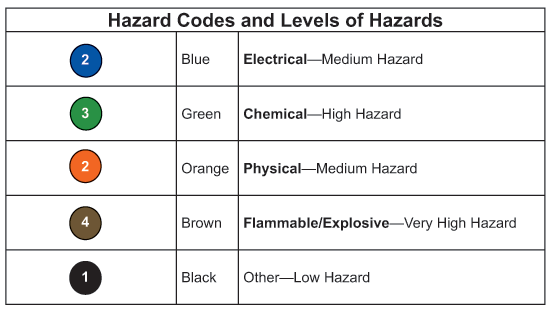
Identifying areas of concern
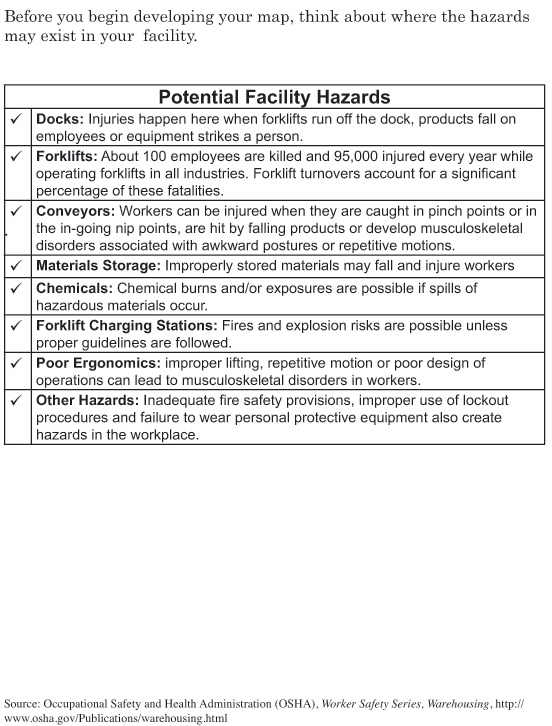
Example of home hazard map
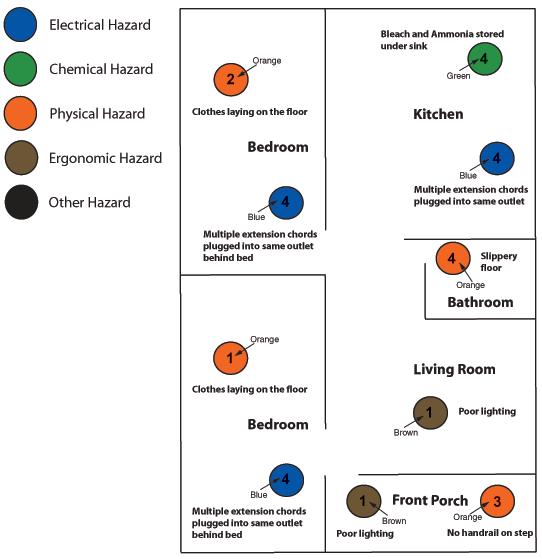
Summary
- A Hazard Map is a visual representation of the workplace where there are hazards that could cause injuries.
- Hazard mapping can help you identify occupational safety and health hazards.
- The point of hazard mapping is to gather the knowledge about hazards from your co-workers so you can work together to eliminate and/or reduce the risks of accidents and injuries.
Start a forklift behavioral observation program
Forklifts are prevalent in most operations. And, while OSHA requires a three-year evaluation, and general supervision in between, it can be beneficial to have supervisors conduct more formal frequent checks, and importantly reward operators for exhibiting the desired behaviors. The first step is to develop a list of critical behaviors that you want your operators to perform. Then work with your operators to ensure the behaviors are appropriate, and have them sign off that they will abide by them. Example behaviors include:
- Slows down and sounds horn at intersections,
- Looks in the direction of travel,
- Wears seat-belt (if equipped),
- Keeps hands inside the truck,
- Drives a safe speed,
- Stays in designated aisles,
- Makes smooth and deliberate movements, and
- Other behaviors that are appropriate for your organization (you might consider reviewing injury/incident records for appropriate root causes).
Each quarter have supervisors conduct unannounced observations of operators. When they notice the behaviors, supervisors should give the operator a small reward or recognition. Rewards can be given for individual behaviors, or when the operators has demonstrated all the desired behaviors or a set number.
Ensure temporary worker safety
Temporary staffing agencies and host employers share control over the employee, and are therefore jointly responsible for temp employees’ safety and health. It is essential that both employers comply with all relevant OSHA requirements. Host employers should:
- Work with a reputable staffing agency. Ask to see their safety programs.
- Arrange for a site visit with the temporary agency, so they can learn your operations, hazards, and need for work.
- When feasible, exchange and review injury and illness prevention programs with the staffing agency.
- Define the scope of the work in the contract with the staffing agency.
- Assign responsibility for various aspects of compliance and safety. In some cases, the staffing agency will be in best position to provide the training or compliance, in others, it will be the host employer.
- Make sure your job descriptions and expectations of roles are clearly written out and explained to temp worker candidates.
- Only allow temporary workers to perform work within the scope of the contract.
- Request and review the safety training and any certification records of the temporary workers who will be assigned to the job.
- Keep injury and illness records, if supervising the temporary worker’s work.
- Provide — either separately or jointly with the staffing agency — safety and health orientations for all temporary workers on new projects or newly-placed on existing projects.
- Provide temporary workers with safety training that is identical or equivalent to that provided to the host employers’ own employees performing the same or similar work.
- Train temporary employees on emergency procedures including exit routes.
Use your safety policy as a working part of your program
Most employers have a company safety policy outlining the organization’s philosophy on and commitment to safety. And, most companies inform employees of that policy at the time of hire or when the policy is implemented/changed. Sadly, for most companies, that’s where the policy ends. But, it doesn’t have to — a company safety policy can be a working and active part of your safety program.
For example, some companies have found it beneficial to print the company safety policy on a wall-sized banner that covers a wall in the shop floor. All employees sign the policy banner. Then, when a worker commits a safety violation (i.e., a violation of a well-communicated safety rule, or displays a general disinterest in safety), the company management takes the employee to the wall and points to the signature that the worker understands the policy and will work to uphold it.
The safety policy can also work as a recruitment tool or an aid in contracting — if it is displayed on the company’s external website. Most employers display their policy on the intranet, but not all display it for the larger community to see. With OSHA’s recent push to make negative information available via OSHA.gov, employers can be proactive in putting out positive safety information about their company.
Show upper management commitment to safety
What’s the best way to show upper management commitment to safety? Give them a voice! And, make that voice heard. How do you do that? The following activities, adapted from OSHA’s Safe + Sound initiative, can help:
Send an email blast
A good way to get management involved in safety is to encourage upper management to send an email blast. The email can focus on any number of safety topics, but should include a key message about your company’s commitment to safety and health. Use this email, or a series of emails, to:
- Share why safety is important to management;
- Show how injury and illness prevention is tied to organizational goals and values;
- Provide recognition for positive outcomes from existing safety and health strategies; or
- Highlight upcoming investments in safety and health.
Ideally, the email blast will begin on a Monday. You can also include a different health and safety message each day of the week. For example, one day’s email could feature your upcoming safety activities, another day could highlight safety resources available at your worksite (e.g., trainings, job hazard analysis forms), and the last day could summarize how you will use what you learned during the week to establish or improve your safety and health program.
Create a video
Record an interview with the head of the company talking about why safety is important to them and/or demonstrating how to properly operate equipment, use personal protective equipment, or conduct a task safely in your workplace. You could also invite workers to interview the boss about his or her commitment to safety. Have senior managers host a screening for all workers and show the video during new worker orientation. A simple video shot on any smartphone should suffice.
Write a company newsletter column or article
Start a senior manager column in your company’s newsletter to reiterate your commitment to safety in the workplace. This column could feature organizational goals for safety and health; recognize workers for their safety and health efforts and participation; or report the outcomes of analysis and action taken to address identified concerns or hazards. Ideally, managers will focus on the safety and health best practices they have used first-hand, in the first person. It is also very impactful when management tells a story about how safety (or a lack of good hazard controls) has affected them personally, and why it’s so important to them now.
Find or become a safety mentor
Does an organization you work with have safety efforts or results you would like to emulate? If so, ask the lead safety officer or a peer at that company to serve as your safety mentor. Likewise, if you have a successful safety and health program, consider mentoring a colleague at a supplier, customer, or related organization who is trying to get a fledging program underway. Mentorship is a way to improve your relationships and help strengthen both organizations.
To find mentoring opportunities, try the local chapter of your industry trade association, safety professionals’ organizations, or an OSHA Voluntary Protection Program (VPP) participant near you. Following are some groups that may be helpful:
- American Industrial Hygiene Association’s Mentoring Program. See https://www.aiha.org/get-involved/AccoladesandAwardPrograms/Pages/Become-a-Mentor.aspx.
- American Society of Safety Engineers’ Mentoring Groups:
- Management Practice Specialty at https://www.assp.org/membership/communities/practice-specialties/management/mentoring
- Women in Safety Engineering at https://www.assp.org/membership/communities/practice-specialties
- Blacks in Safety Engineering at https://www.assp.org/membership/communities/practice-specialties
- OSHA’s VPP at https://www.osha.gov/vpp/
Jumpstart your safety program in 10 easy steps
If you are not quite ready to implement a complete safety and health program, here are some simple steps you can take to get started. Completing these steps will give you a solid base from which to take on some of the more structured actions you may want to include in your program.
- Always set safety and health as the top priority. Tell your workers that making sure they finish the day and go home safely is the way you do business. Assure them that you will work with them to find and fix any hazards that could injure them or make them sick.
- Lead by example. Practice safe behaviors yourself and make safety part of your daily conversations with workers.
- Implement a reporting system. Develop and communicate a simple procedure for workers to report any injuries, illnesses, incidents (including near misses/close calls), hazards, or safety and health concerns without fear of retaliation. Include an option for reporting hazards or concerns anonymously.
- Provide training. Train workers on how to identify and control hazards in the workplace.
- Conduct inspections. Inspect the workplace with workers and ask them to identify any activity, piece of equipment, or material that concerns them. Use checklists, such as those in the Identify and Control Hazards section of this publication.
- Collect hazard control ideas. Ask workers for ideas on improvements and follow up on their suggestions. Provide them time during work hours, if necessary, to research solutions.
- Implement hazard controls. Assign workers the task of choosing, implementing, and evaluating the solutions they come up with.
- Address emergencies. Identify foreseeable emergency scenarios and develop instructions on what to do in each case. Meet to discuss these procedures and post them in a visible location in the workplace.
- Seek input on workplace changes. Before making significant changes to the workplace, work organization, equipment, or materials, consult with workers to identify potential safety or health issues.
- Make improvements. Set aside a regular time to discuss safety and health issues, with the goal of identifying ways to improve the program.
Use your OSHA 300 log to uncover hazards
Most workplace injuries and illnesses don’t just happen — they are usually predictable and preventable. That’s why OSHA calls them “incidents” instead of “accidents.”
While using a different word might seem like a small thing, it’s part of a huge shift underway. It’s a shift toward prevention — finding and fixing hazards before they lead to injury or illness. It’s like choosing between putting out fires after they damage people and property and making sure fires never start in the first place.
This is where your OSHA 300 log comes in. The log is not just a way to look at your past safety and health record, and it’s not just something for OSHA. It’s a powerful tool to help you identify hazards in your workplace so you can correct them and prevent future injuries and illnesses.
- Think of the 300 log as part of your road map to finding and fixing hazards. For example: “Slip and fall” injuries might tell you that there are housekeeping-related hazards to correct or procedures to adjust.
- A back injury might show you that there is a need for lifting equipment or better training in safe lifting techniques.
- A needlestick injury might indicate that you need to improve your needlestick prevention program and/or implement safer needle devices.
- A fall-related injury might indicate the need for improvements in fall protection or training.
You should examine the log regularly (at least annually), to look for trends. The log should indicate the types of injuries or illnesses that have occurred, their frequency, and the specific processes, activities, tasks, or equipment/material involved.
You can use this information to “find and fix” safety and health problems. [Note: Make sure to review injuries or illnesses among temporary or contractor employees you may have working onsite as well.] Using the 300 log to identify injury and illness trends is a good first step in identifying hazards and demonstrating management commitment to safety and health. Involving workers in reviewing the log and making recommendations for correcting hazards will make this step much more effective.
Start tracking SIFs (Serious Injuries and Fatalities)
Consider the following two scenarios:
- A worker is doing some work on top of a railcar. He slips, but doesn’t fall. He suffers a strained back.
- A worker is walking across the parking lot. He slips, but doesn’t fall. He suffers a strained back.
What we have are two work-related cases, likely to end up on the OSHA logs. Both would go down as back strains. The question is: How related are the two incidents? How related should the interventions be? If you went back through injury records and noticed you had two back strains in the past month, would it concern you that much? Should it?
It’s all about potential
Most would agree that in the situation with the railcar, there is a high probability that a serious injury COULD have occurred, if the worker had actually fallen off the railcar. That’s not to say that a worker couldn’t be seriously injured falling in a parking lot, but the probability is less.
That is the concept behind SIFs: Identifying, intervening, and tracking exposures, either actual or potential, where there is the liklihood of a serious injury or fatality.
Ask many plant managers how the safety program is doing and they’ll say “Good, our injury rates are as low as they’ve been in years.” Then, when a serious injury happens, they’re blindsided. Obviously you don’t want them to be blindsided, so you want to prevent as many serious injuries and fatalities as you can. But, also you want to make sure that management understands the true picture of what’s going on — and that involves more than just the recordable rate. You need to teach them about the SIF rate also.
What the data says
A quick look at the data shows that in 2016 the number of recordable incidents declined to near record-low numbers. However, in the same year, a total of 5,190 fatal work injuries occurred, the highest since 2008.
And, this is a common occurrence in companies who have analyzed their data — that is, the serious injury and fatality rate is not dropping at the same rate as the recordable rate.
So, what gives?
For many years, companies have focused most attention on lagging indicators, such as OSHA’s recordable incident rate, to assess how they are performing year to year.
Further, there is a long-held belief that reducing the number of incidents (recordables) would reduce the number of serious and fatal events (SIFs) (or as some have referred to them, FSI for Fatalities and Serious Injuries). However, data is showing that’s not the case. Focusing on the causes of minor injuries has no major correlation to the future occurrence of a serious or fatal injury.
For example, one company had a 10-year span of declining recordable incident rates, with the highest yearly rate around 6.0. The company is doing something right, right? When that company looked at their fatalities during that same period, they discovered there had been over 60. Most safety professionals would agree that 60 workplace fatalities over a 10-year span is not indicative of a perfectly functioning safety system.
Another issue is the focus on the “safety pyramid,” which has been used for years to correlate near misses and minor injuries to more serious injuries and fatalities, for example for every 1 major injury, there are 29 minor injuries, and 300 near misses. The theory was that focusing on near misses would automatically reduce the number of serious injuries.
Studies are showing that the triangle is not predictive because not all injuries or near misses actually have the potential to cause a SIF. This means that a reduction or intervention at the bottom of the triangle (i.e., near misses) will not necessarily correspond to an equivalent reduction in SIFs. Actually the number is closer to 20 percent.
What you can do
First, you have to target SIFs independently of other injuries and hazards. They are not equal in terms of their causes. Take for example an incident that could result in a minor cut. That may be the worst injury that could happen from the exposure. On the other hand, if you take a burn injury, maybe a slight shift in positioning or pressure could have taken the minor burn to a major one.
To do this, it’s important to create a list of SIF exposures in your work environment. You can start this by reviewing injury and near miss records for the past several years. How many could have been SIFs? What are the common elements of those that met that criteria?
Next, create a list of SIF exposures. These will vary from company to company, but common examples are:
- Fall from greater than 6 feet
- Electrical work
- Confined space
- High-pressure line rupture
- Rigging/lifting-related incident
- Mobile equipment contacting electrical line
- Forklift/pedestrian contact
- Material handling equipment falling from loading dock
- Lockout/tagout or machine guarding failure
- Motor vehicle incident
- Non-routine task
- Combustible dust
You should communicate this list with a campaign to kick off the new SIF focus. You should also target any new SIFs with aggressive hazard controls.
At the same time, you should create an initial SIF rate. This is calculated similarly to your incident rate or DART rate, only you substitute in actual and potential SIF incidents:
(Actual SIF incidents + Potential SIF incidents) * 200,000 / Total Hours Worked = SIF rate
From there, you evaluate every new incident to see if it fits into your new SIF criteria.
Start communicating your SIF rate annually to employees and management, so it is top of mind.
Set effective, SMART leading indicators
Good leading indicators are based on SMART principles, meaning they are Specific, Measurable, Accountable, Reasonable, and Timely:
- Specific: Does your leading indicator provide specifics for the action that you will take to minimize risk from a hazard or improve a program area?
- Measurable: Is your leading indicator presented as a number, rate, or percentage that allows you to track and evaluate clear trends over time?
- Accountable: Does your leading indicator track an item that is relevant to your goal?
- Reasonable: Can you reasonably achieve the goal that you set for your leading indicator?
- Timely: Are you tracking your leading indicator regularly enough to spot meaningful trends from your data within your desired timeframe?
The chart below, adapted from OSHA’s Using Leading Indicators to Improve Safety Outcomes, demonstrates how to create a SMART leading indicator to address the issue that workers have not been attending monthly safety meetings. It walks through a good and bad example for meeting each SMART criterion using the leading indicator “Number of workers who attend a monthly safety meeting.”
| Example Leading indicator: Number of workers who attend a monthly safety meeting Goal: 97% worker attendance rate at monthly safety meetings | |
|---|---|
| SPECIFIC | Does your leading indicator provide specifics for the action that you will take to minimize risk from a hazard or improve a program area? |
| GOOD EXAMPLE Workers will attend a safety meeting every month. This is specific because it clearly identifies what the activity is and who needs to attend. | BAD EXAMPLE Safety meetings will be held monthly. This is not specific because it does not describe who needs to attend. |
| MEASURABLE | Is your leading indicator presented as a number, rate, or percentage that allows you to track and evaluate clear trends over time? |
| GOOD EXAMPLE Workers will attend a safety meeting every month. This is measurable because you can track the number of workers that attend every month. | BAD EXAMPLE Workers will attend safety meetings. This is not measurable because it does not track a number, rate, or percentage with respect to your goal. |
| ACCOUNTABLE | Does your leading indicator track an item that is relevant to your goal? |
| GOOD EXAMPLE Workers will attend a safety meeting every month. This indicator is relevant to your goal because it asks workers to attend the meeting. | BAD EXAMPLE Safety meetings for workers will be held monthly. This indicator is not relevant to your goal because it does not specify that your workers would be asked to attend. |
| REASONABLE | Can you reasonably achieve the goal that you set for your leading indicator? |
| GOOD EXAMPLE Workers will attend a safety meeting every month. Your goal is a 97% attendance rate. Your 97% goal is achievable because it takes into account that you will not have a make-up meeting and workers missing work will not be able to attend on the day the meeting is scheduled. | BAD EXAMPLE Workers will attend a safety meeting every month. Your goal is a 100% attendance rate. Your 100% goal is not achievable because you know that some workers will occasionally miss work on the day the meeting is scheduled. |
| TIMELY | Are you tracking your leading indicator regularly enough to spot meaningful trends from your data within your desired timeframe? |
| GOOD EXAMPLE
You decide to track meeting attendance monthly. This is timely; because you track your meetings monthly, you can identify meaningful trends before the end of the year, which is when you wanted to analyze your data. | BAD EXAMPLE You decide to track meeting attendance twice a year. Because you only tracked two meetings, you cannot see any meaningful trends until at least the following year. |
Designate safety advocates
Getting employees to support safety, or even just follow your written procedures, can be a challenge. Supervisor support and reinforcement is critical because they’re the day-to-day contact for employees. As a safety professional, you can’t reinforce safety with every employee every day.
One option could increase compliance while also help to alleviate the burden on supervisors. It involves identifying at least one employee in each team or department to serve as a safety advocate.Even supervisors who fully support safety need to create time for including that obligation among their other duties.
As a result, safety may not be something they devote time to every day.
Creating a program that identifies individual employees to serve as safety advocates, who promote compliance among their peers, could provide much-needed assistance and backup for a busy supervisor. In addition, other workers in the department may be more willing to listen to feedback from a coworker, since the reinforcement won’t seem like an authoritarian demand from management.
Identifying candidates
You’ll need volunteers for a safety advocate program, since the participants should willingly support all safety efforts.
However, supervisors should help identify likely individuals, based on performance and particularly seeking individuals who have the respect of their coworkers. Potential candidates might include individuals who:
- Know someone (friend, family member, coworker) who was injured at work and would like to help others avoid that fate; or
- Have a personal story regarding safety, whether they were injured or experienced a frightening near-miss incident.
Workers may have other relevant backgrounds, for example, military or EMT experience. The goal is finding individuals whose experience helps them understand that “safety is serious.” If you can identify a few individuals and present the safety advocate role as a development opportunity, you may be able to develop safety “deputies” and gain eyes, ears, and peer support for your programs.
Your company may want to provide incentives for participating, but someone who volunteers for a reward is not necessarily the best candidate. The ideal advocate is someone who participates out of a desire to help others.
Running the program
Once a few potential advocates are identified, they’ll need training on their expected roles. You can start small, since even one person from three or four different departments could have a substantial impact in their areas.
When developing training, don’t expect them to learn everything at once. Identify a few key issues that have been challenging in their work areas, and focus only on those areas to start.You can always add additional items in the future.
Training might cover a review of key safety issues, along with guidance on how to gently remind coworkers to follow the rules. For instance, ask them to share the experience that caused them to volunteer or to offer phrases to use such as, “Steve, I’m worried you’ll get hurt reaching past the guard. I have a friend who lost two fingers doing that.” If the potential advocates don’t have their own stories to share, give them examples from your own company’s experience or (if your safety record is strong) from other employers.
Although they’ll be telling friends and peers to “follow the rules” in a practical sense, their purpose is to deliver reminders and encouragement, not to threaten discipline or to report violations. Essentially, these advocates are leading from the middle by inspiring others through their actions, along with giving encouragement.
Keep your drivers safe
Texting while driving dramatically increases the risk of a motor vehicle injury or fatality. Employers need to make it clear to all workers that their company doesn’t require or condone texting while driving. It’s literally a matter of life and death.
Strong policies
- Have a strong policy that prohibits the use of portable electronic devices while driving.
- Establish work procedures and rules that do not make it necessary to text while driving.
- Make safe driving an integral part of your business culture.
Vehicle and driver safety
- Review and consider the safety features of all vehicles used, including late model vehicle safety systems (e.g., collision warning, driving control assistance).
- Check the driving records of all employees who drive for work purposes.
- Ensure vehicles are safe and properly maintained.
- Encourage workers to focus on the road, avoid electronic distractions, slow down in work zones and not drive if fatigued.
Training
- Provide continuous driver safety training and communication.
- Train workers on driving distractions and to not solely rely on navigation and other advanced technology systems.
- Instruct drivers to take extra precautions during inclement weather.
- Ensure drivers know procedures, times and places for drivers to use phones and other technologies for communicating with managers, customers and others.
Training
Incorporate a forklift obstacle course for your training
Forklift training is required to have a hands-on aspect. Nothing is more hands-on (and fun) than a forklift obstacle course. If you don’t currently utilize a course, they can be relatively easy and inexpensive to set up. The following are some tips on creating an obstacle course where trainees work on picking up a load, carrying a load, turning, backing, and stopping at intersections.
Caution: Exercises should be conducted under the supervision of a qualified forklift operator trainer.
What you will need:
- 40 x 60 foot clear area
- Traffic cones or empty pallets
- Box on pallet
- Tape
Steps:
- Place traffic cones to form course. See illustration on following page. (Pallets or a combination of pallets/cones can also be used.)
- Place load as shown in illustration. (Can be on the floor or in a rack.)
- Designate load drop point as shown in illustration. (Can be on the floor or in a rack.)
- Tape floor to show intersections.
Exercises:
- Have trainee pick up the pallet and navigate through the course.
- Have trainee place the load in the designated load drop point.
- Have trainee back down the aisle and then proceed back to start point.
When done, discuss the following:
- Lifting the load. Look at the approach, fork position, smoothness of lift and tilt.
- Traveling with a load. Look at speed and height of forks.
- Placing the load. It should be placed squarely and securely.
- Reading the workspace layout/design. Were there sudden stops or jerking motions or other difficulties with maneuvering?
- Challenges with backing. Did trainee face the direction of travel?
- Sounding the horn at intersections. Also, did trainee slow down?
- Specific challenges or questions raised by the trainee’s performance.
Course enhancements:
Depending on your available space, you can use the same general design but enhance it with additional stops, aisles, or turns. For example, place traffic cones in the middle of the aisle and require the trainee to slalom through.
In addition, you can challenge trainees by using different loads, or an uneven load that the operator should stabilize or secure before picking, or depending on attachments, a drum or roll.
Combustible dust training
If your facility has the potential for combustible dust or chemical hazards, the Chemical Safety Board’s video series can be extremely useful for training. The videos contain stellar animation and present real-life case studies. To access the videos, visit www.csb.gov/videos/. Search for the words combustible dust in the Video Search field to bring up several on that particular topic.
Safe behavior training
It doesn’t always come to mind when we think of workplace safety, but our own behaviors play a key role in keeping us free of injury.
Think about it. When you drove to work this morning, you probably took the time to put on your seat-belt … a safe behavior. Why did you do that?
Chances are, either you did it because it has become second-nature.
Or you did it because you didn’t want to receive a traffic ticket for not wearing it.
Or you did it because you know it’s the safe thing to do and see the value in it.
Or you did it because you wanted to set a good example for your children who you were dropping off at school.
But, what about that time a few weeks ago when you were just moving the car to the street, so your spouse could back out of the driveway. Did you buckle up then? Or what about the time when you were a passenger in your coworker’s backseat and didn’t see the seat-belt attachment … did you buckle up then? Did you ask or tell your friend to stop the car?
The point here is that behavior is a very complex issue. It involves a series of attitudes, beliefs, experiences, consequences, environmental factors, and other issues.
It is important to highlight these behavioral issues to workers and explain how they relate to safety at work.
Unfortunately, we often let factors — whether outside or internal — influence our behavior in a negative way. Where safety is concerned, this can be fatal.
Take for example the case of John, a maintenance worker at a manufacturing facility. John hadn’t got much sleep the night before because he was up late with his sick child. It was nearing 3:30 in the afternoon, and John really wanted to go home. He just had one quick job to finish up. It was an easy one — one he’d done many times before. So, he decided to save some time and skip the company’s procedure to lock out the energy source on machinery before working on it. Unfortunately, the machine cycled, and John lost his left arm.
Regardless of the outside or internal influences, workers must follow proper safety procedures and policies.
But, it’s a complex issue, because there are many reasons a worker might choose an unsafe behavior. For example, it may help do something quicker or easier and often workers are not injured as a result of the unsafe behavior. The following exercises can help you teach your employees about the impact behaviors have on safety.
Exercise: All about activators
Objectives: Use this exercise to give trainees an opportunity to identify activators and their impact on behaviors.
Ask the trainees to provide examples of activators (for example, a speed limit sign, an icy patch on the road, a no smoking sign, a gas gauge, a ringing telephone). Display responses so the group can view them.
When you have a sufficient number of responses, then ask the group to describe what behavior might be triggered by the activator (for example, place foot on the brake, remove foot from accelerator, put out cigarette, pull car over and pump gas, answer telephone).
After you have a sufficient list of activators and behaviors, discuss the relationship between the two, and point out how multiple activators (for example, a speed limit sign + a police car, or ice on the road + a car on the side of road in a ditch) might cause a stronger response than a single activator; how people respond differently to the same activators (for example, a person who got a speeding ticket last week may respond differently to a speed limit sign than someone who has not), etc.
Works well with: Small groups.
Materials required: A means to display group responses (Flip-chart, whiteboard, overhead, etc.)
Preparation time: 15-20 minutes to think of activators and behaviors.
Exercise: Negative versus positive consequences
Objectives: Use this exercise to give trainees an opportunity to think about negative and positive consequences.
Give trainees a few scenarios (can use clip art or photos, or a simple description) of various behaviors (for example, someone lifting a new television, someone putting on safety glasses, someone driving in wintry conditions). Ask them to list positive and negative consequences for each behavior (for example, get to watch the game on a new television versus a back injury from improper lifting). Display responses so the group can see them.
Works well with: Small groups.
Materials required: A means to display group responses (Flip-chart, whiteboard, overhead, etc.)
Preparation time: 15-20 minutes to think of behaviors to be used and examples of consequences.
Reach ALL your workers with training
All workers learn at different paces and in different ways. Language and literacy levels play a key role in learning outcomes.The following suggestions, excerpted from an OSHA publication on training methods, are designed to help trainers adapt training techniques to reach participants at all skill/literacy levels.
These techniques will also be helpful in teaching participants for whom English is a second language (sometimes referred to as English Language Learners (ELL)).
- Do not assume that all participants are equally skilled or confident in speaking, reading, writing, and math.
- Plan for plenty of small group activities where participants get to work together on shared tasks — reading, discussing, integrating new information, relating to life experience, recording ideas on flip charts, and reporting back to the whole group. In small groups, participants can contribute to the tasks according to their different backgrounds and abilities.
- Try to use as many teaching techniques as possible that require little or no reading.
- At the beginning of a class mention that you are aware that people in the group may have different levels of reading and writing skills.
- Establish a positive learning situation where lack of knowledge is acceptable and where questions are expected and valued. Participants need to be able to indicate when they do not understand and to feel comfortable asking for explanations of unfamiliar terms or concepts.
- Make it clear that you will not put people on the spot. Let them know that you are available during breaks to talk about any concerns.
- Let the group know that they will not necessarily be expected to read material by themselves during the training.
- Let people know that you will not be requiring them to read aloud. Ask for volunteers when reading aloud is part of an activity. Never call on someone who does not volunteer.
- Do not rely on printed material alone. When information is important, make sure plenty of time for discussion is built into the class so participants have the opportunity to really understand.
- Read all instructions aloud. Do not rely on written instructions or checklists as the only way of explaining an activity or concept.
- If other materials must be read aloud, read them yourself or ask for a volunteer.
- Make sure your handouts are easy to read and visually appealing.
- Give out only the most important written material. Make any other materials available as an option.
- If possible, provide audio recordings of key readings so that participants have the option to listen and read along.
- Explain any special terms, jargon, or abbreviations that come up during the training. Write them on a flip chart.
- If participants have to write, post a list of key words. This can serve as a resource for people with writing or spelling difficulties.
Make your training slides more readable
While slides are an important part of most training presentations, if they are not designed properly, they can actually hinder the training. Here are a few tips to make your training slides more user friendly:
- One concept per slide.
- Use a simple design.
- Make sure you really understand how to create and design slides. It takes some knowledge and skill to develop a presentation. For instance, getting the animation correct can be tricky.
- Do not make the mistake of designing the slide with too many graphics and animation (a common error among instructors). This can result in a design that is too complicated and difficult to read. Go easy on the graphics. Simple graphics that are easily understood are best. Do not use graphics just to make a slide look good; only use them if they have some content value. Keep animation to a minimum.
- Use lots of white space.
- Use contrast: dark on light, or light on dark. In choosing colors, make sure that the text is easy to see.
- Design from top left to bottom right.
- Use large font sizes (26 point minimum). No more than two fonts on a page.
- Limit use of bolding, italics, and underlining.
Demonstrate ergonomic principles in a practical way
For most safety professionals and trainers, ergonomic principles can be difficult to grasp, as they often involve an understanding of the way our musculoskeletal system works, along with principles of physics. This means they are also difficult to teach, which is vital if workers are to utilize proper techniques to eliminate injury.
Several years ago, NIOSH produced a publication that contains practical guidance on explaining ergonomic principles. This document was developed for individuals who provide training on ergonomic principles that focus on MSD risk-factor exposures. It was designed for trainers of all experience levels including the beginning trainer.
The demonstrations are designed to be performed by both the trainer and the worker. Each demonstration reinforces specific ergonomic principles and teaches the worker how and why to avoid MSD risk factors.
Additionally, individuals involved in the purchase and selection of new and/or replacement tools may benefit from many of the demonstrations because they highlight the importance of considering ergonomic principles before purchasing tools.
Now, NIOSH has placed a video supplement to the publication online for free access.
The video demonstration highlights worker participation and uses relatively inexpensive materials. The demonstrations are organized by type of ergonomic principle. Five general topics are addressed:
- Neutral compared with nonneutral postures;
- Grip types;
- Hand-tool selection and use;
- Fatigue failure and back pain; and
- Moment arms and lifting.
To access the video, visit http://bit.ly/2li1WmU.
To access the guidance publication, visit http://bit.ly/2kUwWgU.
Format of the guide
Each section of this document begins with a discussion of an ergonomic principle and its role in avoiding MSD risk factors, followed by a series of demonstrations that may be used to show how the principle can be incorporated into the work environment.
Each demonstration starts with clear objective statements and concludes with take-home messages that participants should incorporate into their everyday thinking.
These demonstrations encourage audience participation because discussing how the principle plays a role in a worker’s specific workplace is important for promoting understanding.
Each demonstration includes the following information:
- Objectives of the demonstration,
- List of suggested supplies needed to conduct the demonstration,
- Step-by-step demonstration methodology,
- Take-home messages that should be emphasized during the demonstration.
Sample demonstration - The pen and paperclip exercise
Repeated lifting, even at sub-maximal levels, may eventually lead to damage of the spine (fatigue failure). Substantially reducing loads placed on the spine can greatly minimize the risk of fatigue failure.
But, how do you teach this concept to workers? The NIOSH Guide uses an exercise called the “pen and paperclip exercise.”
Supplies
One plastic pen cap (the type with a stem/tail)
One paper clip for each audience member
Step-by-step demonstration method:
- Take intact pen cap and bend the “tail” once.
- Show audience members that there is a discoloration at the spot where the bending occurred, which is a visual example of sub-failures occurring.
- Continue to bend the pen cap about five times, and then show the audience that the discoloration has expanded.
- Explain to the audience that, if you continue to bend the pen cap, it would eventually fail.
- Explain to the audience that, for some materials (e.g. paper clip, vertebrae), fatigue failure is not visible.
- Distribute one paper clip to each audience member.
- Ask the audience to bend the paper clip back and forth, and count the number of cycles it can withstand before breaking.
- Ask various audience members how many cycles it took before the paper clip failed; emphasize that the number of cycles varies for the paper clips as no one paper clip is exactly the same as another. This is also true for people and their vertebrae. Just like with the paper clips, some workers will experience fractures in their vertebrae very quickly as others require many cycles despite undergoing the same loading conditions.
- Show the graph in Figure 24 to the audience. Editor’s note: In the NIOSH publication, “Figure 24” contains photos of a pen cap that is bent multiple times, visibly showing fatigue; a photo of a paper clip shows the result of failure (no fatigue).
- Explain that every type of material has an ultimate load (i.e., the load at which it fails when that load is applied only once). The graph in Figure 24 of the NIOSH publication illustrates the amount of loads the spine can handle without breaking. Because every spine is unique, the ultimate load varies somewhat for each spine. Thus, the y-axis of this graph represents the percentage of ultimate load. The x-axis represents the number of cycles a load was applied. For example, if you applied a load to a spine that was 80% of its ultimate load, you would be able to apply that load 100 times before the spine would fail. Likewise, if you applied a load that was only 50% of its ultimate load, you could apply that load 1,000 times before failure. If you applied a load that was only 30% of its ultimate load, you could complete an infinite number of loading cycles without the spine ever failing.
- Explain to the audience that this means they are not doomed to having a back injury. Rather, if the load applied to the spine is decreased substantially, they could perform their job an infinite number of times and never injure their spine. You may also increase your core strength to better handle loads — a balanced body in terms of abdominal and back strength makes a more stable core when trained together.
- Discuss ways to reduce the load applied to the spine, such as decreasing the weight of the object, reducing the moment arm (which is demonstrated in the NIOSH publication), removing barriers, and eliminating twisting and back flexion.
Take home messages
Often, the vertebrae of the back can have multiple sub-failures that are not visible but can result in complete failure over time.
The number of cycles that lead to failure of the vertebrae varies across the population.
Efforts should be made to substantially decrease loading of the spine.
Hazard identification
- Hazards must be identified in order to protect employees.
The most basic component of safety and health is the identification of hazards. If employers are to protect employees, hazards must be identified. Unfortunately, there is no single way to guarantee all hazards will be identified; rather employers should implement a multi-pronged approach.
Fundamentals of hazard identification
- A multi-pronged effort to hazard identification is needed to ensure a comprehensive hazard inventory.
There are numerous approaches to hazard identification, corresponding to the numerous types of hazards that may be found in each workplace. A multi-pronged effort is needed to ensure a comprehensive hazard inventory.
Thirteen hazard categories
- There are 13 major hazards common to many workplaces.
- Falls to the same surface and to a lower level are the most common types of accidents.
- Ergonomics-related hazards are the most common source of injury in the workplace.
The following list of hazard categories (based on information contained in Oregon Occupational Safety and Health Administration’s (OSHA’s) Identifying and Controlling Hazards workshop materials) may serve as a checklist for employers to begin identifying hazards in the workplace. It is not a comprehensive listing but does cover many of the major hazards common to many workplaces.
- Falls — The most common types of accidents are falls to the same surface and falls to a lower level. The severity of injury from a fall depends on three factors: velocity of an initial impact, magnitude of deceleration (due to hardness of the surface), and orientation of the body on impact.
- Impact — Impacts resulting in being struck by and struck against an object may cause serious accidents. The severity of the injury from impacting objects depends on three factors:
- Velocity of the impact,
- Characteristics of the object (size, hardness, shape, etc.), and
- Body part impacted.
- Mechanical — If it’s mechanical and it moves, it’s a hazard, and employees must be protected. There are as many hazards created by moving machine parts as there are types of machines. Mechanical hazards cause caught-in, caught-on, and crush accidents that can cut, crush, amputate, break bones, strain muscles, and even cause asphyxiation. Mechanical hazard motions include rotating, reciprocating, and transverse. Mechanical hazard actions include cutting, shearing, bending, and punching.
- Vibration and noise — Tools, equipment, and machinery that vibrate at a low frequency can injure a part of the body or the whole body. However, the most common sound-induced injury is due to high frequency vibration. Low frequency vibration hazards exist in two primary categories:
- Segmental vibration — Exposure to equipment that vibrates at various frequencies can affect different parts of the body. For instance, the hands are most sensitive to vibrations at 30–40 cycles per second. Internal organs can be affected at vibrations as low as 4–10 cycles per second.
- Whole-body vibration — Very low frequencies can affect the entire body. For instance, truck drivers experience continuous whole-body vibration as they travel. That’s one reason truck driving is considered one of the most hazardous tasks for lower back injuries.
- Toxics — Virtually all materials may be toxic to some extent. In the workplace a material is toxic if a small quantity can cause an injurious effect, such as tissue damage, cancer, or mutations. It’s important to consider the routes of entry of toxic materials into the human body. There are four possible routes of entry:
- Inhalation — Breathing in toxics is the most common and dangerous route.
- Ingestion — Toxics enter through the gastrointestinal tract.
- Absorption — Toxics pass through skin into the bloodstream.
- Injection — Toxics may be injected into the body (needles, sharp tools, or work surfaces, etc.); this is the least common, yet most direct route of entry.
- Heat and temperature — Overexposure to heat and temperature extremes may result in a range of injuries from burns to frostbite. Temperature indicates the level of heat present. The second law of thermodynamics states that heat will flow from an area of higher temperature to one of lower temperature. Heat is produced as a result of chemical reaction, combustion, electrical current, mechanical motion, and metabolism. Heat is transferred by:
- Convection — Heat is transferred by molecules moving through a fluid, gas, or liquid.
- Radiation — Occurs when a body’s temperature is above absolute zero.
- Conduction — Heat is transferred through a substance or between substances without physical movement of the substances themselves.
- Flammability/Fire — Fire may cause burn injuries. For combustion to take place, the fuel and oxidizer (oxygen) must be present in gaseous form. Flammable materials include:
- Fuel
- Solvents
- Cleaning agents
- Lubricants
- Coatings
- Chemicals
- Refrigerants
- Insecticides
- Plastics
- Hydraulic fluid
- Vegetation
- Wood/paper
- Fabrics
- Metals
- Rubber products
- Explosives — The results of an explosion may range from minor injury to major catastrophe. Instantaneous release of gas, heat, noise, light, and over-pressure creates a wave front that damages anything in its path. About two billion pounds of explosives are used by industry annually in construction, mining, quarrying, and seismographic work. Explosives may be found in the following forms:
- Chemicals,
- Solids,
- Gases, Dusts,
- Vapors, and
- Equipment.
- Pressure hazards — High- and low-pressure conditions in the workplace can result in injury. Standard atmospheric pressure is 14.7 pounds per square inch (psi). High-pressure gas distribution lines are considered high-pressure when operating at two psi or higher. The American Society of Mechanical Engineers (ASME) rate boilers which operate at more than 15 psi as high-pressure. The pressure in full cylinders of compressed air, oxygen, or carbon dioxide, are over 2,000 psi! Examples of pressure hazards include:
- Ruptured cylinders — The thrust generated by gas flowing through a puncture or rupture of a cylinder can be 20 times greater than the weight of the cylinder and reach velocity of 50 feet per second in 1/10th of a second! The result: a missile.
- Whipping hoses and lines — Compressed air and water hoses can kill when end fittings become loose. Such hoses and lines should be restrained by weighting with sandbags at short intervals, chained, clamped, etc. Never try to grab a whipping hose or line: turn off the controlling valve.
- Water hammer — The effect caused by a sudden stop of liquid flow causing a shock wave (water hammer) that can cause a line rupture. Ever heard a pipe “clang”?
- Electrical contact — Exposure to electrical current may cause injury or death. The voltage is not so important as the amount of current. It doesn’t take much current to kill. There are five principal categories of electrical hazards:
- Shock — Electrical shock is a sudden and accidental stimulation of the body’s nervous system by an electrical current. Look for bare conductors, insulation failures, buildup of static electricity, and faulty electrical equipment.
- Ignition of combustible (or explosive) material — Ignition is usually caused by a spark, arc, or corona effect (ionized gas allows a current between conductors).
- Overheating — High current creates high heat that can result in fires, equipment burnout, and burns to employees.
- Electrical explosions — Rapid overheating of circuit breakers, transformers, and other equipment may result in an explosion.
- Inadvertent activation of equipment — Unexpected startup of equipment and machinery can injure and kill. That’s why we have lockout/tagout procedures.
- Ergonomics — Improper lifting, lowering, pushing, pulling, and twisting can cause strains and sprains. Ergonomics-related hazards are the most common source of injury in the workplace. About 50% of all claims are related to ergonomics! Ergonomics hazards exist in:
- The worker – Physical/mental capability, preexisting conditions, etc.
- The task – Work that includes high force, repetition, frequency, duration, inappropriate posture, and point of operation.
- The environment – Noise, temperature, humidity, etc.
- Biohazards — Exposure to plants, animals or their products that may be infectious, toxic, or allergenic may cause illness and disease. People who work with animals, animal products, or animal waste have a greater risk of infection. Biohazard agents include:
- Bacteria — Simple one-celled organisms that may or may not be harmful.
- Viruses — Organisms that depend on a host cell for development and reproduction.
- Fungi — May be small or large (mushrooms) parasitic organisms growing in a living or dead plant or animal matter.
- Rickettsia — Rod-shaped microorganisms that are smaller than bacteria and depend on a host for development and reproduction.
- Microorganisms transmitted by fleas, ticks, and lice.
- Workplace violence — Workplace violence is any violent act that occurs in the workplace and creates a hostile work environment that affects employees’ physical or psychological well-being. A risk factor is a condition or circumstance that may increase the likelihood of violence occurring in a particular setting. Risk factors include:
- Employee contact with the public;
- Exchanging money;
- Selling/dispensing alcohol or drugs;
- Delivering passengers, goods, or services;
- Mobile workplace (such as a taxicab or police cruiser);
- Exposure to unstable or volatile persons (such as in health care, social services);
- Employees working alone, late at night/early morning, or in small numbers;
- Employees working in high-crime areas;
- Employees guarding valuable property or possessions;
- Employees working in community settings; and/or
- Employees deciding on benefits, or in some other way controlling a person’s future, well-being, or freedom (such as a government agency).
Methods to identify hazards
- Each hazard identification technique serves a unique purpose.
There are numerous hazards to be encountered in most workplaces. No one technique will identify all hazards. A safety committee walkthrough will likely uncover blocked fire extinguishers, but it’s unlikely to identify ergonomic hazards from repetitive movement. Similarly, an ergonomics evaluation will likely identify repetitive motion hazards, but will not uncover blocked fire extinguishers.
Each hazard identification technique serves a unique purpose. To be effective, employers need to implement several techniques.
Third-party audits
- Third-party audits are helpful in establishing the initial list of hazards.
- Third-party audits are typically done around every five years.
Third-party audits are an excellent way to get a fresh look at the hazards in a workplace. These can be done by private consultants, Occupational Safety and Health Administration (OSHA) consultation personnel, corporate personnel, and workers’ compensation representatives. These types of audits are very helpful in establishing the initial (comprehensive) list of hazards. They are also typically done every five years or so, to refresh the baseline of hazards.
To ensure that the worksite will receive the comprehensive survey, consider asking potential surveyors certain questions:
- What type of training and experience do they have? How recent is it?
- Do they have experience in this industry?
- Do they have references? Check to see whether any OSHA inspections occurred after the consultant has conducted an audit, and if so, whether any serious hazards were found that the consultant had missed.
- What tools will they bring?
- What kind of information will they need in advance? A professional who is planning an in-depth survey will prepare by learning beforehand as much as possible about the worksite and its processes. Both safety and industrial hygiene professionals will probably want to see a layout of the operations. The industrial hygienist may ask for a list of the chemicals they use or the safety data sheets (SDSs) received from the suppliers and the types of processes in which they will be used.
- What kind of test equipment will they bring? Expect the safety professional to bring: a tape measure and electrical testing equipment. The industrial hygienist should bring noise testing equipment and, depending upon the chemicals or other contaminants expected, sampling pumps or grab sampling devices.
- How long will the survey take? It should take several times longer than a routine inspection of the worksite.
Self-inspections
- Self-inspections can help ensure ongoing hazard detection.
Self-inspections are typically done by the site safety manager and/or safety committee. These types of inspections are usually done anywhere from monthly to yearly, depending on how comprehensive they are. Self-inspections are a good way to ensure ongoing hazard detection as well as provide visibility for the safety effort.
Employee suggestions/surveys
- An employee safety suggestion box can yield leads to hazards that may otherwise go unnoticed.
A good employee safety suggestion box can yield many leads to hazards that might otherwise go unnoticed. In addition, a periodic survey of employees can reveal much about hazards as well as morale.
Change analysis
- Change analysis helps in heading off a problem before it develops.
Anytime something new is brought into the workplace, whether it be a piece of equipment, different materials, a new process, or an entirely new building, new hazards may unintentionally be introduced. Before considering a change for a worksite, it should be analyzed thoroughly beforehand. Change analysis helps in heading off a problem before it develops. A company may find change analysis useful when:
- Building or leasing a new facility.
- Installing new equipment.
- Using new materials.
- Starting up new processes.
- Staffing changes occur.
Behavioral observations
- Behavior-based observations can help to identify unsafe behaviors and hazards.
- Observations are not used to punish employees, but rather to make safety improvements and to assess the company’s safety efforts.
Many companies use behavior-based observations to identify unsafe behaviors and hazards. In the process, workers are given a list of safe behaviors to observe. The workers then spend a few minutes each week watching a coworker perform a task and observing whether the coworker is performing the safe behaviors on the list.
The safe behavior checklist should be developed through thorough analysis, using input from many different company personnel. The checklist should contain identified safe behaviors for given tasks. For example, a safe behavior checklist might contain items such as “Put on gloves,” “Set-up ladder,” “Use suction device to pick up part,” “Bend at the knees when lifting,” and so on.
When the observation is finished, the worker should give the coworker feedback on what was observed. This hopefully will be positive feedback, as in “Great job! All the behaviors on the list were performed, including … using the correct tool, maintaining a good posture with arms close to the body and wrists straight.” The goal here is that when a coworker is recognized for using safe behaviors, the worker will repeat those behaviors later, known as positive reinforcement.
But what about when a worker is observed not performing an identified safe behavior? In these situations, under a formal behavior-based safety system, the worker will identify the behavior to the coworker, but in a non-judgmental way. The point here is to reinforce what the desired safe behavior is, but not to be critical. If the coworker offers information on why the behavior was not performed, then note that information. Remember, observations are not used to punish employees. The observations are used to make safety improvements and to assess the company’s safety efforts.
To facilitate this effort, workers will turn in completed observation checklists to the appropriate safety personnel or committee. Names are usually not recorded on the checklists. The purpose of turning in the checklists is simply to measure the process and identify behavior trends and possible interventions. Remember, these observations are not linked to any discipline measures.
Process hazard analysis
- PHA is required if a company is covered by OSHA’s Process Safety Management of Highly Hazardous Chemicals standard.
If the company is covered by Occupational Safety and Health Administration’s (OSHA’s) Process Safety Management of Highly Hazardous Chemicals standard, it is required that a process hazard analysis (PHA) is conducted. See 1910.119 for additional information.
PPE hazard assessment
- Begin PPE hazard assessment with a walk-through survey of the facility to develop a list of potential hazards.
- Periodically reassess the workplace for any changes in conditions, equipment or operating procedures that could affect occupational hazards.
The Occupational Safety and Health Administration (OSHA) requires employers to assess the workplace for hazards that may require the use of personal protective equipment (PPE). Potential hazards may be physical or health-related and a comprehensive hazard assessment should identify hazards in both categories. Examples of physical hazards include moving objects, fluctuating temperatures, high intensity lighting, rolling or pinching objects, electrical connections, and sharp edges. Examples of health hazards include overexposure to harmful dusts, chemicals or radiation.
The PPE hazard assessment should begin with a walk-through survey of the facility to develop a list of potential hazards in the following basic hazard categories:
- Impact,
- Penetration,
- Compression (roll-over),
- Chemical,
- Heat/cold,
- Harmful dust,
- Light (optical) radiation, and
- Biologic.
In addition to noting the basic layout of the facility and reviewing any history of occupational illnesses or injuries, things to look for during the walk-through survey include:
- Sources of electricity.
- Sources of motion such as machines or processes where movement may exist that could result in an impact between personnel and equipment.
- Sources of high temperatures that could result in burns, eye injuries or fire.
- Types of chemicals used in the workplace.
- Sources of harmful dusts.
- Sources of light radiation, such as welding, brazing, cutting, furnaces, heat treating, high intensity lights, etc.
- The potential for falling or dropping objects.
- Sharp objects that could poke, cut, stab or puncture.
- Biologic hazards such as blood or other potentially infected material.
When the walk-through is complete, the employer should organize and analyze the data so that it may be efficiently used in determining the proper types of personal protective equipment (PPE) required at the worksite. The employer should become aware of the different types of PPE available, and the levels of protection offered. It is definitely a good idea to select PPE that will provide a level of protection greater than the minimum required to protect employees from hazards.
The workplace should be periodically reassessed for any changes in conditions, equipment or operating procedures that could affect occupational hazards. This periodic reassessment should also include a review of injury and illness records to spot any trends or areas of concern and taking appropriate corrective action. The suitability of existing PPE, including an evaluation of its condition and age, should be included in the reassessment.
Documentation of the hazard assessment is required through a written certification that includes the following information:
- Identification of the workplace evaluated;
- Name of the person conducting the assessment;
- Date of the assessment; and
- Identification of the document certifying completion of the hazard assessment.
Monitoring/Sampling
- Conduct monitoring to uncover many hazards.
Many hazards won’t be known unless monitoring is conducted. For example, a company may not know there is a noise problem without conducting monitoring/sampling. At the least, the full extent of the problem won’t be known without conducting monitoring. Many employers have the expertise/equipment in-house to conduct some monitoring. However, employers should also take advantage of consultants, industrial hygienists, ergonomists, and workers’ compensation personnel when needed.
Records/Document review
- Review documents/records in the workplace to identify hazards.
- Look for similar injuries and illnesses when analyzing injury and illness records.
Another way to identify hazards is to review documents/records in the workplace. For example, injury and illness and workers’ compensation records can highlight areas where attention is needed, or emerging trends are present. In addition, documents such as safety data sheets, manufacturer’s operating manuals, and warning labels can help identify hazards.
Injury and illness records analysis: Since there must be enough information for patterns to emerge, small sites may require a review of three to five years of records. Larger sites may find useful trends yearly, quarterly, or monthly. When analyzing injury and illness records, look for similar injuries and illnesses. These generally indicate a lack of hazard controls. Look for where the injury or illness occurred, what type of work was being done, time of day, or type of equipment.
Analysis of other records: Repeat hazards, just like repeat injuries or illnesses, mean that controls are not working. And patterns in hazard identification records can show up over shorter periods of time than accidents or incidents. Upgrading a control may involve something as basic as improving communication or accountability. Hazards found during worksite analysis should be reviewed to determine what failure in the safety and health system permitted the hazard to occur. The system failure should then be corrected to ensure that similar hazards do not reoccur.
Job hazard analysis/job safety analysis
- JHA/JSA is an important component of a safety and health program.
The terms job hazard analysis (JHA) and job safety analysis (JSA) are different ways of describing the same process. That process involves breaking down a job into its smaller steps, identifying hazards, and implementing controls. No matter what the process is called, it is an important component of a safety and health program.
1. Analyze the “job”
- Priority is given to certain jobs regarding job hazard analysis.
Regarding a job hazard analysis, “job” means tasks or steps, such as chocking a trailer, changing a light bulb, or grinding a part. It does not refer to a job title or occupation, such as “warehouse worker” or “welder.” Ideally, all jobs at a workplace will be subjected to analysis at some point. The reality, however, is that there simply isn’t enough manpower in most organizations to perform job hazard analysis (JHA) on all jobs at once. For this reason, priority should be given to the following:
- Jobs with high number of incidents or near misses;
- Jobs with high number of employee complaints (e.g., heat, fatigue);
- Dangerous jobs (e.g., those under a permit);
- New jobs; and
- Jobs that have changed (e.g., new process, new equipment, new workers).
2. Break job down into steps
- Analyze each job by breaking it down into steps in order of typical sequence.
Once each job has been prioritized, the next step is to analyze each job by breaking it down into steps in order of typical sequence. It is advisable to work with the operator or employee(s) performing the job. They have a unique understanding of the job, and this knowledge is invaluable for finding hazards. Many employers will try to do the job hazard analysis (JHA) by simply observing the worker doing the job as normal, rather than working with the operator to work through the job. Record each step as the worker takes it. Be sure to record enough information to describe each job action without getting overly detailed. A good rule of thumb is 10 steps per job.
Avoid making the breakdown of steps so detailed that it becomes unnecessarily long or so broad that it does not include basic steps. Use action words (e.g., “lift,” “turn,” “pull”) and object words (e.g., “handle,” “lever”) to describe how tasks are being performed. It may be valuable to get input from other workers who have performed the same job. Later, review the job steps with the employee to make sure nothing has been omitted. Point out that the company is evaluating the job itself, not the employee’s job performance. It may be helpful to photograph or videotape the worker performing the job. These visual records can be handy references when doing a more detailed analysis of the work.
3. Analyze the hazards
- Identify hazards for each step once all the steps have been identified.
Once all the steps have been identified, then the hazards for each step must be identified. Focus on anything that could potentially cause harm. Along with the hazards, determine the outcome that would occur should an employee be exposed to the hazard (consequence). For example, what could happen if an employee’s hand encountered an unguarded pulley? This will help determine severity and probability when selecting hazard controls.
4. Implement controls
- Use a hierarchy of hazard controls.
Information obtained from a job hazard analysis (JHA) is useless unless hazard control measures recommended in the analysis are incorporated into the tasks. Managers should recognize that not all hazard controls are equal. Some are more effective than others at reducing the risk. A hierarchy of controls should be used as follows:
- Elimination (e.g., using an abrasive material instead of a hazardous chemical)
- Substitution (e.g., using a less toxic chemical instead of a hazardous one)
- Engineering controls
- Administrative controls
- Personal Protective Equipment
Often a combination of controls will be needed; also, interim controls may be used until a better and more permanent control can be implemented.
5. After finishing
- Periodically review the JHA to ensure that it remains current and continues to help reduce workplace accidents and injuries.
After the necessary controls have been implemented, it’s important to periodically review the job hazard analysis to ensure that it remains current and continues to help reduce workplace accidents and injuries. Even if the job has not changed, it is possible that during the review process the company will identify hazards that were not identified in the initial analysis. It is particularly important to review the job hazard analysis if an illness or injury occurs on a specific job.
Based on the circumstances, the company may determine that the job procedure may need to change to prevent similar incidents in the future. If an employee’s failure to follow proper job procedures results in a “near miss,” discuss the situation with all employees who perform the job and remind them of proper procedures. Any time a job hazard analysis is revised, it is important to train all employees affected by the changes in the new job methods, procedures, or protective measures adopted.
Remember, a job hazard analysis (JHA) is one component of the larger commitment of a safety and health management system.
Hazard prevention and control
- Implement effective hazard prevention and controls to protect workers from hazards.
Effective controls protect workers from workplace hazards; prevent injuries, illnesses, and incidents; minimize or eliminate safety and health risks; and help employers provide workers with safe and healthy working conditions. This element of a safety and health management program helps to prevent and control the hazards identified in other parts of the program. Hazard prevention and control means that the company will:
- Identify and evaluate options for controlling hazards.
- Use a hazard control plan to guide the selection and implementation of controls.
- Develop plans with measures to protect workers during emergencies.
- Evaluate the effectiveness of controls to determine whether additional or different controls may be more effective. New technologies may be more protective, reliable, or less costly to operate.
Fundamentals of hazard prevention and control
- Design a program of prevention and control once hazards have been inventoried.
Once the hazards and potential hazards of the workplace have been inventoried, begin designing a program of prevention and control.
Hazard prevention
- In some cases, it may be necessary to bring in some help to get the initial baseline down of the major hazards.
To some degree, most every workplace has at least one or two ways of recognizing and controlling hazards. But, with a formal safety and health program, it’s more well-rounded and comprehensive, including having a baseline survey conducted, often by a third party. Particularly if they are new to safety or don’t have the expertise in-house, it’s necessary to bring in some help just to get the initial baseline down of the major hazards in their operations.
Change analysis
- If the procedures are changed, make sure the written procedures get changed and that training is conducted with the employees impacted.
One element that really stands out in terms of employers with a formal safety and health program and those without is change analysis. With change analysis, employers want to make sure that there is a mechanism in place to review major changes before they happen and before equipment is purchased, etc. The safety aspect needs to be considered when evaluating vendors and products. Then, the employer must factor in the impact of those on such things as air flow, noise, ergonomic-type issues, and job procedures. If the procedures are changed, make sure the written procedures get changed and that training is conducted with the employees impacted.
While this is nothing radical, many companies don’t have a formal mechanism for doing this, so it’s often not done, or it’s done after the equipment is purchased or installed when there is little flexibility in the controls. The earlier that safety is brought into the mix the better chance employers stand at not introducing a hazard that they are later going to have to control through personal protective equipment (PPE) or work practices.
Not to mention, the cost of retrofitting a hazard control is usually much more expensive than incorporating it up-front.
Preventive maintenance
- PM is a good idea for most equipment.
Preventive maintenance (PM) is an element of a safety and health management program that makes sense on many levels. First, from an operational standpoint, equipment should run efficiently all the time. It should also run safely. Many an accident has occurred because maintenance wasn’t performed. Also, many an accident has occurred because a breakdown happened that needed to be fixed quickly and maintenance felt pressure to rush.
It may be a stretch to have PM for every single item in the workplace, but for most equipment it is a good idea and should generally be performed per the manufacturer’s schedule. In particular, look at any engineered hazard controls, emergency equipment, and material handling equipment that can be a high hazard and prone to breakdown from use.
Housekeeping
- The same factors that result in good housekeeping also usually result in good safety performance.
Housekeeping is another element of hazard prevention and control. It’s also one of those elements that really reflects how the organization operates. The same factors that result in good housekeeping also usually result in good safety performance — it takes caring, organization, and management commitment. It’s amazing what can be addressed in terms of safety if everyone can get on board with a good housekeeping program.
Hazard control
- There are five prioritized strategies for controlling exposures to workplace hazards.
Controlling exposures to workplace hazards is the fundamental method of protecting workers. Traditionally, a “hierarchy of controls” has been used as a means of determining how to implement feasible and effective controls.
The terminology for the different strategies varies in the literature, but generally, it describes these prioritized strategies (adapted from Oregon Occupational Safety and Health Administration’s (OSHA’s) Hazard Identification and Control workshop materials; OSHA’s Safety and Health Management eTool; and a draft OSHA publication on managing safety, made available through the Missouri Department of Labor and Industrial Relations).
- Engineering controls — Consists of substitution, isolation, ventilation, and equipment modifications.
- Administrative controls — Any procedure that significantly limits daily exposure by control or manipulation of the work schedule or way work is performed. Note: The use of personal protective equipment is not considered a means of administrative control.
- Work practice controls — A type of administrative control where the employer changes the way the employee performs assigned work, often improving work habits or sanitation and hygiene practices. Such modification may result in reducing exposure to hazards.
- Personal protective equipment (PPE) — A method of employee protection utilized only when there are no other feasible means. The use of PPE requires the highest level of supervision. It is simply a barrier between the worker and the hazard.
- Interim measures — Employers may use this when developing a long-term control strategy. This method is temporary and must provide adequate protection from the hazard. Generally, this is accomplished by isolating the hazard from the worker.
Engineering controls
- Engineering controls focus on eliminating or reducing the actual source of the hazard.
These controls focus on eliminating or reducing the actual source of the hazard, unlike other control strategies that generally focus on employee exposure to the hazard. The basic concept behind engineering controls is that, to the extent feasible, the work environment and the job itself should be designed to eliminate hazards or reduce exposure to hazards. While this approach is called engineering controls, it does not necessarily mean that an engineer is required to design the control.
Why engineering controls?
- If an engineering control eliminates the hazard, it may also remove the need to control employee behaviors with management controls.
The underlying intent of the Occupational Safety and Health Administration (OSHA) law requires employers to first attempt to remove hazards through the use of realistic engineering controls because they have the potential to eliminate hazards in the workplace. If an engineering control eliminates the hazard, it may also remove the need to control employee behaviors with management controls.
Engineering controls do not necessarily have to be expensive or complicated. They can be quite simple in some cases. Engineering controls are based on the following broad strategies:
- If feasible, design or redesign the tools, equipment, machinery, materials and/or facility.
- If design/redesign is not possible, remove the hazard and/or substitute something that is not hazardous or is less hazardous.
- If removal is not feasible, enclose the hazard to prevent exposure in normal operations.
- If complete enclosure is not feasible, establish barriers or local ventilation to reduce exposure to the hazard in normal operations.
Elimination of hazards through design or substitution
- Redesigning or substituting process and/or equipment can help eliminate hazards.
Some examples of this strategy include:
- Redesigning, changing, or substituting equipment to remove the source of excessive temperatures, noise, or pressure;
- Substituting a toxic chemical with a less toxic or non-toxic chemical;
- Redesigning a process to use less toxic chemicals;
- Redesigning a workstation to relieve physical stress and remove ergonomic hazards; or
- Designing general ventilation with sufficient fresh outdoor air to improve indoor air quality and generally to provide a safe, healthful atmosphere.
One example of this is the common file cabinet. Newer file cabinets do not allow more than one drawer to open, thus reducing or eliminating the possibility of it tipping over.
Enclosure of hazards
- Enclosing a hazard usually means that there is no hazard exposure to workers during normal operations.
When a hazard cannot be removed and cannot be replaced with a less hazardous alternative, the next best control is enclosure. Enclosing a hazard usually means that there is no hazard exposure to workers during normal operations. There still will be potential exposure to workers during maintenance operations or if the enclosure system breaks down. For those situations, additional controls such as safe work practices or personal protective equipment (PPE) may be necessary to control exposure.
Some examples of enclosures are:
- Complete enclosure of moving parts of machinery;
- Complete containment of toxic liquids or gases from the beginning to the end of a process;
- Glove box operations to enclose work with dangerous microorganisms, radioisotopes, or toxic substances; and
- Complete containment of noise, heat, or pressure producing processes with materials especially designed for those purposes.
Barriers or local ventilation
- When the potential hazard cannot be removed, replaced, or enclosed, the next best approach is a barrier to exposure.
- This engineered control should only be used in conjunction with other types of controls.
When the potential hazard cannot be removed, replaced, or enclosed, the next best approach is a barrier to exposure or, in the case of air contaminants, local exhaust ventilation to remove the contaminant from the workplace. This engineered control involves potential exposure to the worker even in normal operations. Consequently, it should be used only in conjunction with other types of controls, such as safe work practices designed specifically for the site condition and/or personal protective equipment (PPE). Examples include:
- Ventilation hoods in laboratory work,
- Machine guarding, including electronic barriers and isolation of a process in an area away from workers; and
- Baffles used as noise-absorbing barriers nuclear radiation or heat shields.
Administrative controls
- Any system that relies on human behavior is inherently unreliable.
- Administrative controls should be used in conjunction with more effective or reliable engineering controls.
Administrative or management controls are aimed at reducing employee exposure to hazards that engineering controls fail to eliminate. Management controls work by designing safe work practices into job procedures and adjusting work schedules. These controls are only as effective as the safety management system that supports them. It’s always better to eliminate the hazards rather than rely on controls that tend to work only as long as employees work safely.
Here’s an important principle that reflects this idea: Any system that relies on human behavior is inherently unreliable. To make sure controls are effective in the long term, they must be designed from a base of solid hazard analysis and sustained by a supportive safety culture. Then they must be accompanied by adequate resources, training, supervision, and appropriate consequences. Remember, administrative controls should be used in conjunction with, and not as a substitute for, more effective or reliable engineering controls. Examples of this are:
- Removing tripping and slipping hazards using signage,
- Rotating shifts of workers in hazardous areas, and
- Maintaining equipment and tools in good repair by using a maintenance schedule.
Work practice controls
- Many employers conduct a job hazard analysis (JHA) to develop safe procedures.
Safe work practices may be quite specific or general in their applicability. They may be a very important part of a single job procedure or applicable to many jobs in the workplace. Safe work practices include:
- Using safe lifting techniques,
- Wetting down surfaces to keep toxic dust out of the air, and
- Ensuring proper hygiene after using potentially harmful chemicals.
Other safe work practices apply to specific jobs in the workplace and involve specific procedures for accomplishing a job..
To develop safe procedures, many employers conduct a JHA.
Personal protective equipment (PPE)
- The use of PPE does not control the hazard itself; rather, it merely controls exposure to the hazard.
Using personal protective equipment (PPE) is a very important control measure when all other attempts of hazard elimination have been tried. It’s important to remember that, like other controls except for engineering, the use of PPE does not control the hazard itself, but rather it merely controls exposure to the hazard by setting up a barrier between the employee and the hazard. Use of PPE may also be appropriate for controlling hazards while engineering controls are being installed or work practices developed.
PPE drawbacks
- PPE is designed for specific functions and is not suitable in all situations.
The limitations and drawbacks of safe work practices also apply to personal protective equipment (PPE). Employees need training in why the PPE is necessary and how to use and maintain it. It also is important to understand that PPE is designed for specific functions and is not suitable in all situations.
For example, no one type of glove or apron will protect against all solvents. To pick the appropriate glove or apron, refer to recommendations on the safety data sheets (SDS) of the chemicals being used.
Employees need positive reinforcement and fair, consistent enforcement of the rules governing PPE use. Some employees may resist wearing PPE according to the rules, because some PPE is uncomfortable and puts additional stress on employees, making it unpleasant or difficult for them to work safely. This is a significant drawback, particularly where heat stress is already a factor in the work environment. An ill-fitting or improperly selected respirator is particularly hazardous, since respirators are used only where other feasible controls have failed to eliminate a hazard.
Interim measures
- Interim measures can be taken to eliminate or reduce worker risk.
When a hazard is recognized, the preferred correction or control cannot always be accomplished immediately. However, in virtually all situations, interim measures can be taken to eliminate or reduce worker risk. These can range from taping down wires that pose a tripping hazard to shutting down an operation temporarily. The importance of taking these interim protective actions cannot be overemphasized. There is no way to predict when a hazard will cause serious harm, and no justification to continue exposing workers unnecessarily to risk.
Combination of controls
- The ideal control system for many hazards will use a combination of controls.
For many hazards, the ideal control system will use a combination of controls. That is, engineering, administrative, and personal protective equipment (PPE). For example, ventilation may reduce the exposure, job rotation may reduce the exposure further, and as a last control, PPE may be used to protect the eyes.
Risk prioritization
- The risk/hazard rating of a job or task considers two factors, severity, and probability.
- When a job or task has a high probability and high severity it has the highest risk.
Most companies cannot address all hazards or needed improvements at the same time due to resource constraints. It is vital the employers assess and prioritize risk. The risk/hazard rating of a job or task usually considers two factors:
- Severity — The seriousness of the injury or illness (e.g., first-aid, minor, lost-time, permanent disability, fatality) that could occur should there be an incident.
- Probability — The likelihood that an incident will occur (e.g., frequent, occasionally, extremely unlikely).
When a job or task has a high probability and high severity it has the highest risk; when there is low probability and low severity that is the lowest risk. But there are numerous combinations of severity/probability in between. (Many companies utilize a risk matrix or table that assigns numeric measures to risk based on probability and severity; the ratings are used to prioritize safety efforts.)
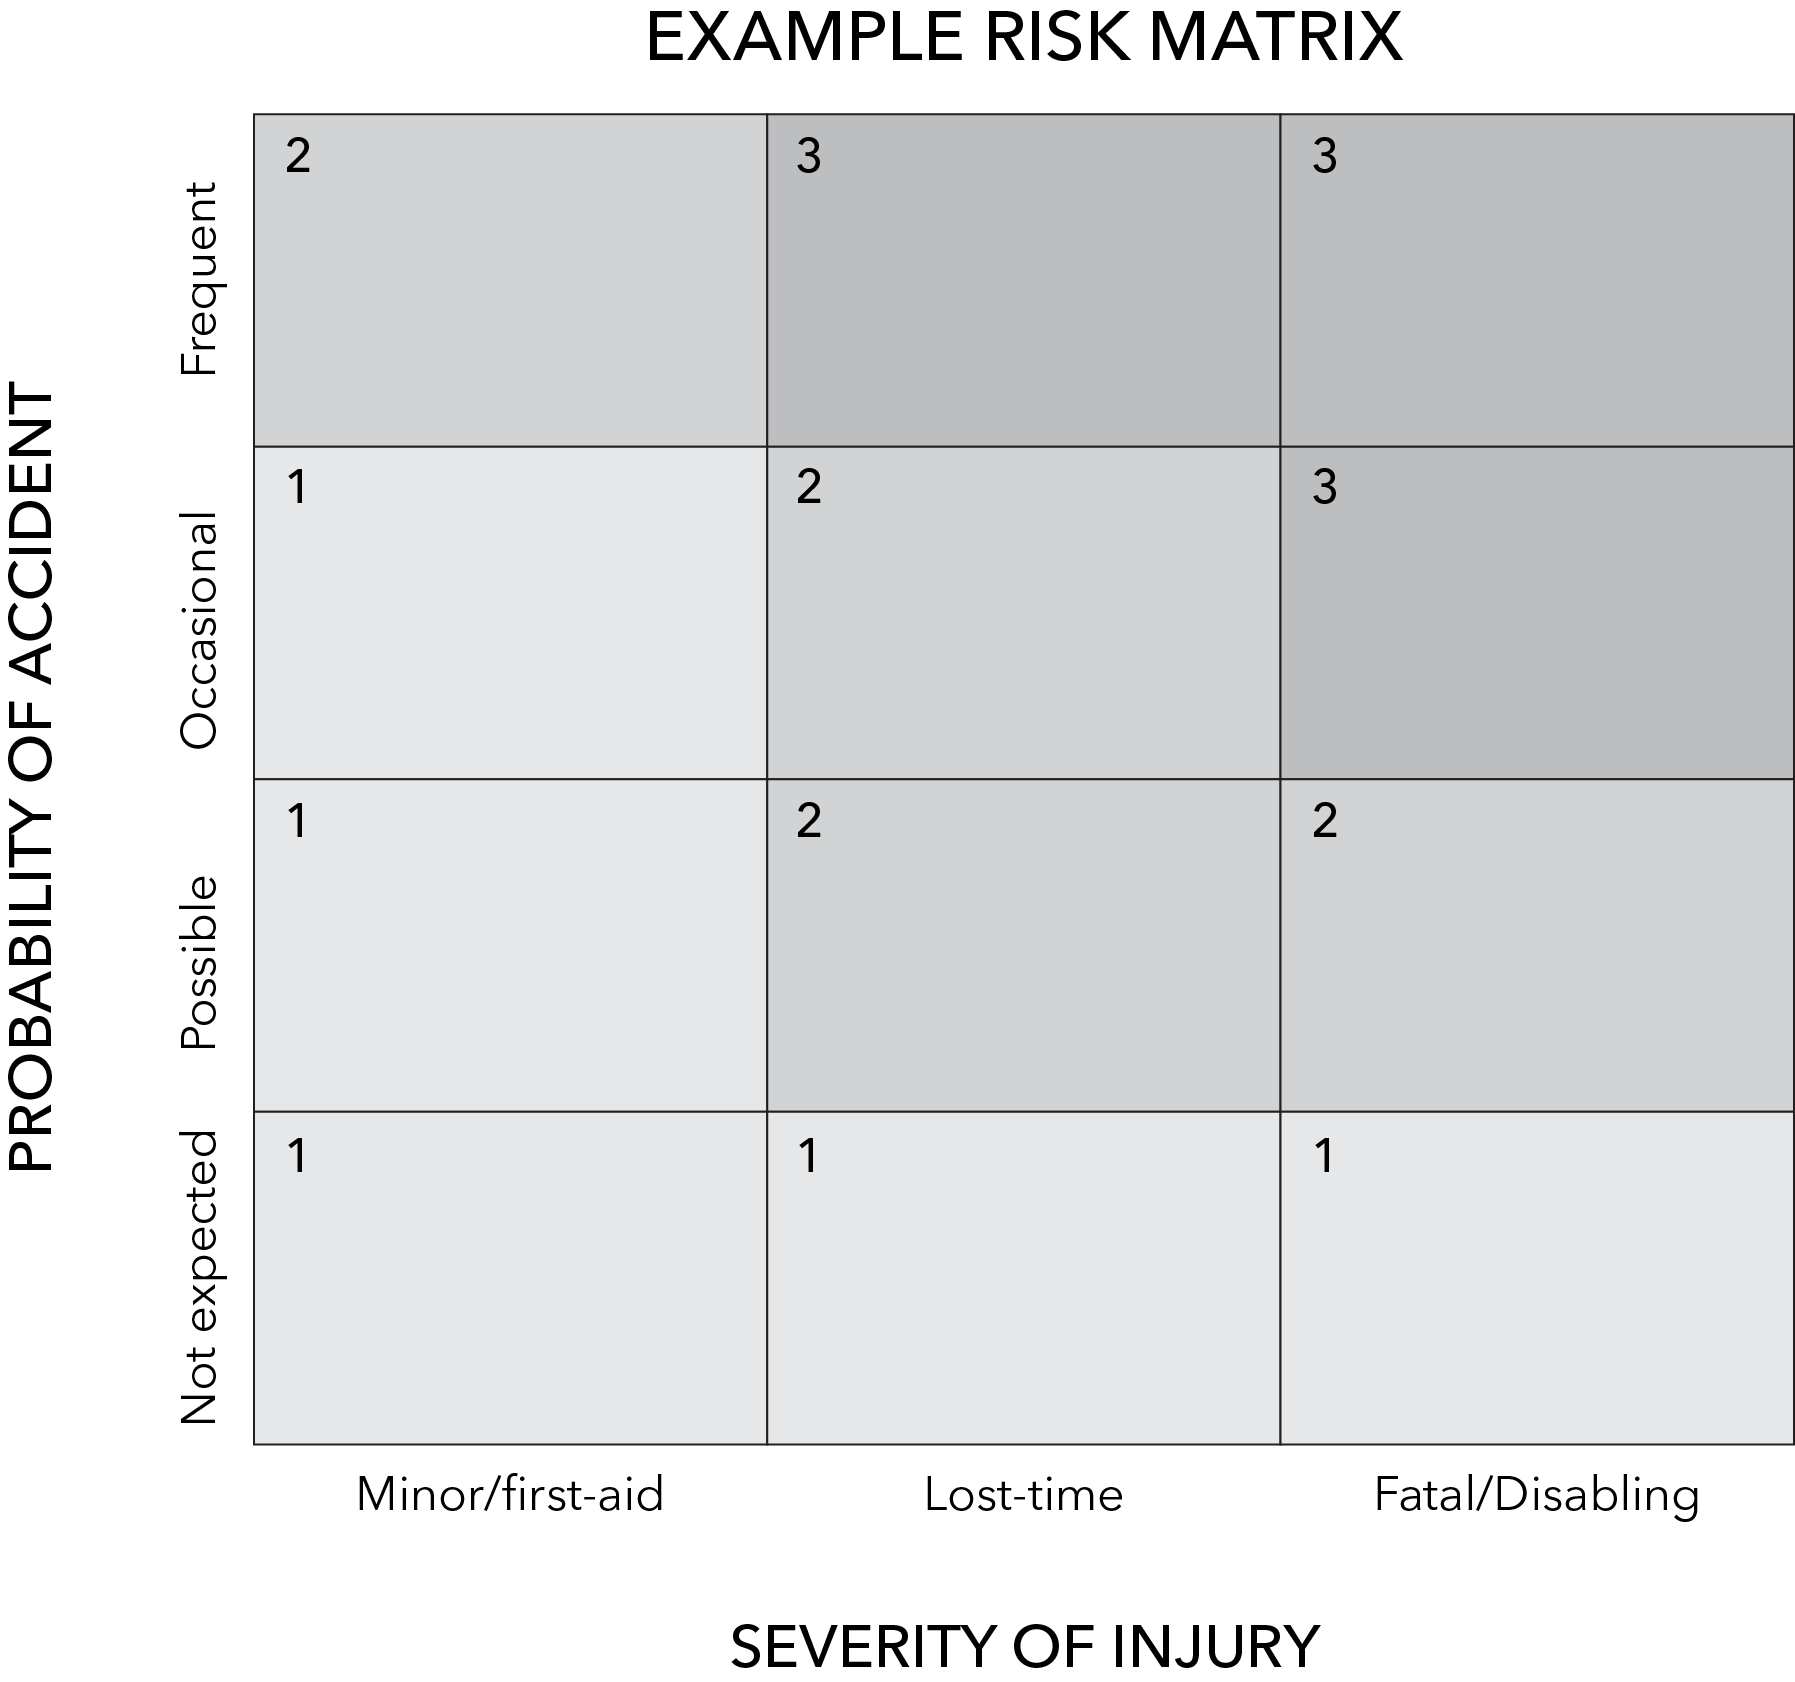
When assessing probability, it is important to look at several factors, such as:
- How many workers are exposed,
- How often the workers are exposed to the hazard,
- How close the workers are to the danger zone or hazard, and
- Whether there have been accidents or near misses related to the hazard.
Some hazards will need to be controlled immediately before work can continue. In some cases, the hazard control may need to be an engineering control based on the nature of the hazard, its severity and probability, and likelihood that other controls will not be as effective. Some hazards the company just can’t take a chance with! For others, work practice controls or personal protective equipment (PPE) may be sufficient.
The key is not just to find hazards but to figure out the most effective and feasible control; it takes a little analysis and in some cases interim measures, but it is a crucial part of ensuring long-term, effective solutions.
Hazard tracking procedures
- Documenting corrections of hazards are important particularly for larger sites.
An essential part of any day-to-day safety and health effort is the correction of hazards that occur despite the overall prevention and control program. Documenting these corrections is equally important, particularly for larger sites. Documentation is important because:
- It keeps management and safety staff aware,
- It provides a record of what occurred, and
- It provides timely and accurate information.
Notations on the report form
- Inspection reports include notations about hazard correction alongside hazard information.
Many companies use the form that documents the original discovery of a hazard to track the correction of the hazard. Inspection reports include notations about hazard correction alongside the information about the hazard. Employee reports of hazards and reports of accident/incident investigations also should provide space for notations about hazard correction.
When recording information about hazard correction, it is important to note all interim protective measures and to include the date of a completed action. Otherwise, the company runs the risk of intended corrections never actually being completed. This may not pose a problem if the hazard can be corrected in a short period of time. Someone probably will remember to see that the final correction occurs.
There is always a danger, however, that the expected correction will “slip through the cracks.” This can happen when a part must be ordered and time is needed for procurement, or when interim, less-than-adequate measures become substitutes for preferred but possibly more costly or time-consuming actions.
Tracking by committee
- A central management safety committee or a joint employee-management committee will devote a part of each meeting to reviewing reports.
Some companies separate the tracking of hazard correction from the system that uncovered the hazard. Typically, a central management safety committee or a joint employee-management committee will devote a part of each meeting to reviewing inspection reports, employee hazard reports, and accident/incident reports. The committee will list in its minutes any remaining uncorrected hazards for continued tracking. The benefit of such a system is the high-level scrutiny applied to hazard correction tracking.
The system can be cumbersome, however, especially when information must be transferred from the reports to the committee. There is the possibility of information being lost in transit or of incomplete and incorrect information being conveyed. This can be minimized by allowing the committee to review the original reports.
Tracking by separate form
- Tracking by separate form is most effective when computerized.
- There is always a possibility that incorrect or incomplete information will be transferred.
Another way to track hazard correction is to transfer information from the original hazard report to a separate hazard tracking report. Ideally, this system receives information on all uncorrected hazards and not just information from one of the avenues for uncovering hazards. Tracking by separate form is most effective when computerized.
For small businesses that do not use written inspection reports or written employee reports of hazards, this system provides important documentation that otherwise might not exist. The weakness in this system is much the same as for tracking by committee: there is always a possibility that incorrect or incomplete information will be transferred or that a correction needing tracking will fail to be recorded.
Training
- Involve both management and employees in developing the safety and health training program.
Another core element of a safety and health program is training. Before training begins, be sure that company policy clearly states the company’s commitment to health and safety and to the training program. This commitment must include paid work time for training and training in the language that the worker understands. Involve both management and employees in developing the program.
Workers who know about workplace hazards and the measures in place to control them can work more safely and be more productive. Education and training mean that employers, managers, supervisors, and workers:
- Have the knowledge and skills needed to work safely and avoid creating hazards that could place themselves or others at risk.
- Demonstrate awareness and understanding of workplace hazards and how to identify, report, and control them.
- Receive specialized training when their work involves unique hazards. In addition, all workers receive specialized training when they are assigned specific roles in managing or operating the safety and health program.
Fundamentals of training and education
- Several factors contribute to successful training.
Quality safety and health training helps prevent work-related injuries and illnesses. Effective training also encourages workers by educating and empowering them to advocate for safer working conditions. Several factors contribute to successful training. One of the most important is ensuring that the training facilitator exhibits safety and health expertise, sound instructional skills and flexibility.
Assessing training needs
- Use OSHA rules as a starting place when analyzing training needs.
- To be effective, go beyond what is required in the OSHA general industry rules for training.
Occupational Safety and Health Administration (OSHA) rules are a good place to start when analyzing training needs. If an OSHA regulation applies to the operations, be sure to meet all the rule’s training requirements. There are over 60 OSHA general industry rules that include training or employee information requirements. And some of these have either annual or refresher training requirements. But that’s just a beginning.
To be effective, employers need to go beyond what is required. If an employer just trained on OSHA requirements, employees wouldn’t get training on safe lifting techniques, as that’s not required; but clearly it’s needed.
- General Duty Clause of the Occupational Safety and Health (OSH) Act: Under 5(a)(1) of the OSH Act, employers are required to furnish a place of employment which is “free from recognized hazards that are causing or are likely to cause death or serious physical harm” to employees. Since OSHA doesn’t have a rule to address each individual safety issue, employers can take steps to meet this general duty by providing training in topics that aren’t covered by OSHA regulations. Training that addresses ergonomics, lifting safety, heat stress, or workplace violence comes under this category.
- 10- and 30-hour training is another area to consider. These classes are part of OSHA’s voluntary outreach training program. They provide basic safety training for either general industry or construction. Even though OSHA doesn’t require this training, several states do have this requirement for construction workers, particularly to work on publicly funded construction sites. In addition, many private construction or service contracts can also include provisions for 10- or 30-hour training.
- Other voluntary standards and minimum criteria guidance on developing and delivering safety and health training exist and OSHA encourages employers to review these documents as well:
- ANSI/ASSP Z490.1-2024, Criteria for Accepted Practices in Safety, Health, and Environmental Training, and
- NIEHS/WETP (National Institute of Environmental Health Sciences/Worker Education and Training Program), Minimum Health and Safety Training Criteria Guidance for Hazardous Waste Operations and Emergency Response (HAZWOPER).
Characteristics of sound training programs
- The best training programs are accurate, credible, clear, and practical.
A general review of training “best practices” reveals four characteristics that sound training programs have in common. The best training programs are accurate, credible, clear, and practical.
Accurate
Training materials should be prepared by qualified individuals, updated as needed, and facilitated by appropriately qualified and experienced individuals employing appropriate training techniques and methods.
Credible
Training facilitators should have a general safety and health background or be a subject matter expert in a health or safety-related field. They should also have experience training adults or experience working with the target population. Practical experience in the field of safety and health as well as experience in training facilitation contribute to a higher degree of facilitator credibility.
Clear
Training programs must not only be accurate and believable, but they must also be clear and understandable to the participant. If the material is only understandable to someone with a college education or someone who understands the jargon, then the program falls short of meeting workers’ needs.
Training materials should be written in the language and grammar of the everyday speech of the participants. Training developers should ensure that readability and language choices match the intended audience.
If an employee does not speak or comprehend English, instruction must be provided in a language that the employee can understand. Similarly, if the employee’s vocabulary is limited or there is evidence of low literacy among participants, the training must account for this limitation. Remember that workers may be fluent in a language other than English, or they may have low literacy in both English and their primary language. Training needs to be adjusted to accommodate all the factors that are present.
Practical
Training programs should present information, ideas, and skills that participants see as directly useful in their working lives. Successful transfer of learning occurs when the participant can see how information presented in a training session can be applied in the workplace.
Overview of best practices for training adults
- Proper training of providers and facilitators will maximize benefits for participants.
Training providers and instructional facilitators who recognize and embrace characteristics of sound training and principles of adult education will maximize the benefits of the training for their participants.
Training techniques, methods, and modes
- Training must be both in a language and vocabulary that workers can understand and should primarily be activity-based learning.
- Proven adult learning techniques should be at the core of training development and delivery.
- Peer-to-peer training with activity-based learning is one effective model for worker training. Effective development of peer trainers requires ongoing organizational support to the developing peer trainer.
- Activity-based learning should fill at least two-thirds of training hours (no more than one-third is lecture).
- Training must be provided in a way that workers receiving it can understand. In practical terms, this means that the training must be both in a language and vocabulary that the workers can understand.
- While computer-based training (CBT) can augment the effectiveness of safety and health training for workers, it should not be the sole form of training that workers receive.
Needs assessment
- Safety and health training should be preceded by a needs assessment.
Safety and health training should be preceded by a needs assessment to ensure the training meets the needs of the participants. Needs assessments can also be used to learn more about the target population’s knowledge, experience, learning styles, reading and writing skills, and interests.
Evaluation of training
- Evaluate the training to assess for future changes.
Evaluating training allows the company to determine whether the program is achieving its intended outcomes, specifically, whether employees understand the material, can apply it to their job tasks, and are working more safely as a result. This process helps identify gaps in knowledge, deficiencies in delivery methods, or areas where additional or refresher training may be needed.
An effective training evaluation should consider multiple factors, such as:
- Knowledge retention: Are employees able to demonstrate understanding through testing, discussion, or observation?
- Behavioral changes: Has employee behavior improved on the job (e.g., safer work practices, proper PPE use, adherence to procedures)?
- Incident and near-miss trends: Are injuries, near misses, or compliance issues decreasing following training?
- Employee feedback: Do employees feel the training was relevant, clear, and applicable to their work?
- Regulatory alignment: Does the training continue to meet applicable OSHA or other regulatory requirements?
Evaluation methods may include quizzes, hands-on demonstrations, supervisor observations, safety audits, and review of incident data. Results from these evaluations should be used to continuously improve the training program, ensuring it remains effective, up to date, and aligned with workplace hazards and operational needs.
Principles of adult education
- Apply principles of adult education to the training programs.
The following are the basic principles of how adults learn, which is directly applicable to safety and health training programs:
- Adults are voluntary learners: Most adults learn because they want to. They learn best when they have decided they need to learn for a particular reason.
- Adults learn needed information quickly: Adults need to see that the subject matter and the methods are relevant to their lives and to what they want to learn. They have a right to know why the information is important to them.
- Adults come with a good deal of life experience that needs to be acknowledged: They should be encouraged to share their experiences and knowledge.
- Adults need to be treated with respect: They resent an instructor who talks down to them or ignores their ideas and concerns.
- Adults learn more when they participate in the learning process: Adults need to be involved and actively participating in class.
- Adults learn best by doing: Adults need to “try-on” and practice what they are learning. They will retain more information when they use and practice their knowledge and skills in class.
- Adults need to know where they are heading: Learners need “route maps” with clear objectives. Each new piece of information needs to build logically on the last.
- Adults learn best when new information is reinforced and repeated: Adults need to hear things more than once. They need time to master new knowledge, skills, and attitudes. They need to have this mastery reinforced at every opportunity.
- Adults learn better when information is presented in different ways: They will learn better when an instructor uses a variety of teaching techniques.
Instructor-trainee ratios
- Keep training class size at 25 people or fewer.
Class sizes of about 25 people (or fewer) work best, according to the Occupational Safety and Health Administration (OSHA), especially when incorporating activity-based learning into the training experience. When class size exceeds 30 people, it is advisable to provide a second instructor and divide the class into two sections during instruction.
Participation
- Participatory training methods draw on participants’ own experiences.
- Participatory methods work well with people who have difficulty reading and writing.
Participatory training involves learners actively in the process by drawing on their experience, encouraging teamwork, and using hands-on problem solving. These methods allow participants to identify and analyze workplace hazards and develop practical solutions, while promoting meaningful interaction between workers and instructors.
This approach is particularly effective for workers with limited literacy because it emphasizes learning through discussion and hands-on activities rather than reading. It also enables instructors to observe engagement and identify individuals who may need additional support.
Participatory training methods:
- Build on workers’ existing knowledge and experience;
- Emphasize learning by doing, not just listening; and
- Foster a comfortable, engaging learning environment.
Common participatory techniques include:
- Icebreakers
- Risk mapping
- Role-playing Games
- Small group exercises
- “Trigger” visuals
- Brainstorming
- Demonstrations and hands-on activities
- Participatory lectures
Objectives
- Pick one or two objectives to accomplish during training even if it is only refresher training.
While the company may only be conducting a required refresher training, it’s advisable to plan ahead of time one or two objectives that they would like to accomplish during the training — aside from “meeting the Occupational Safety and Health Administration (OSHA) requirement.”
Pick one or two items that the company would like to see workers know more about or do more effectively, then incorporate those into the training. That way, each training session will be valuable, rather than just fulfilling a requirement. Importantly, even if “canned” training materials are used, make sure to incorporate the company’s own objectives.
Evaluating program effectiveness
- An evaluation of training can give employers the information necessary to decide whether workers have achieved desired results.
To make sure that the training program is accomplishing its goals, an evaluation of the training can be valuable. Training should have, as one of its critical components, a method for measuring the effectiveness of the training. When course objectives and content are developed for a training program, a plan for evaluating the training session(s) should be designed and integrated into the program’s other elements. An evaluation will help employers or supervisors determine the amount of learning achieved and whether a worker’s performance has improved on the job.
Among the methods for evaluating training are:
- Student opinion. Questionnaires or informal discussions with workers can help employers determine the relevance and appropriateness of the training program.
- Assessment of student learning. This can be accomplished through such activities as demonstration skills or testing.
- Supervisors’ observations. Supervisors are in good positions to observe a worker’s performance — both before and after the training — and to note improvements or changes.
- Workplace improvements. The ultimate success of a training program may be changes throughout the workplace that result in reduced injury and illness rates.
However it is conducted, an evaluation of training can give employers the information necessary to decide whether workers have achieved the desired results, and whether the training session should be offered again at a future date.
Evaluation
- Adjust and monitor how well the program performs whenever there are opportunities to improve it.
Periodically, it is important to step back and evaluate what works and what does not, and whether the company is on track to achieve the program goals. Evaluate the program initially to verify that it has been implemented as intended and on a regular basis once it is established. Whenever there are opportunities to improve the program, make adjustments, and monitor how well it performs as a result. Share the results of the monitoring and evaluation within the workplace to help drive further improvement. Program evaluation and improvement means that the company will:
- Establish, report, and track metrics that indicate whether the program is effective.
- Evaluate the overall program, initially and periodically, to identify deficiencies and opportunities for improvement.
Fundamentals of program evaluation and improvement
- A safety and health evaluation looks at the systems created to carry out the safety and health program.
Once the safety and health program elements are in place, it is easy to think that the work is done. However, a critical next step is to continually evaluate the program and make improvements.
This process is more than an inspection or an audit. Inspections are necessary to look at the facility, the process, and the individual jobs in order to identify and then to eliminate or control any hazards that may exist. Audits focus on program activities and seek to determine whether specific objectives have been met.
For example, if the company is assessing employee participation by looking at the activities of the safety committee, they will want to know if that committee met at the intervals specified, and if most of the members attended each meeting. These are audit questions.
But beyond this simple accounting are larger questions. For example, has employee participation at safety committee meetings helped improve the worksite’s safety and health program? How is the work of the safety committee helping meet the goal? These are the kinds of issues addressed by an evaluation. A safety and health evaluation looks at the systems created to carry out the safety and health program. It asks if these systems are working effectively and efficiently. All systems that contribute to the safety and health program should be reviewed.
Note that OSHA offers a self-evaluation checklist for a safety and health program. See https://tinyurl.com/3redwtz5.
Metrics — Measuring safety
- There are two types of measurements for safety, leading indicators and lagging or trailing indicators.
Here’s a topic that goes hand-in-hand with program evaluation: measuring safety. How do we do it? What should we be measuring? There are essentially two types of measurements or metrics. There are leading indicators and lagging or trailing indicators.
- Lagging indicators are those things we look at after an injury or incident has already occurred. The common one is incidence rate or DART rate (DART refers to cases with Days Away from work or with Restricted duty or Transfer). There’s nothing necessarily wrong with using lagging indicators if they are then complemented with other measurements. In particular, upper management may be interested in some of the incident rate metrics, and they do have a place, particularly if they are descriptive enough to give results at the department level and if they can be tied to causes of injuries. But employers should really consider moving toward leading indicators.
- Leading indicators are activities that occur prior to an incident ever occurring. They are those activities that occur in attempts to try to head off injuries.
Leading indicators that support management leadership
- Various suggested leading indicators can help measure the implementation of recommended practices for management leadership.
Here are some suggested leading indicators for measuring the implementation of recommended practices for management leadership:
- Percentage of managers and supervisors who attend mandatory safety and health training for workers.
- Number of times each month that top management initiates discussion of a safety and health topic.
- Average score on survey questions related to workers’ perception of management’s safety and health commitment.
- Number of worker-reported hazards or concerns for which employers initiated corrective action within 48 hours (compared with the total number of such reports).
- Average time between worker report of a hazard or concern and management acknowledgment of the report.
- Number of safety-related line items in budget and percentage of these fully funded each year..
When to take action: Take action when trends indicate that management leadership could be improved. For example, if a busy owner or chief executive officer (CEO) skipped the safety meeting last year, note this year’s meeting in their schedule ahead of time so they prioritize attendance. Similarly, if workers are reporting hazards that are not ultimately addressed due to lack of resources or competing priorities, it may be wise to determine what, if any, additional resources can be allocated to control those hazards or manage competing priorities.
Leading indicators that support worker participation
- Various suggested leading indicators can help measure the implementation of recommended practices for worker participation.
Here are some suggested leading indicators for measuring the implementation of recommended practices for worker participation:
- Number of workers asked for feedback on good safety goals ahead of safety meetings.
- Number of workers involved in developing safety procedures.
- Number of workers participating in toolbox talks.
- Number of workers participating in injury investigations.
- Safety perception survey participation rate.
- Number of workers involved in developing task-specific job safety analyses/job hazard analyses on how to perform routine tasks safely.
- Number of workers participating in accident investigation teams and helping to identify/implement corrective actions to eliminate hazards.
When to take action: Take action when trends indicate that worker participation could be improved. For example, if workers have not been participating in hazard prevention meetings, find out why. For example, some workers may feel that their managers do not value their opinions. In such instances, take actions to change that perception and meaningfully increase worker participation rates in safety meetings.
Leading indicators that support hazard identification
- Various suggested leading indicators can help measure the implementation of recommended practices for hazard identification assessment.
Here are some suggested leading indicators for measuring the implementation of recommended practices for hazard identification and assessment:
- Frequency with which preventive equipment maintenance tasks are initiated and completed on schedule.
- Number of hours passed after an incident before an investigation is started.
- Number of hours passed after an incident before an investigation is completed.
- Percentage of incident investigations that include a root cause investigation.
- Percentage of daily/weekly/monthly inspections completed.
- Percentage of inspections that include a follow-up inspection to ensure that the hazard has been controlled.
When to take action: Take action when trends indicate that hazard identification and assessment methods could be improved. For example, if the goal is to complete all investigations within a week of the incident, and there are findings that the average investigation has taken over two weeks, talk to the workers about the delay and develop a plan to complete them faster. Similarly, if workers only conduct root cause investigations 50 percent of the time, but the goal is 100 percent of the time, try to find out why they did not always conduct them and develop a plan that will ensure that they become a routine part of the investigations.
Leading indicators that support hazard prevention and control
- Various suggested leading indicators can help measure the implementation of recommended practices for hazard prevention and control.
Here are some suggested leading indicators for measuring the implementation of recommended practices for hazard prevention and control:
- Length of time interim controls have been in place.
- Percentage of recommendations implemented that pertain to personal protective equipment (PPE) hazard controls, administrative controls, engineering controls, substitution, and elimination.
- Number of special work permits filled out.
- Number of cartridge filers with an end of service life indicator that were returned or replaced before the indicator turned red.
- Number of hazards identified where leading indicators were used to control the hazard.
- Percentage of hazards abated on the same day, week, or month in which the hazard was identified.
- Number of workers required to wear respiratory protection.
- Number of unacceptable risks identified during risk assessments.
When to take action: Take action when trends indicate that hazard prevention and control methods can be improved. For example, if some recommendations continue to remain open past their due date, find out why this might be the case and try to correct the issue so recommendations can be addressed on time. Similarly, if the company has not been using leading indicators as a tool for controlling hazards, optionally implement a leading indicator program and start with just one or two leading indicators during the program’s first year.
Leading indicators that support training and education
- Various suggested leading indicators can help measure the implementation of recommended practices for education and training.
Here are some suggested leading indicators for measuring the implementation of recommended practices for education and training:
- Number of trainings provided to workers on hazard recognition and control compared with worker attendance rates at these trainings.
- Percentage of workers receiving mandatory training on schedule.
- Percentage of incident investigations listing insufficient number of workers trained on how to recognize and report a hazard or near-miss compared with the number of workers that report understanding the training they have received.
- Percentage of improvement on post-training assessment scores over pre-training assessment scores.
When to take action: Take action if trends indicate that the company is not effectively administering training. For example, a leading indicator may reveal that they offer regular training on how to recognize and report hazards, but workers still do not clearly understand how to recognize and report certain hazards after completing the training. In this example, ask workers that have experience or knowledge of the hazard for suggestions on hands on training approaches and simulations that could be more effective.
Auditing the system
- Audits may be voluntary or required.
- Audits can be mandatory if they are part of the settlement of an enforcement action between a government agency or if they are required by a regulation.
An audit is a systematic, objective tool to assess regulatory compliance in the workplace. An audit usually involves a survey of the workplace to:
- Identify what regulations apply to a company or facility.
- Determine whether environmental and workplace safety requirements, and corporate policies and procedures regarding compliance are being followed.
- Assess management systems currently in place to ensure compliance. An audit may also look at and evaluate the methods used to achieve compliance.
Audits may be voluntary, or they may be required. In a voluntary audit, the facility management decides on its own that it would be advantageous to conduct an audit, whether to evaluate compliance status, or to identify any suspected problems.
Audits can be mandatory, however, if they are part of the settlement of an enforcement action between a governmental agency and the company. The Environmental Protection Agency (EPA) and Occupational Safety and Health Administration (OSHA) regularly include an audit requirement in their settlement agreements with companies that have violated environmental or safety regulations.
Audits may also be mandatory if they are required by a regulation. For example, under the Clean Air Act Amendments of 1990, EPA has the authority to require auditing by regulation. Some OSHA regulations, such as those governing lockout/tagout and process safety management, also have self-audit requirements.
Benefits of safety audits
- There are multiple benefits to a safety audit.
There are numerous benefits to an audit if it is properly conducted and acted upon.
- An audit can help to identify and correct regulatory problems, which can improve workplace safety, and help reduce company and personal liability.
- It can serve as an educational tool. It can increase employee awareness and understanding of environmental and safety regulations, and the audit process can also be an opportunity to demonstrate the company’s commitment to compliance.
- Audits can potentially identify ways to improve the efficiency and cost-effectiveness of the compliance program.
- Workplace audits may be viewed favorably by regulatory agencies and criminal prosecutors. A thoroughly completed audit with proper follow-up can signal that the company is making a good-faith effort to comply with applicable regulatory requirements.
Potential drawbacks to safety audits
- There are certain drawbacks to a safety audit.
Although audits provide definite benefits, there are some potential negatives as well. Before conducting an audit, be aware of the following points.
- An audit may uncover previously unknown problems, and the solution may not always be simple. If a violation of a regulation or law is discovered, what will be done? Should it be disclosed to the regulatory agency?
- Failure to correct problems identified in an audit can potentially lead to many more problems. Implementing corrective actions in a timely manner is an important part of conducting an audit. If problems are identified in an audit and nothing is done to correct the situation, this may be used against the company in future enforcement proceedings.
- Consult with legal counsel to obtain further information about whether audit information must be disclosed to the Occupational Safety and Health Administration (OSHA) or Environmental Protection Agency (EPA). OSHA and EPA do not, generally, require disclosure of audit reports because these agencies do not want to discourage companies from self-auditing to improve environmental and/or safety compliance. However, there have been instances when the agencies have subpoenaed audit information during an investigation, using it against the company.
Making audits work
- The benefits of safety audits outweigh the drawbacks.
Of course, the benefits of workplace safety audits outweigh the negatives, and in no way should the drawbacks discourage the company from performing them. There are some important points to keep in mind to help make safety audits a consistent benefit to the company.
Research the areas to be inspected
- The inspectors should research the jobsites that will be inspected.
The inspectors should know the jobsites that will be inspected, the types of tasks being conducted, and the accident experience of the work area(s). This will entail a little up-front research, but with those details, the auditor will have a better knowledge of the potential problem areas within the work area.
Gather the necessary equipment
- Auditors should have certain items with them during the audit.
Although it depends upon the area to be inspected, auditors should have the following items with them during the audit:
- Personal protective equipment relevant to the area,
- Any necessary sampling devices,
- Camera,
- Flashlight,
- Any necessary electrical testing equipment, and
- Paper and pen or pencil.
The types of items brought into the area will depend upon how in-depth the inspection will be, the type of equipment that is being inspected, and the background of the inspector.
Ensure adequate training of the inspector
- Review regulations to increase the inspectors’ knowledge.
Unless the individuals who will conduct the inspection have a well-rounded background in the safety field, they may need training or education on safety knowledge or regulations pertinent to the areas to be inspected. Reviewing the regulations will increase the inspectors’ knowledge base and will probably enable them to observe more unsafe conditions or procedures.
Set an appropriate time for the inspection
- Perform the inspection at a time and in a way that it does not interfere with the production process.
Although spot audits of equipment and procedures are useful, it is helpful to arrange schedules where most of the equipment will be operating, and when most employees will be in the immediate area. On the other hand, the inspection should be performed at a time and in a way that it does not interfere with the production process. Unless the point of the inspection is to see if those time periods generate more hazards than other time periods, avoid particularly heavy workflow periods.
Use checklists effectively
- Modify audit checklists to apply to the business.
Using a checklist during the audit will give some indication of where to begin to make the business safer and more healthful for all employees. But remember that checklists are by no means all-inclusive, and the company may wish to add to them, or delete portions that do not apply to the business. Carefully consider each item, then make a decision; don’t spend time with items that obviously have no application to the business.
After the audit, ensure that the recommendations and implementation of solutions are shared with all managers, line supervisors, and employees. Be sure that they understand what they are required to do, and the reasons for any changes in job procedures. Organize team meetings or meet with each affected employee individually to explain any new information. The bottom line: always look for hazards that threaten the health and safety of workers; then find the most efficient way to prioritize and control them.
Written safety plans
Written safety plans are the evidence of management and employee concern for safety and health that a company displays on a day-to-day basis. In order to heighten awareness for safety, your company should develop a comprehensive safety program with written safety plans for each topic covered in the program. Having a formal written program helps you to define and direct the safety effort. Ensure that the plans cover all major safety issues on a topic-by-topic basis, organizing the safety information in an accessible and logical order.
Purpose of written plans
The main purpose of any written plan is to set standard procedures for daily, weekly, monthly, and annual activities associated with that topic. Setting standard procedures saves money by streamlining area efforts, and by providing an ongoing effort that keeps safety a high priority.
The effort to develop a written safety plan takes time and money, but in return it provides a company and its employees with:
- Goals to achieve, and rules to live by.
- An implied and stated level of commitment to safety.
- Standards and expectations of employees.
- Indisputable boundaries, and disciplinary justification for failure to stay within those boundaries.
- Defined safety roles and responsibilities for managers, supervisors, and employees.
- Conservation and direction of the safety effort.
- More resourceful and efficient use of the safety budget.
- An increased element of control at worksites.
The purpose of written safety and health plans may vary from one company to another. One, several, or all of the reasons listed above may motivate your company to create a written safety and health program supported by plans.
Tips for plan implementation
Successful implementation of your written safety plans and procedures depends on the following key factors.
Keep a long-term perspective
Even with the implementation of written safety plans, improvement will not happen overnight. The planning and organizing of the activities that will emit improvement take time and commitment from all levels of the company. But, keep in mind that the longer your organization takes to implement and conform to its plans and procedures, the longer it will continue to pay for deviations. And, unless implementation remains a priority, your organization risks losing the commitment of its employees.
Secure top management commitment
If your company’s written plan implementation initiative is dependent on one person’s leadership, the initiative will usually die, and the plans will ultimately be ineffective; the plans and procedures need to be accepted company-wide. And, piecemeal implementation virtually guarantees failure. Therefore, evident and visible examples of management commitment toward developing written plans must be established by top management of the company.
Enlist company-wide participation
Plans and procedures help define job roles and expectations. The individuals in an organization that best understand their roles, know what is expected, and know how to improve it, are the ones performing them. Plans and procedures empower employees to make decisions that positively affect the bottom-line results of the company. Once an issue or activity of the company has been determined to need a policy, employee input should be solicited throughout the development and implementation process.
Provide training and tools
Training is vital in order to reach a common understanding of the goals and objectives of your plans, and the means to attain them. Management needs to also realize that training does not stop, and can never be considered finished. This continuous training is accomplished by constantly reinforcing the behavior dictated by the plans and procedures, and through open, up-front communication.
Develop measurement and reporting systems
Measurements based on facts (statistical data) must be established to assess the effectiveness of your plans and procedures; measurements might include measuring deviations from a procedure. In addition, the reporting of information must be done regularly, and it must be timely, accurate, and shared. All employees require information so that problems (deviations) can quickly be identified, analyzed, and eliminated.
Provide effective communication
The implementation of written plans and procedures may have a significant impact on the activities of your organization. They will establish definite guidelines, and will call for much tighter integration among all departments and individuals. Several factors go into effective communication of your written plans, such as:
- All written plans must have a clear objective statement that can be understood by all.
- Definite training and review of how the plans will be created and introduced.
- An opportunity for all employees to become involved in the information gathering process and participation in policy development.
Focus four hazards
- Four major hazards that construction workers face are fall, struck-by, caught–in or –between, and electrocution hazards.
Construction safety is one of OSHA’s top concerns. Construction is among the most dangerous industries in the country and construction inspections comprise 60 percent of OSHA’s total inspections.
OSHA has determined the four major hazards that construction workers face are:
- Fall hazards
- Struck-by hazards
- Caught–in or –between hazards
- Electrocution hazards

Construction employers whose workers are exposed to these four major hazards must comply.
Falls
- Someone is at risk for a fall hazard if working at a height of six feet or more.

Fall hazards are present at most worksites and many workers are exposed to these hazards daily. A fall hazard is anything at the worksite that could cause someone to lose their balance or lose bodily support and result in a fall. Any walking or working surface can be a potential fall hazard. Anytime someone is working at a height of six feet or more, they are at risk.
Fall hazard incidents are injuries produced by impact between the injured person and the source of injury when the motion producing contact was generated by gravity.
Fall examples
- Fall hazards in construction cause a variety of accidents.
Fall hazard incidents are injuries produced by impact between the injured person and the source of injury when the motion producing contact was generated by gravity. Fall hazards in construction cause accidents such as the following:
- A makeshift scaffold collapsed under the weight of four workers and their equipment, seriously injuring all four.
- A worker carrying a sheet of plywood on a flat roof stepped into a skylight opening and fell to the level below.
- A roofer, while attempting to remove a roof opening cover, fell approximately 21 feet to the concrete floor below and was killed.
- A construction worker was working from a carpenters’ wall bracket scaffold without fall protection. The worker fell 19 feet to the ground, sustained blunt trauma to the head and later died.
Determine the threshold height
- Fall protection must be provided when working over dangerous equipment and machinery.
The Occupational Safety and Health Administration (OSHA) generally requires that fall protection be provided at four feet in general industry, five feet in maritime and six feet in construction. However, regardless of the fall distance, fall protection must be provided when working over dangerous equipment and machinery. The importance of fall protection cannot be stressed enough.
On scaffolds, fall protection is required at 10 feet. In steel erection, workers on walking/working surfaces with unprotected sides or edges above 15 feet must be protected. (There are some exceptions for connectors and workers working in controlled decking zones for heights between 15 and 30 feet. See 1926.760).
Identify sources of fall hazards
The following are sources of fall hazards:
- Unprotected roof edges, roof and floor openings, structural steel, and leading edges
- Improper scaffold construction
- Unsafe portable ladders
Unprotected roof edges, roof and floor openings, structural steel, and leading edges
Almost all sites have unprotected sides and edges, wall openings, or floor holes at some point during construction. If these sides and openings are not protected at the site, injuries from falls or falling objects may result, ranging from sprains and concussions to death. Falls to a lower level are a major cause of fatalities in construction. Factors such as improperly covered or protected floor holes and openings are a common fall hazard. It‘s easy to step into a hole or opening when carrying something that blocks one’s forward view.
Roofing falls are the leading cause of roofing injuries and fatalities. Roofing, siding, and sheet metal work have the highest rate of occupational injuries and illnesses for a non-manufacturing industry. One of the most frequently cited serious Occupational Safety and Health Administration (OSHA) violations involving roofing and fall protection is unprotected sides and edges.
Workers involved in steel erection are exposed to fall hazards. Typically, more ironworkers are killed from falls than workers in any other construction occupation. The rate of work-related deaths among ironworkers is 10 times higher than the construction average. The most frequently cited serious OSHA violations involving steel erection are fall protection, fall hazard training and fall protection for connectors.
Improper scaffold construction
Working with heavy equipment and building materials on the limited space of a scaffold is difficult. Without fall protection or safe access, it becomes hazardous. Falls from improperly constructed scaffolds can result in injuries ranging from sprains to death. Guardrails or personal fall arrest systems for fall prevention/protection are required for workers on platforms 10 feet or higher.
Most of the workers injured in scaffold accidents attribute the accident to factors like the planking or support giving way, or to lack of guardrails or other fall protection. OSHA’s most frequently cited serious scaffold violations include lack of fall protection; scaffold access; use of aerial lifts without body belts and lanyards, platform construction and no worker training.
Unsafe portable ladders
A person can risk falling if a portable ladder is not safely positioned each time it is used. While on a ladder, it may move and slip from its supports. A person can also lose balance while getting on or off an unsteady ladder. Falls from ladders can cause injuries ranging from sprains to death. Bureau of Labor Statistics (BLS) data show that falls from ladders account for over 100 fatalities each year.
Factors that contribute to falls from ladders are ladder slip (top or bottom), overreaching, slipping on rungs/steps, defective equipment and improper ladder selection for a given task. Frequently cited OSHA ladder violations include not having a portable ladder extend three feet above the landing, no worker training, and improper use of the top of stepladders.
Protect employees from fall hazards
- Guardrails, safety net systems, and personal fall arrest systems are methods of protection for workers exposed to vertical drops of six feet or more.
The three generally acceptable methods of protection for workers on a construction site who are exposed to vertical drops of six feet or more are guardrails, safety net systems, and personal fall arrest systems.
- Guardrails are considered prevention systems, as they stop someone from having a fall in the first place.
- Safety net systems are designed to catch and break a fall. They must be placed as close as practicable under the working surface, but never more than 30 feet below.
- A personal fall arrest system consists of an anchorage, connectors, and a full-body harness that work together to break the fall. In general, it is better to use fall prevention systems, such as guardrails, than fall protection systems, such as safety nets/fall arrest devices, because prevention systems provide more positive safety means.
Scaffold work requires guardrails or a personal fall arrest system on any platform 10 feet or higher. Also, do not climb cross-bracing as a means of access; safe access must be provided by the employer. Ensure that fall protection equipment is right for the work being done, in good condition, and that it is used properly. Remember that the employer needs to provide the worker with protection to prevent falls at the worksite.
The employer must provide the worker with training if they are exposed to fall hazards. The training program must train the worker to recognize the hazards of falling and explain the procedures to be followed in order to minimize fall hazards. The worker must also be trained before working on scaffolds and when working with ladders.
Use a checklist for fall prevention
- A checklist of eight items can help to prevent fall hazards.
The following are some things the employer should do to prevent fall hazards at the worksite:
- Develop a written fall protection plan.
- Identify potential fall hazards prior to each project and during daily walk-arounds. Pay attention to hazards associated with routine and non-routine tasks.
- Eliminate the need for fall protection where possible by rescheduling the task, isolating the task, or changing the task.
- Ensure that fall protection equipment is appropriate to the task, in good condition and used properly.
- Conduct general fall prevention training on a regular basis.
- Train workers on the specific fall hazards identified and on the required personal protective equipment.
- Conduct regular inspections of fall protection equipment in accordance with the manufacturer’s recommendations and the Occupational Safety and Health Administration’s (OSHA’s) requirements.
- Emphasize fall hazards unique to the site, such as open floor holes or shafts, riser penetrations and skylights.
Provide necessary fall protection equipment
- Employers are required to provide fall protection when a worker is exposed to a fall hazard.
The Occupational Safety and Health Administration’s (OSHA’s) fall protection standards require employers to provide fall protection when exposed to a fall hazard. The standards set the criteria and practices for fall protection systems and require training. The standards cover hazard assessment, fall protection, and safety monitoring systems. Controlled access zones, safety nets, and guardrail, personal fall arrest, warning line, and positioning device systems are also addressed.
Employers are required to assess the workplace to determine if the walking/working surfaces have the strength and structural integrity to safely support workers. A worker is not permitted to work on those surfaces until it has been determined that the surfaces have the strength and structural integrity to support all workers. Once employers have determined that the surface is safe for workers, the employer must select one of the permitted types of fall protection for the work operation if a fall hazard is present.
For example, if a worker is exposed to falling six feet or more from an unprotected side or edge, the employer must select a guardrail system, safety net system, or personal fall arrest system to protect the worker.
If personal fall protection systems are used, employers must pay particular attention to identifying attachment points and to ensuring that workers know how to properly don and inspect the equipment.
Ensure proper scaffold construction
- Employers must provide safe access to scaffold platforms.
Employers must construct all scaffolds according to the manufacturer’s instructions. A “competent person” must supervise as scaffolds are erected, moved, taken apart or changed, and must inspect the scaffolding. A guardrail system or a personal fall arrest system is required for scaffolds more than 10 feet above a lower level. In addition, employers must provide safe access to scaffold platforms.
Designate a competent person
- A competent person identifies existing and predictable hazards in the surroundings or working conditions and has authorization to take corrective measures to eliminate them.
The Occupational Safety and Health Administration (OSHA) defines a “competent person” as “one who is capable of identifying existing and predictable hazards in the surroundings or working conditions which are unsanitary, hazardous, or dangerous to employees, and who has authorization to take prompt corrective measures to eliminate them.” The employer must designate a competent person for certain construction activities that may have caught-in or –between hazards:
- Training for scaffold erection;
- Inspections of excavations, the adjacent areas, and protective systems;
- Engineering survey prior to demolition of a structure (and any adjacent structure where workers may be exposed) to determine the condition of the framing, floors, and walls, and possibility of unplanned collapse; and
- Continuing inspections during demolition to detect hazards resulting from weakened or deteriorated floors, or walls, or loosened material.
Ensure proper ladder use and condition
- Employers must maintain ladders in proper condition.
Employers are required to provide ladders where necessary and maintain the ladders in proper condition. The following rules apply to all ladders:
- Maintain ladders free of oil, grease, and other slipping hazards.
- Do not load ladders beyond their maximum intended load nor beyond their manufacturer’s rated capacity.
- Use ladders only for their designed purpose.
- Use ladders only on stable and level surfaces unless secured to prevent accidental movement.
- Do not use ladders on slippery surfaces unless secured or provided with slip-resistant feet to prevent accidental movement. Do not use slip-resistant feet as a substitute for exercising care when placing, lashing or holding a ladder upon slippery surfaces.
- Secure ladders placed in areas such as passageways, doorways or driveways, or where they can be displaced by workplace activities or traffic to prevent accidental movement. Or use a barricade to keep traffic or activity away from the ladder.
- Keep areas clear around the top and bottom of ladders.
- Do not move, shift or extend ladders while in use.
- Use ladders equipped with nonconductive side rails if the worker or the ladder could contact exposed energized electrical equipment.
- Face the ladder when moving up or down.
- Use at least one hand to grasp the ladder when climbing.
- Do not carry objects or loads that could cause loss of balance and falling.
Provide training
- The employer must provide training if a worker is exposed to fall hazards.
The employer must provide training if a worker is exposed to fall hazards. The training program must train the worker to recognize the hazards of falling and explain the procedures to be followed in order to minimize fall hazards. The worker must also be trained before working on scaffolds and when working with ladders.
Caught-in and between
- The key factor in deciding between a Caught event and a Struck event is whether the impact of the object alone caused the injury.
The key factor in deciding between a Caught event and a Struck event is whether the impact of the object alone caused the injury. When the impact alone creates the injury, the event should be recorded as Struck. When the injury is created more as a result of crushing injuries between objects, the event should be recorded as Caught. Events that should be classified as Caught include:
- Cave-ins (trenching)
- Being pulled into or caught in machinery and equipment (this includes strangulation as the result of clothing caught in running machinery and equipment)
- Being compressed or crushed between rolling, sliding, or shifting objects such as semi-trailers and a dock wall, or between a truck frame and a hydraulic bed that is lowering
Caught-in and between examples
- There are various example of caught- in or –between hazards in construction accidents.
Caught- in or -between hazards in construction cause accidents such as the following:
- A worker was ripping a 6-inch piece of wood on an unguarded compound miter saw. The worker’s left thumb was caught in the saw and amputated.
- An employee was performing diagnostic work on a water truck at a construction site. The worker crawled under the operating truck. The employee’s work shirt collar and coveralls became caught on a projecting set screw on the rotating pump shaft. The set screw pulled the worker into the pump shaft. The employee died in route to the hospital.
- A worker climbed onto an I-beam to clean muck off the tail pulley of a conveyor belt attached to a separator. While the conveyor system was energized and in operation, the employee reached between the feed and return of the belt in front of the tail pulley to brush the muck off the belt. The employee was caught by the moving belt, and the employee’s hand and arm were pulled into a pinch point in the tail pulley. The employee’s arm was fractured.
- A worker was in the bottom of a 9.5-foot-deep trench, setting grade for concrete pipe while the employer was installing additional shoring. During the shoring installation, the west wall at the south end of the excavation caved-in and covered the worker. There was no shoring or protective system at the location of the trench. The employee was dug out by coworkers and the fire department and survived.
- A worker was operating a road grader when the engine died, and the vehicle began to roll toward a small ravine. The employee jumped off the grader but was pulled under the grader as it overturned. The employee was killed when he was crushed underneath the tires.
- An employee was working from an aerial lift, which was in the “up” position, under an I-beam. The employee accidentally came into contact with the “drive/steer” lever, which made the manlift move. The employee was killed when pinned between the I-beam and manlift control panel.
- A worker was cleaning an asphalt paving spreader. Another worker was repairing a pavement roller. The roller was accidently put into motion and it rolled toward the spreader. The first employee was injured when pinned between the two machines.
- An employee was placing dunnage underneath the sheet metal. A coworker was operating a powered industrial forklift loading sheet metal onto a flatbed truck. As the coworker was loading the sheet metal onto the flatbed truck, one of the bands holding the sheet metal together either broke or the clamp was not properly secured. The back band failed and the load of sheet metal slid forward onto the employee, pinning the employee under the sheet metal and against a dumpster. The employee was hospitalized and treated for a fractured leg and a dislocated knee.
Check for unguarded moving parts
- Machines must be properly guarded or de-energized.
Almost all sites use machinery that has moving or rotating parts or that requires maintenance or repair at some point during construction. If machinery is not properly guarded or de-energized (locked-out) during maintenance or repair, injuries from caught-in or –between hazards may result, ranging from amputations and fractures to death. When machines or power tools are not properly guarded, workers can get their clothing or parts of their body caught in the machines. Workers can be trapped and crushed under heavy equipment that tips, especially if they are thrown from the equipment.
Inspect for buried in or by hazards
- Cave-ins of unprotected trenches and excavations pose a buried in or by hazard.
The major hazard related to buried in or by is cave-ins of unprotected trenches and excavations. Cave-ins crush or suffocate workers. In addition, trenches may contain hazardous atmospheres; workers can drown in water, sewage, or chemicals in the trenches; and if working around underground utilities, workers may also face burns, electrocution or explosions from steam, hot water, gas, or electricity. Workers who are working underneath large scaffolds may also be buried if the scaffolds collapse. Workers may be buried and crushed by walls that collapse during demolition.
Look for pinned-between hazards
- A worker can be pinned between equipment and other materials.
A worker can be pinned between equipment and a solid object, such as a wall or another piece of equipment; between materials being stacked or stored and a solid object; or between shoring and construction materials in a trench. These types of hazards can result in multiple broken bones, asphyxiation, or death.
Use machinery that is properly guarded
- Avoid wearing loose clothing or jewelry.
- Never remove a safety guard when a tool is being used.
Be sure to avoid wearing loose clothing or jewelry that can be caught in moving parts.
Never remove a safety guard when a tool is being used. Hazardous moving parts of power tools and equipment need to be safeguarded. For example, belts, gears, shafts, pulleys, sprockets, spindles, drums, fly wheels, chains, or other reciprocating, rotating, or moving parts of equipment must be guarded if such parts are exposed to contact by workers.
Use other methods to ensure that machinery is safe
- Make sure that equipment is de-energized and cannot be started accidentally.
Make sure that the equipment is de-energized and cannot be started accidentally. First, disconnect tools when not in use, before servicing, and when changing accessories such as blades, bits, and cutters. Turn off vehicles before doing maintenance or repair work. If possible, lock out the power source to the equipment. The type of power source may be electric, pneumatic, liquid fuel, hydraulic, or powder-actuated. Lower or block the blades of bulldozers, scrapers, and similar equipment before making repairs or when the equipment is not in use.
Protect employees from being pinned between equipment
- Take measures to protect workers from being pinned between equipment.
- Be aware at all times of the equipment around and stay a safe distance from it.
- Never be between moving materials and an immovable structure, vehicle, or stacked materials.
- Make sure that all loads carried by equipment are stable and secured.
- Stay out of the swing radius or cranes and other equipment.
- Wear a seatbelt, if required, to avoid being thrown from a vehicle and then potentially being crushed by the vehicle if it tips over.
Protect employees from excavation hazards
- Sloping or benching, trench boxes or shields, and shoring can all provide protection in a trench.
Do not work in an unprotected trench that is five feet deep or more. The type of protection may be one of the following:
- Sloping or benching. Sloping is cutting back the sides of the trench to a safe angle, so it won’t collapse. Benching uses a series of steps that approximate the safe sloping angle. The angle depends on the soil type.
- Trench box or shield. These do not prevent cave-ins but protect the workers who are in them if a cave-in happens.
- Shoring. Shoring are wooden structures or mechanical or hydraulic systems that support the sides of an excavation.
- Enter or exit a trench or excavation only by using a ladder, stairway or properly designed ramp that is placed within the protected area of the trench.
- Do not work outside of the confines of the protection system!
Provide training
- Ensure workers have proper training on the equipment and hazards of the job.
Make sure a worker has the proper training on the equipment and hazards of the job so that they can do the work safely. The Occupational Safety and Health Administration’s (OSHA’s) general training requirement for construction workers is:
- The employer shall instruct each employee in the recognition and avoidance of unsafe conditions and the regulations applicable to the work environment to control or eliminate any hazards or other exposure to illness or injury.
- The employer must train the worker to perform the job and use the provided equipment safely.
- Construction activities that may have caught-in or –between hazards and that have specific training requirements in OSHA standards include scaffolds — workers who are involved in erecting, disassembling, moving, operating, repairing, maintaining, or inspecting a scaffold.
Provide guards on equipment with moving parts
- Hand-held power tools must be fitted with guards and safety switches.
Occupational Safety and Health Administration (OSHA) standards require the employer to ensure that hand-held power tools are fitted with guards and safety switches. The type of guard will be determined by the power source of the tool (electric, pneumatic, liquid fuel, hydraulic, or powder-actuated). Exposed moving parts of power tools, such as belts, gears, shafts, pulleys, etc. must be guarded. Points-of operation — where the work is performed on the materials — must also be guarded. Power saws are a primary type of equipment that requires a point-of operation guard. In-running nip points, such as where the sanding belt runs onto a pulley in a belt sanding machine, must also be guarded.
Make safe equipment having parts that workers could be caught between
- Lock-out/tag-out programs can ensure that equipment is not accidentally energized during maintenance or repair.
- The employer should provide a lock-out/tag-out program or equivalent system to ensure that equipment is not accidentally energized during maintenance or repair. Lockout/tagout procedures are specifically required for equipment used in concrete and masonry operations.
- Bulldozer and scraper blades, end-loader buckets, dump bodies, and similar equipment must be blocked or fully lowered when being repaired or not in use.
Prevent workers from being crushed by heavy equipment that tips over
- Prevent heavy equipment from tipping over.
The best way to prevent workers being crushed by heavy equipment that tips over is to prevent the equipment from tipping over in the first place. For examples, cranes can tip over if the load capacity is exceeded, or the ground is not level or too soft. Occupational Safety and Health Administration (OSHA) requires that the employer designate a competent person to inspect crane operations to identify working conditions that are hazardous to workers, including ensuring that the support surface is firm and able to support the load.
The employer must make sure that material handling equipment is equipped with rollover protective structures. OSHA standards require that motor vehicles, forklifts, and earth-moving equipment must be equipped with seat belts. The employer must require their use. The use of seat belts will prevent workers being thrown from a vehicle or equipment and subsequently being crushed when the vehicle or equipment tips over.
Prevent workers from being pinned between equipment and a solid object
- Take measures to prevent workers from being pinned between equipment and a solid object.
Employers are required to take measures to prevent workers from being pinned between equipment and a solid object, such as a wall or another piece of equipment; between materials being stacked or stored and a solid object, between shoring and construction materials in a trench. Other example situations are: During demolition operations, when balling or clamming is being performed, only the personnel necessary to the work must be allowed in the work area. The employer must make sure that proper bracing is used between heavy plates used as shoring in a trench. The employer must carefully arrange the path of travel when loading/unloading, stacking, and storing materials so that no workers will be caught between materials and moving equipment or between materials and a wall.
Provide protection for workers during trenching and excavation work
- The employer must make sure all excavations and trenches five feet deep or more, but less than 20 feet, are protected.
- Workers must be protected from equipment or materials that could fall or roll into excavations.
Occupational Safety and Health Administration (OSHA) standards on trenching and excavation require the employer to designate a competent person to inspect the trenching operations. The competent person must be trained in and knowledgeable about soil classification, the use of protective systems, and the requirements of the OSHA standard. The competent person must be capable of identifying hazards and authorized to immediately eliminate hazards. The employer must make sure all excavations and trenches five feet deep or more, but less than 20 feet, are protected by: sloping or benching, trench box or shield, or shoring, and that there are adequate means of access and egress from the excavation. If an excavation is more than 20 feet deep, a professional engineer must design the system to protect the workers.
Workers must be protected from equipment or materials that could fall or roll into excavations. This could include spoils that could fall into the trench and bury the workers. Mobile equipment used near or over an excavation presents a hazard. When mobile equipment is operated adjacent to an excavation, or when such equipment is required to approach the edge of an excavation, and the operator does not have a clear and direct view of the edge of the excavation, a warning system must be utilized such as barricades, hand or mechanical signals or stop logs. If possible, the grade should be away from the excavation. If a crane or earth-moving equipment is operating directly over the top of a trench, workers should not be working underneath.
Provide means to avoid the collapse of scaffolds
- Scaffolds can only be erected, moved, dismantled or altered under the supervision of a competent person.
Measures need to be taken by the employer to avoid the collapse of other structures, such as scaffolds, that could bury workers underneath them. Anytime there is inadequate support, improper construction, or a shift in the components of a scaffold (including the base upon which the structure is built), there is danger of collapse. Cinder blocks or other similar materials should not be used to support a scaffold because they could be crushed. Occupational Safety and Health Administration (OSHA) standards require that scaffolds can only be erected, moved, dismantled or altered under the supervision of a competent person. The competent person selects and directs the workers who erect the scaffold.
Provide means to avoid workers being crushed by collapsing walls
- In most cases, during demolition, any stand-alone wall that is more than one story must have lateral bracing.
During demolition, any stand-alone wall that is more than one story must have lateral bracing, unless the wall was designed to be stand-alone and is otherwise in a safe condition to be self-supporting. Jacks must have a firm foundation. If necessary, the base of a jack must be blocked or cribbed. After a load has been raised, it must be cribbed, blocked, or otherwise secured at once.
Struck-by
- Struck-by injuries are produced by forcible contact or impact between the injured person and an object or piece of equipment.
- Struck-by hazards are categorized as being struck-by flying, falling, swinging, or rolling objects.
Struck-by injuries are produced by forcible contact or impact between the injured person and an object or piece of equipment. Having said that, it is important to point out that in construction, struck-by hazards can resemble caught–in or –between hazards. There is a distinction which is best explained by looking at the key factor in deciding between a Caught event and a Struck event, ask: Was it the impact of the object alone that caused the injury? When the impact alone creates the injury, the event is considered as Struck. On the other hand, when the injury is created more as a result of crushing injuries between objects, the event is considered as Caught.
Struck-by hazards are categorized as follows:
- Struck-by flying object
- Struck-by falling object
- Struck-by swinging object
- Stuck-by rolling object
Struck-by examples
- There are a variety of examples of accidents caused by struck-by hazards.
Struck-by hazards in construction cause accidents such as the following:
- A construction worker was hoisting bricks in a bucket to the top of a building. The bucket tilted, and the bricks spilled out of the bucket, striking the worker in the head. The worker suffered blunt force trauma to his head, and died at the hospital eight days later.
- Four workers were installing signs on a highway, when a pick-up truck changed several lanes and entered the work area. The truck struck one of the workers, knocking the worker off the road and over a bridge rail. The worker fell approximately 18 feet and died.
- Four workers were struck by an exterior wall while attempting to lift it in place. Three of the workers received bruises and contusions. One of the workers received a fractured leg and was hospitalized.
- A construction inspector was crossing an equipment vehicle route at an interstate highway bridge construction site. The inspector walked into the path of the end loader traveling the route, was run over, and killed. The loader operator was unaware of striking the inspector.
- A worker was struck by the counterweight and revolving superstructure of an excavator when the worker walked between the excavator and a hillside.
- Workers were pulling 60-foot sections of pipe out of a hole, using a hoist to stack them on the derrick floor. One of the workers let go of a pipe section before it was secured. As the worker bent over, the pipe swung around and struck the worker on the head, resulting in death.
- A worker was maneuvering an overhead crane when a metal plate weighing approximately 7,330 pounds separated from the lifting clamp and fell, striking and killing the worker.
Struck-by flying object
- Flying object hazard exists when something has been thrown, hurled, or is being propelled across space.
- Compressed air can cause flying object hazards.
Flying object hazard exists when something has been thrown, hurled, or is being propelled across space. It can include instances when a piece of material separates from a tool, machine or other equipment, striking a worker, resulting in injuries or fatality. Also, a hazard exists if an object is ejected under power by a tool or equipment usually designed for that purpose such as, a nail from a nail gun: The nail is propelled from the gun by force. It is discharged. This force can be either pneumatic or powder-actuated. Powder-actuated tools are particularly hazardous due to the force behind the fastener. These fasteners are designed to go through wood, concrete and steel and they can certainly go through workers. Using compressed air can also cause flying object hazards. Compressed air is commonly used to power tools and clean surfaces.
Examples of accidents related to struck-by flying object hazards:
- A worker was removing a frozen bolt from the track of a caterpillar front end loader and was struck-by a bolt that entered the forehead.
- A worker was freeing a pump component under pressure and another worker was killed when a blast of compressed air from a gas pipeline struck the worker. A compressor was started, to fill the pipeline with compressed air to push out a “pig.” when the pipeline suddenly cleared, the employee was still in the way and was killed. The area should have been cleared before the compressor was started.
- The worker was in the process of using an 8-foot step ladder to gain height to nail a strap onto a residential home single story construction project. The worker used a nail gun with a 16d nail to affix the strap to the exterior wall. Using their right hand for the gun, the worker leaned over to the left and tried to place a nail into the strap. The nail ricocheted and hit on the left side of the worker’s head just above the left ear. The worker fell to the ground and eventually passed out. Fellow workers transported the worker to the hospital. The worker died approximately two days later.
Struck-by falling object
- A falling object hazard exists when a person is struck by a falling object.
Falling object hazards exist when the source of injury is falling from an elevation to a lower level, including instances where the injured person is crushed, pinned, or caught under a falling object, other than collapsing material or structures, thus resulting in being struck by a falling object.
Examples of accidents related to struck-by falling object hazards:
- A worker was tearing down a transmission structure using a digger-derrick when a pole broke and struck the worker on the head.
- A worker was struck by a load of wall panels that fell off the truck.
- Four workers rebuilding a bridge that had washed out by floods were injured when a crane boom cable broke, and the boom fell on them.
- A worker was engaged in cutting an 8,000-pound boiler in sections with a cutting torch. The section being cut, fell off allowing the remaining section, 5,000 pounds, to flip over onto its bottom and land on the worker.
- A worker was assisting a rigger who had attached a load to the block hook of a wheel mounted crane. The crane operator was positioned in the cab and waiting for the hand signal to make the lift. During this process, the jib of the crane fell from its stowed position on the boom and struck the worker. The worker died later at the scene. It was discovered that the pin used to secure the jib to the boom was missing thus allowing the jib to be displaced. The crane was not inspected prior to use.
Struck-by swinging object
- Materials that are mechanically lifted can swing and strike workers.
- Windy conditions can worsen this hazard and cause a load to swing more.
When materials are mechanically lifted, they have the potential to swing and strike workers. As the load is lifted, the materials may swing, twist or turn. This movement can catch workers by surprise, and they could be hit by the swinging load. Windy conditions are especially hazardous because the load will swing more. Depending on where the worker is standing and the force behind the load, the worker may fall to another level after being struck and sustain even greater injuries. In addition to swinging, loads can slip from their riggings and strike workers. Loads must be rigged properly to prevent slippage. When the source of injury has been referred to objects which are not free standing, they are attached at some point or are being held by the worker. This includes instances where a hinge-like motion retracts creating swinging motion in which the worker is struck-by a slamming or swinging motion.
Examples of accidents related to struck-by swinging hazards:
- A worker was working within the swing radius of a barge-mounted crane used in dredging operations. The worker was hit and killed.
- Two workers were instructed by their foreman to set up on a ground slab in the southeastern corner of a building. They were to land and place reinforcing steel using a crane. A truck crane was positioned at street level, 30 feet higher in elevation than the ground slab and approximately 162 feet from the landing area. The landing area was approximately 40 feet beyond the radius limit for the crane, as specified by the manufacturer. The 24-piece bundle of 28 1/2 foot long #9 rebar that was to be picked up and loaded onto the crane’s hoist line was at street elevation, 50 feet in front of the crane. The operator made the pick-up and was swinging around and lowering it to the left using hand signals when the right pennant line broke at the yoke/bridle. The boom collapsed, striking one of the workers on the head and killing the worker.
Struck-by rolling object
- A struck-by rolling object is when an object which is rolling, moving, or sliding on the same level at which the worker is located, hits the worker.
A struck-by rolling object is when an object which is rolling, moving, or sliding on the same level at which the worker is located, hits the worker. This includes instances in which the worker is struck or run over by a moving vehicle without being caught under it or instances in which the worker is struck-by a sliding object or equipment on the same level.
Examples of accidents related to struck-by rolling hazards:
- While walking along track, a worker was struck by an unmanned rail car at an airport.
- A worker (security guard) was struck by a tractor trailer and dragged, resulting in fatal injuries.
- A worker suffered fatal injuries after being struck by a moving semi-truck while loading/unloading freight.
- A worker was performing repair operations on an impact attenuator and was struck by a truck.
- A worker was flagging traffic and was struck by a truck.
- A four-person ground crew was working with a mobile under-hung bridge crane. The crane ran over one of the crew members, who had walked too close to the wheel of the crane. The employee died of sustained injuries.
- A worker was setting traffic cones at a paving project. A steel wheel roller was compressing the asphalt, and the traffic cones were being moved so that they would not be in the path of the roller. The worker was injured when being struck by an automobile. The worker was thrown over the hood of the car and into another lane of traffic, where the worker was struck by another automobile. The worker was dragged 141 feet by the second vehicle. The worker was pronounced dead at the hospital.
Protect workers from struck-by hazards from heavy equipment
- Practice safe actions while around heavy equipment.
Employees must:
- Stay away from heavy equipment when it’s operating — In fact, be alert to the location of all heavy equipment whether in use or not.
- Stay clear of lifted loads and never work under a suspended load.
- Beware of unbalanced loads.
- Workers should confirm and receive acknowledgment from the heavy equipment operator that they are visible.
- Be aware of the swing radius of cranes and backhoes and do not enter that zone.
- Drive equipment (or vehicles) on grades or roadways that are safely constructed and maintained.
- Make sure that all workers and other personnel are in the clear before using dumping or lifting devices.
- Lower or block bulldozer and scraper blades, end-loader buckets, dump bodies, etc., when not in use, and leave all controls in neutral position.
- Haulage vehicles that are loaded by cranes, power shovels, loaders etc., must have a cab shield or canopy that protects the driver from falling materials.
- Do not exceed a vehicle’s rated load or lift capacity.
- Do not carry personnel unless there is a safe place to ride.
Employers must:
- Determine whether the ground is sufficiently level and firm to support the anticipated weight of hoisting equipment and associated loads.
- Assess hazards within the work zone that would affect the safe operation of hoisting equipment such as, power lines and objects or personnel that would be within the swing radius of the hoisting equipment.
- Erect barriers to mark the area covered by the rotating superstructure to warn workers of the danger zone.
- Ensure that the equipment is in safe operating condition via required inspections.
- Comply with all manufacturer procedures regarding proper operational functions of equipment, including its use with attachments.
- Ensure safe attachment of rigging devices such as, shackles, hooks, eyebolts, spreader beams and slings, wedge socket and wire rope clips.
- Provide seat belts when required.
- Ensure roadways and grades are maintained to accommodate the safe movement of equipment and vehicles.
- Ensure all earthmoving/compacting equipment with obstructed view does not operate in reverse gear unless the equipment has a reverse signal alarm, or a worker has been designated to signal when it is safe.
Protect workers from struck-by hazards from motor vehicles
- Follow vehicle safety practices at construction sites to limit worker exposure to struck-by hazards.
Vehicle safety practices must be observed at construction sites to limit worker exposure to struck-by hazards such as struck-by swinging backhoes, struck-by falling/overturning vehicles, and struck-by trucks or cars. To avoid these types of hazards, workers should:
- Wear seat belts when provided.
- Check vehicles before each shift to assure that all parts and accessories are in safe operating condition.
- Do not drive a vehicle in reverse gear with an obstructed rear view, unless it has an audible reverse alarm, or another worker signals that it is safe.
- Set parking brakes when vehicles and equipment are parked, and chock the wheels if they are on an incline.
- All vehicles must have adequate braking systems and other safety devices.
- Use traffic signs, barricades or flaggers when construction takes place near public roadways.
- Workers must be highly visible in all levels of light. Warning clothing, such as red or orange vests, are required; and if worn for night work, must be of reflective material.
When working on or near any construction zone:
- Wear high-visibility reflective clothing.
- Do not be put at risk of being struck by a vehicle and do not get caught in a situation where there’s no escape route.
- Do not direct traffic unless designated as the flagger.
- Check that necessary warning signs are posted.
- Never cross the path of a backing vehicle.
- Follow “Exit” and “Entry” worksite traffic plan.
The employer is required to do the following:
- Conduct a hazard assessment of the worksite using the job-site coordinator (supervisor or foreman) who should:
- Make a thorough assessment of potential worksite safety hazards;
- Plan for work being conducted in close proximity of a public road or highway and for the safe handling of intermittent roadway traffic stoppages, such as a truck entering a roadway;
- Plan the entry and exit to and from the worksite to reduce exposure to traffic;
- Post construction areas with legible traffic signs at points of hazard;
- Erect barricades that conform to the MUTCD; and
- Place necessary warning signs along the road.
- All workers on site should have a safety and operations orientation.
Use general safe work practices
- Follow general safe work practices when working with various tools and objects.
- Employers must ensure that tools are in good condition and any applicable guards are equipped.
Employees must ensure:
When working with compressed air:
- Reduce air pressure to 30 pounds per square inch (psi) if used for cleaning, and use only with appropriate guarding and proper protective equipment; and
- Never clean clothing with compressed air.
When working with hand tools:
- Do not use tools with loose, cracked or splintered handles; and
- Do not use impact tools with mushroomed heads.
When working with machines, such as jack hammers, pavement saws:
- Be sure to be trained on safe operation of machinery. Inspect machinery;
- Ensure all guards are in place and in working order; and
- Protect feet, eyes, ears and hands; wear hearing protection.
When performing overhead work:
- Secure all tools and materials;
- Use toeboards, screens, guardrails and debris nets. Barricade the area and post signs; and
- Be sure materials stored in buildings under construction are placed farther than six feet of hoist way / floor openings, and more than 10 feet from an exterior wall.
When working with powder-actuated tools:
- Be sure to be trained and licensed to operate these tools if required.
When working with power tools, such as saws, drills, grinders:
- Be sure to be trained on how to safely use the power tool;
- Inspect tool(s) before each use;
- Wear safety goggles;
- Operate according to manufacturer’s instructions; and
- Ensure that all required guards are in place.
When pushing or pulling objects that may become airborne:
- Stack and secure materials to prevent sliding, falling or collapse;
- Keep work areas clear; and
- Secure material against wind gusts.
Employers must ensure:
- All hand tools are maintained in good condition.
- The use of unsafe hand tools is not permitted (i.e., no sprung jaws on wrenches, no mushroomed heads, no splinters or cracks in wooden handles, no loose parts / heads of tools).
- Saws are equipped with guards and have a constant pressure switch that will shut off the power when the pressure is released.
- Safety guards are on all abrasive wheel bench and stand grinders.
- Only trained workers are allowed to operate powder-actuated tools.
- All powder-actuated tools are tested daily before use and all defects discovered before or during use are corrected.
- Powder-actuated tools are not loaded until immediately before use and loaded tools are not left unattended.
- Compressed air used for cleaning purposes is reduced to less than 30 psi and provide effective chip guarding and personal protective equipment (PPE).
- All materials stored in tiers are secured to prevent sliding, falling, or collapsing.·
- Toeboards are erected along the edge of overhead walking/working surfaces.
Use personal protective equipment
- Use eye and face protection based on anticipated hazards.
- Wear hard hats when there is a potential for falling objects or bumps to the head.
Eye and face protection:
- Use based on anticipated hazards.
- Safety glasses or goggles should be worn any time work operations present an eye hazard – for example, during welding, cutting, grinding, nailing (or when working with concrete and/or harmful chemicals or when exposed to flying particles).
Head protection:
- Wear hard hats where there is a potential for objects falling from above, bumps to the head from fixed objects.
- Hard hats: Routinely inspect for dents, cracks or deterioration; replace after a heavy blow; maintain in good condition.
Employers must:
- Pay for personal protective equipment (PPE) as required by the Occupational Safety and Health Administration (OSHA).
- Provide and require the use of appropriate PPE in all operations where there is an exposure to hazardous conditions.
- Ensure adequacy of PPE including proper maintenance and sanitation.
- Provide head protection (e.g., hard hats, helmets) whenever there is possible danger of head injuries from impact, flying or falling objects.
- Provide eye and face protection when machines or operations present eye or face injury.
- Provide workers involved in welding operations with filter lenses or plates of proper shade number.
- Ensure eye, face, and head protective equipment meets American National Standards Institute (ANSI) requirements.
Training
- Train workers to recognize hazards associated with the use of the equipment and any related duties that they are assigned to perform.
Train workers in the work zone to recognize hazards associated with the use of the equipment and any related duties that they are assigned to perform. Ensure crane operators are qualified or certified according to Occupational Safety and Health Administration (OSHA) standards. Ensure signal person meets qualification requirement according to OSHA standards.
Instruct workers in the recognition and avoidance of unsafe conditions and the regulations applicable to the worker’s work environment to control or eliminate any hazards or other exposure to illness or injury. Ensure that qualified operators and riggers have been trained on rigging safety.
Electrocution
- Electrocution results when a person is exposed to a lethal amount of electrical energy.
- Remember to BE SAFE by recognizing, avoiding, and protecting against electrical hazards.
Electrocution results when a person is exposed to a lethal amount of electrical energy. An electrical hazard can be defined as a serious workplace hazard that exposes workers to the following:
- Burns
- Electrocution
- Shock
- Arc flash/Arc blast
- Fire
- Explosions
Therefore, BE SAFE by recognizing, avoiding, and protecting against all these electrical hazards.
These BE SAFE terms are defined as:
- B = Burns: A burn is the most common shock-related injury. Burns from electricity are one of three types: Electrical, Arc/Flash or Thermal Contact. The types of burns from electricity are further defined as:
- Electrical burns result from heat generated by the flow of electric current through the body.
- Arc/Flash burns are high temperature burns caused by an electric arc or explosion.
- Thermal contact burns occur when skin meets overheated electric equipment.
- E = Electrocution: Electrocution is fatal; it means to kill with electricity. Electrocution results when a human is exposed to a lethal amount of electrical energy.
- S = Shock: Shock results when the body becomes part of the electrical circuit; current enters the body at one point and leaves at another. Electrical shock is defined as a reflex response to the passage of electric current through the body.
- A = Arc Flash/Blast: An arc flash is the sudden release of electrical energy through the air when a high-voltage gap exists and there is a breakdown between conductors. An arc flash gives off thermal radiation (heat) and bright, intense light that can cause burns. Temperatures have been recorded as high as 35,000°F. High-voltage arcs can also produce considerable pressure waves by rapidly heating the air and creating a blast. An arc flash can be spontaneous or result from inadvertently bridging electrical contacts with a conducting object. Other causes may include dropped tools or the buildup of conductive dust or corrosion.
- F = Fire: Most electrical distribution fires result from problems with “fixed wiring” such as faulty electrical outlets and old wiring. Problems with cords (such as extension and appliance cords), plugs, receptacles, and switches also cause electrical fires.
- E = Explosions: An explosion can occur when electricity ignites an explosive mixture of material in the air.
Electrocution examples
- There are a variety of examples of electrocutions in the construction industry.
The following are examples of electrocutions that have occurred in the construction industry:
- Two workers were moving an aluminum ladder. One of them was electrocuted when the ladder encountered overhead power lines.
- A worker was raising a mast on a water well drilling truck when the mast encountered high voltage overhead lines, electrocuting the worker.
- A worker was electrocuted when the boom of a rotary drilling truck contacted an overhead power line. The victim and another worker had just finished drilling a water well at a residential property. The victim moved the truck away from the well. The victim was standing at the controls, lowering the boom and was thrown several feet away from the truck.
- A worker was fatally injured when electrocuted and fell to the concrete floor while working from an eight-foot fiberglass step ladder. The worker was changing an energized ballast on a two-bulb florescent light fixture, located approximately 11 feet and 6 inches off the ground.
- A worker was electrocuted while connecting a replacement electrical service box to the electrical service drop to the building.
Contact with overhead power lines
- Overhead and buried power lines are especially hazardous because they carry extremely high voltage.
Overhead and buried power lines are especially hazardous because they carry extremely high voltage. Fatalities are possible as electrocution is the main risk; however, burns and falls from elevations are also hazards that workers are exposed to while working in the vicinity of high voltage power lines. Workers may not realize that cranes are not the only equipment that reaches overhead power lines. Working on a ladder or in a man-basket suspended under or near power lines also poses a risk of electrocution.
Important to note: The covering on an overhead power line is primarily for weather protection; therefore, workers need to know that if they touch a power line, covered or bare, death is probable.
Contact with energized sources
- The major hazards regarding contact with energized sources are electrical shock and burns.
The major hazards regarding contact with energized sources are electrical shock and burns. Electrical shock occurs when the body becomes part of the electric circuit, either when an individual encounters both wires of an electrical circuit, one wire of an energized circuit and the ground, or a metallic part that has become energized by contact with an electrical conductor. The severity and effects of an electrical shock depend on several factors, such as:
- The pathway through the body,
- The amount of current,
- The length of time of the exposure, and
- Whether the skin is wet or dry.
Water is a great conductor of electricity, allowing current to flow more easily in wet conditions and through wet skin. (1,000 milliamperes = 1 ampere; therefore, 15,000 milliamperes = 15 amperes circuit). Current reaction below one milliampere generally not perceptible. One milliampere results in faint tingle. Five milliampere results in slight shock felt; not painful but disturbing. An average individual can let go. Strong involuntary reactions can lead to other injuries. Painful shock occurs at 6–25 milliamperes (women). Loss of muscular control happens at 9–30 milliamperes (men). Extreme pain, respiratory arrest, and severe muscular contractions occur at 50–150 milliamperes. Death is possible. Rhythmic pumping action of the heart ceases at 1,000– 4,300 milliamperes. Muscular contraction and nerve damage occur; death likely. Cardiac arrest and severe burns occur at 10,000 milliamperes; death probable.
Electrical burns can be arc burns, thermal contact burns, or a combination of burns. Electrical burns are among the most serious burns and require immediate medical attention. They occur when an electric current flows through tissue or bone, generating heat that causes tissue damage. The body cannot dissipate the heat generated by current flowing through the resistance of the tissue, therefore burns occur. To further illustrate how easily a person can receive a fatal shock, consider a voltage that is common to every location in the United States, 120-volts.
Under average working conditions where the person is perspiring and has a resistance of only 1000-ohms from hand-to-hand, using the simple Ohm’s Law formula (current equals the voltage divided by the resistance) the current flow will be 0.12 amperes or 120 milliampere. If the power supply to electrical equipment is not grounded or the path has been broken, or if there are live parts or bare wires, a fault current may travel through a worker’s body, causing electrical burns or death. Even when the power system is properly grounded, electrical equipment can instantly change from safe to hazardous because of extreme conditions and rough treatment.
Improper use of extension and flexible cords
- Exposed wires in cords can create hazardous conditions.
The normal wear and tear on extension and flexible cords can loosen or expose wires, creating a hazardous condition. Cords that are not 3-wire type, not designed for hard-usage, or that have been modified, increase the risk of contacting electrical current. With the wide use of power tools on construction sites, flexible extension cords are often necessary. Because they are exposed, flexible, and unsecured, they are more susceptible to damage than fixed wiring. Hazards are created when cords, cord connectors, receptacles, and cord- and plug connected equipment are improperly used and maintained. To reduce hazards, flexible cords must connect to devices and to fittings in ways that prevent tension at joints and terminal screws. A flexible cord may be damaged by door or window edges, staples and fastenings, abrasion from adjacent materials, or simply by aging. If the electrical conductors become exposed, there is a danger of shocks, burns, or fire.
When a cord connector is wet, electric current can leak to the equipment grounding conductor, and to anyone who picks up that connector if they provide a path to ground. Such leakage can occur not just on the face of the connector, but at any wetted portion.
Maintain safe distance from overhead power lines
- Staying away from power lines is the best option.
Staying away from power lines is the best option. The following power line clearance distances are preventive measures for workers to consider:
General
Before work begins, be sure that the:
- Equipment/activity is located within a safe working distance from power lines;
- Utility company has de-energized and visibly grounded the power lines or installed insulated sleeves on power lines;
- Flagged warning lines have been installed to mark horizontal and vertical power line clearance distances; and
- Tools and materials used are nonconductive.
Cranes and other high reaching equipment
Be sure the utility company has confirmed the voltage and therefore the safe working distance from the power lines. Also, if applicable and feasible, use a/an: observer; insulated link; boom cage guard; proximity device.
Mobile heavy equipment
If provided, use installed rider posts under power lines to avoid working too close to the power lines.
Ladders
Use nonconductive ladders and be sure to retract them before moving.
Material storage
- Ensure that no materials are stored under power lines.
- Use caution tape and signs to cordon off area under power lines.
Excavations
- Locate and know what the markings from the local underground line locator service has marked before digging.
- Hand dig within three feet of cable location. Be aware that more than one underground cable may be buried in an area of locator markings.
Use GFCI
- GFCI’s are designed to protect people from severe and sometimes fatal electrical shock.
- There are three types of GFCI’s receptable, temporary/portable, and circuit breaker.
A “GFCI” is a ground fault circuit interrupter that is designed to protect people from severe and sometimes fatal electrical shock. A GFCI detects ground faults and interrupts the flow of electric current and is designed to protect the worker by limiting the duration of an electrical shock.
A classic example of the GFCI at work: An old drill that has a loose bare wire inside it touching the outer metal housing is being used. With the drill plugged in, the housing is charged with electricity. If it used outside in the rain and the worker is standing on the ground, there is a path from the hot wire inside the drill through the worker to ground. If electricity flows from hot to ground through the worker, it could be fatal. The GFCI can sense the current flowing through because not all the current is flowing from hot to neutral as it expects -- some of it is flowing through the worker to the ground. As soon as the GFCI senses that, it trips the circuit and cuts off the electricity.
There are three types of GFCI’s receptable, temporary/portable, and circuit breaker.
Receptacle GFCI: Often found on construction work sites, outdoor areas and other locations where damp conditions do or could exist. The receptacle GFCI fits into the standard outlet box and protects users against ground faults when an electrical product is connected to the GFCI protected outlet.
These should be tested after installation and once a month by:
- Plugging in a test light or power tool and turning “On”;
- Pushing the “Test” button on the receptacle; the “Test” button should pop up and the power to the light or tool should be “Off”; and
- Pushing “Reset” to restore power to the outlet.
If the above steps worked, the GFCI passed the test and is functioning properly; If the GFCI failed the test, remove it from service.
Temporary/Portable GFCI: Anterior-to-posterior (AP) portable GFCI is an extension cord combined with a GFCI. It adds flexibility in using receptacles that are not protected by GFCl’s. Extension cords with GFCI protection incorporated should be used when permanent protection is unavailable. These should be tested prior to each use by:
- Visually inspecting device for obvious defects and/or broken parts;
- Plugging in a test light/tool to the extension cord;
- Pushing “Reset” button on the GFCI device;
- Pushing “Test” button to verify no voltage at outlet (e.g., the light or tool shuts off); and
- Pushing “Reset” button to verify power is restored.
Circuit breaker GFCI: The GFCI circuit breaker controls an entire circuit and is installed as a replacement for a circuit breaker on the main circuit board. Rather than install multiple GFCI outlets, one GFCI circuit breaker can protect the entire circuit. At sites equipped with circuit breakers, this type of GFCI might be installed in a panel box to give protection to selected circuits.
Inspect portable tools and extension cords
- Inspect extension cords prior to use.
- Workers using power tools and equipment should follow tool safety tips to avoid misusing equipment.
Workers need to inspect extension cords prior to their use for any cuts or abrasion. Extension cords may have damaged insulation. Sometimes the insulation inside an electrical tool or appliance is damaged. When the insulation is damaged, exposed metal parts may become energized if a live wire inside touches them. Electric hand tools that are old, damaged, or misused may have damaged insulation inside.
Flexible cords used with temporary and portable lights shall be designed for hard or extra-hard usage. They shall be marked with usage type designation size and number of conductors. The cord could be marked with a 14/3 meaning the conductor size American wire gauge (AWG) is 14 and the number of conductors is 3.
Workers using power tools and equipment should follow tool safety tips to avoid misusing equipment.
Tool safety tips:
- Never carry a tool by the cord;
- Never yank the cord to disconnect it;
- Keep cords away from heat, oil, and sharp edges;
- Disconnect when not in use and when changing accessories such as blades and bits;
- Avoid accidental starting. Do not hold fingers on the switch button while carrying a plugged-in tool;
- Use gloves and appropriate footwear;
- Store in dry a place when not using;
- Don’t use in wet/damp environments;
- Keep working areas well lit;
- Ensure that cords do not cause a tripping hazard;
- Remove damaged tools from use; and
- Use double-insulated tools.
Common examples of misused equipment
- Make sure not to misuse equipment as this is a safety hazard.
The following are common examples of misused equipment:
- Using multi-receptacle boxes designed to be mounted by fitting them with a power cord and placing them on the floor;
- Fabricating extension cords with ROMEX® wire;
- Using equipment outdoors that is labeled for use only in dry, indoor locations;
- Attaching ungrounded, two-prong adapter plugs to three-prong cords and tools;
- Using circuit breakers or fuses with the wrong rating for over-current protection, e.g., using a 30-ampere breaker in a system with 15 or 20 amperes (amp) receptacles. Protection is lost because it will not trip when the system’s load has been exceeded;
- Using modified cords or tools, i.e., ground prongs removed, face plates, insulation, etc.; and
- Using cords or tools with worn insulation or exposed wires. Workers need to know that even when the power system is properly grounded, electrical equipment can instantly change from safe to hazardous because of extreme conditions and rough treatment.
Follow lockout/tagout procedures
- Use a checklist when performing lockout/tagout on circuits and equipment.
Lockout/tagout is an essential safety procedure that protects workers from injury while working on or near electrical circuits and equipment. In addition, lockout/tagout prevents contact with operating equipment parts such as blades, gears, shafts, etc. Also, lockout/tagout prevents the unexpected release of hazardous gases, fluids, or solid matter in areas where workers are present. To protect against being electrocuted, workers need to follow lockout/tagout procedures.
When performing lockout/tagout on circuits and equipment, the following checklist can be used:
- Identify all sources of electrical energy for the equipment or circuits in question.
- Disable backup energy sources such as generators and batteries.
- Identify all shut offs for each energy source.
- Notify all personnel that equipment and circuitry must be shut off, locked out, and tagged out (Simply turning a switch off is not enough).
- Shut off energy sources and lock switch gear in the OFF position. Each worker should apply an individual lock and keys kept with the worker.
- Test equipment and circuitry to ensure they are de-energized. This must be done by a qualified person.
- Deplete stored energy (for example, in capacitors) by bleeding, blocking, grounding, etc.
- Apply a lock or tag to alert other workers that an energy source or piece of equipment has been locked or tagged out.
- Make sure all workers are safe and accounted for before equipment and circuits are unlocked and turned back on. Only a qualified person may determine when it is safe to re-energize circuits.
Only qualified persons may work on electric circuit parts or equipment that has not been deenergized. Such persons must be capable of working safely on energized circuits and must be familiar with the proper use of special precautionary techniques, personal protective equipment (PPE), insulating and shielding materials, and insulated tools.
Ensure overhead power line safety
- Protective measures must be designed to prevent contact with the lines.
- There are three major ways employers should control power line hazards.
Overhead power lines must be deenergized and grounded by the owner or operator of the lines, or other protective measures must be provided before work is started such as personal protective equipment (PPE) (rubber insulating gloves, hoods, sleeves, matting, blankets, line hose, and industrial protective helmets.) Protective measures (such as guarding or insulating the lines) must be designed to prevent contact with the lines.
There are three major ways employers should control power line hazards:
- Maintaining a safe distance from lines;
- Having the power company de-energize and ground the power line(s). Have a power company representative at the site; and
- Having the power company install insulated sleeves (also known as “eels”) over power lines.
Employers should train workers regarding power line hazards and about the available protective measures. Workers need to be fully informed about what jobs may have electrical hazards, and the measure(s) they will take to control the hazards. Also, workers should be reminded that they should always ask questions if they have any doubts about maintaining safe working conditions.
Supply GFCI
- It is the employer’s responsibility to provide a GFCI on sites or a scheduled and recorded assured equipment grounding conductor program.
Occupational Safety and Health Administration (OSHA) ground-fault protection rules and regulations have been determined necessary and appropriate for worker safety and health. Therefore, it is the employer’s responsibility to provide either: (a) ground-fault circuit interrupters (GFCIs) on construction sites for receptacle outlets in use and not part of the permanent wiring of the building or structure; or (b) a scheduled and recorded assured equipment grounding conductor program on construction sites, covering all cord sets, receptacles which are not part of the permanent wiring of the building or structure, and equipment connected by cord and plug which are available for use or used by workers. Receptacles on the ends of extension cords must be protected by GFCIs. Also, there are GFCI circuit breakers. These protected circuit breakers are installed in the main circuit board. It protects an entire circuit.
Establish and implement AEGCP
- OSHA requires a written description of the employer’s assured equipment grounding conductor program to be kept at the jobsite.
The assured equipment grounding conductor program (AEGCP) covers all cord sets, receptacles which are not a part of the permanent wiring of the building or structure, and equipment connected by cord and plug which are available for use or used by employees. The Occupational Safety and Health Administration (OSHA) requires that a written description of the employer’s assured equipment grounding conductor program, including the specific procedures adopted, be kept at the jobsite. This program should outline the employer’s specific procedures for the required equipment inspections, tests, and test schedule.
The required tests must be recorded, and the record maintained until replaced by a more current record. The written program description and the recorded tests must be made available, at the jobsite, to OSHA and to any affected employee upon request. The employer is required to designate one or more competent persons to implement the program.
Electrical equipment noted in the assured equipment grounding conductor program must be visually inspected for damage or defects before each day’s use. Any damaged or defective equipment must not be used by the employee until repaired.
Ensure power tools are maintained in safe condition
- The employer needs to ensure that all power tools and equipment are maintained in a safe condition.
The employer needs to ensure that all power tools and equipment are maintained in a safe condition to:
- Ground power supply systems, electrical circuits, and electrical equipment;
- Frequently inspect electrical systems to insure path to ground is continuous;
- Ensure workers understand to inspect electrical equipment prior to use;
- Ensure ground prongs are not removed from tools or extension cords; and
- Ground exposed metal parts of equipment.
Ensure proper guarding
- Guarding involves locating or enclosing electrical equipment to ensure workers do not accidentally encounter its live parts.
- Guarding involves locating or enclosing electrical equipment to ensure workers do not accidentally encounter its live parts.
- Effective guarding requires equipment with exposed parts operating at 50 volts or more to be placed where they are accessible only to authorized people qualified to work with/on the equipment.
- Recommended locations are a room, vault, or similar enclosure; a balcony, gallery, or elevated platform; or a site elevated eight feet or more above the floor. Sturdy, permanent screens can also serve as effective guards.
Provide training
- Train workers in safety-related work practices.
Ensure workers are trained in and familiar with the safety-related work practices that pertain to their respective job assignments. Train workers working with electric equipment in safe work practices to:
- Deenergize electric equipment before inspecting or repairing;
- Use cords, cables, and electric tools that are in good repair;
- Lockout / tagout recognition and procedures; and
- Use appropriate protective equipment.
Enforce lockout/tagout safety-related work practices
- Enforce lockout/tagout practices with equipment.
- Controls that are to be deactivated during the course of work on energized or de-energized equipment or circuits shall be locked out, tagged or both.
- Equipment or circuits that are deenergized shall be rendered inoperative and post tags attached at all points where such equipment or circuits can be energized.
- Tags shall be placed to plainly identify the equipment or circuits being worked on.
- While any worker is exposed to contact with parts of fixed electric equipment or circuits which have been de-energized, the circuits energizing the parts shall be locked out, tagged out or both.
Ensure proper use of flexible cords
- OSHA requires flexible cords to be rated for hard or extra-hard usage.
The Occupational Safety and Health Administration (OSHA) construction standard requires flexible cords to be rated for hard or extra-hard usage. These ratings are derived from the National Electrical Code, and are required to be indelibly marked approximately every foot along the length of the cord. Examples of these codes are: S, ST, SO, and STO for hard service, and SJ, SJO, SJT, and SJTO for junior hard service. Extension cords must be 3-wire type so they may be grounded, and to permit grounding of any tools or equipment connected to them. Limit exposure of connectors and tools to excessive moisture by using watertight or sealable connectors.