['Air Programs']
['Air Emissions']
03/21/2023
...
§1066.201 Dynamometer overview.
This subpart addresses chassis dynamometers and related equipment.
§1066.210 Dynamometers.
(a) General requirements. A chassis dynamometer typically uses electrically generated load forces combined with its rotational inertia to recreate the mechanical inertia and frictional forces that a vehicle exerts on road surfaces (known as “road load”). Load forces are calculated using vehicle-specific coefficients and response characteristics. The load forces are applied to the vehicle tires by rolls connected to motor/absorbers. The dynamometer uses a load cell to measure the forces the dynamometer rolls apply to the vehicle's tires.
(b) Accuracy and precision. The dynamometer's output values for road load must be NIST-traceable. We may determine traceability to a specific national or international standards organization to be sufficient to demonstrate NIST-traceability. The force-measurement system must be capable of indicating force readings as follows:
(1) For dynamometer testing of vehicles at or below 20,000 pounds GVWR, the dynamometer force-measurement system must be capable of indicating force readings during a test to a resolution of ±0.05% of the maximum load-cell force simulated by the dynamometer or ±9.8 N (±2.2 lbf), whichever is greater.
(2) For dynamometer testing of vehicles above 20,000 pounds GVWR, the force-measurement system must be capable of indicating force readings during a test to a resolution of ±0.05% of the maximum load-cell force simulated by the dynamometer or ±39.2 N (±8.8 lbf), whichever is greater.
(c) Test cycles. The dynamometer must be capable of fully simulating vehicle performance over applicable test cycles for the vehicles being tested as referenced in the corresponding standard-setting part, including operation at the combination of inertial and road-load forces corresponding to maximum road-load conditions and maximum simulated inertia at the highest acceleration rate experienced during testing.
(d) Component requirements. The following specifications apply:
(1) The nominal roll diameter must be 120 cm or greater. The dynamometer must have an independent drive roll for each drive axle as tested under §1066.410(g), except that two drive axles may share a single drive roll. Use good engineering judgment to ensure that the dynamometer roll diameter is large enough to provide sufficient tire-roll contact area to avoid tire overheating and power losses from tire-roll slippage.
(2) Measure and record force and speed at 10 Hz or faster. You may convert measured values to 1-Hz, 2-Hz, or 5-Hz values before your calculations, using good engineering judgment.
(3) The load applied by the dynamometer simulates forces acting on the vehicle during normal driving according to the following equation:

Where:
FR = total road-load force to be applied at the surface of the roll. The total force is the sum of the individual tractive forces applied at each roll surface.
i = a counter to indicate a point in time over the driving schedule. For a dynamometer operating at 10-Hz intervals over a 600-second driving schedule, the maximum value of i should be 6,000.
A = a vehicle-specific constant value representing the vehicle's frictional load in lbf or newtons. See subpart D of this part.
G i = instantaneous road grade, in percent. If your duty cycle is not subject to road grade, set this value to 0.
B = a vehicle-specific coefficient representing load from drag and rolling resistance, which are a function of vehicle speed, in lbf/(mi/hr) or N·s/m. See subpart D of this part.
v = instantaneous linear speed at the roll surfaces as measured by the dynamometer, in mi/hr or m/s. Let v i−1 = 0 for i = 0.
C = a vehicle-specific coefficient representing aerodynamic effects, which are a function of vehicle speed squared, in lbf/(mi/hr)2 or N·s2/m2. See subpart D of this part.
M e = the vehicle's effective mass in lbm or kg, including the effect of rotating axles as specified in §1066.310(b)(7).
t = elapsed time in the driving schedule as measured by the dynamometer, in seconds. Let t i−1 = 0 for i = 0.
M = the measured vehicle mass, in lbm or kg.
a g = acceleration of Earth's gravity = 9.80665 m/s2.
(4) We recommend that a dynamometer capable of testing vehicles at or below 20,000 pounds GVWR be designed to apply an actual road-load force within ±1% or ±9.8 N (±2.2 lbf) of the reference value, whichever is greater. Note that slightly higher errors may be expected during highly transient operation for vehicles above 8,500 pounds GVWR.
(e) Dynamometer manufacturer instructions. This part specifies that you follow the dynamometer manufacturer's recommended procedures for things such as calibrations and general operation. If you perform testing with a dynamometer that you manufactured or if you otherwise do not have these recommended procedures, use good engineering judgment to establish the additional procedures and specifications we specify in this part, unless we specify otherwise. Keep records to describe these recommended procedures and how they are consistent with good engineering judgment, including any quantified error estimates.
[79 FR 23823, Apr. 28, 2014, as amended at 81 FR 74198, Oct. 25, 2016; 86 FR 34581, Jun. 29, 2021]
§1066.215 Summary of verification procedures for chassis dynamometers.
(a) Overview. This section describes the overall process for verifying and calibrating the performance of chassis dynamometers.
(b) Scope and frequency. The following table summarizes the required and recommended calibrations and verifications described in this subpart and indicates when they must occur:
| Type of verification | Minimum frequency a |
|---|---|
| a Perform calibrations and verifications more frequently, according to measurement system manufacturer instructions and good engineering judgment. | |
| §1066.220: Linearity verification | Speed: Upon initial installation, within 370 days before testing, and after major maintenance. Torque (load): Upon initial installation and after major maintenance. |
| §1066.225: Roll runout and diameter verification | Upon initial installation and after major maintenance. |
| §1066.230: Time verification | Upon initial installation and after major maintenance. |
| §1066.235: Speed measurement verification | Upon initial installation, within 370 days before testing, and after major maintenance. |
| §1066.240: Torque (load) transducer verification | Upon initial installation, within 7 days of testing, and after major maintenance. |
| §1066.245: Response time verification | Upon initial installation, within 370 days before testing, and after major maintenance. |
| §1066.250: Base inertia verification | Upon initial installation and after major maintenance. |
| §1066.255: Parasitic loss verification | Upon initial installation, after major maintenance, and upon failure of a verification in §1066.270 or §1066.275. |
| §1066.260: Parasitic friction compensation verification | Upon initial installation, after major maintenance, and upon failure of a verification in §1066.270 or §1066.275. |
| §1066.265: Acceleration and deceleration verification | Upon initial installation and after major maintenance. |
| §1066.270: Unloaded coastdown verification | Upon initial installation, within 7 days of testing, and after major maintenance. |
| §1066.275 Dynamometer readiness verification | Upon initial installation, within 1 day before testing, and after major maintenance. |
(c) Automated dynamometer verifications and calibrations. In some cases, dynamometers are designed with internal diagnostic and control features to accomplish the verifications and calibrations specified in this subpart. You may use these automated functions instead of following the procedures we specify in this subpart to demonstrate compliance with applicable requirements, consistent with good engineering judgment.
(d) Sequence of verifications and calibrations. Upon initial installation and after major maintenance, perform the verifications and calibrations in the same sequence as noted in Table 1 of this section, except that you may perform speed linearity verification after the verifications in §§1066.225 and 1066.230. At other times, you may need to perform specific verifications or calibrations in a certain sequence, as noted in this subpart. If you perform major maintenance on a specific component, you are required to perform verifications and calibrations only on components or parameters that are affected by the maintenance.
(e) Corrections. Unless the regulation directs otherwise, if the dynamometer fails to meet any specified calibration or verification, make any necessary adjustments or repairs such that the dynamometer meets the specification before running a test. Repairs required to meet specifications are generally considered major maintenance under this part.
§1066.220 Linearity verification for chassis dynamometer systems.
(a) Scope and frequency. Perform linearity verification for dynamometer speed and torque at least as frequently as indicated in Table 1 of §1066.215. The intent of linearity verification is to determine that the system responds accurately and proportionally over the measurement range of interest. Linearity verification generally consists of introducing a series of at least 10 reference values to a measurement system. The measurement system quantifies each reference value. The measured values are then collectively compared to the reference values by using a least-squares linear regression and the linearity criteria specified in Table 1 of this section.
(b) Performance requirements. If a measurement system does not meet the applicable linearity criteria in Table 1 of this section, correct the deficiency by re-calibrating, servicing, or replacing components as needed. Repeat the linearity verification after correcting the deficiency to ensure that the measurement system meets the linearity criteria. Before you may use a measurement system that does not meet linearity criteria, you must demonstrate to us that the deficiency does not adversely affect your ability to demonstrate compliance with the applicable standards in this chapter.
(c) Procedure. Use the following linearity verification protocol, or use good engineering judgment to develop a different protocol that satisfies the intent of this section, as described in paragraph (a) of this section:
(1) In this paragraph (c), the letter “y” denotes a generic measured quantity, the superscript over-bar denotes an arithmetic mean (such as y ͞/>), and the subscript “ref” denotes the known or reference quantity being measured.
(2) Operate the dynamometer system at the specified operating conditions. This may include any specified adjustment or periodic calibration of the dynamometer system.
(3) Set dynamometer speed and torque to zero.
(4) Verify the dynamometer speed or torque signal based on the dynamometer manufacturer's recommendations.
(5) After verification, check for zero speed and torque. Use good engineering judgment to determine whether or not to rezero or re-verify speed and torque before continuing.
(6) For both speed and torque, use the dynamometer manufacturer's recommendations and good engineering judgment to select reference values, y refi, that cover a range of values that you expect would prevent extrapolation beyond these values during emission testing. We recommend selecting zero speed and zero torque as reference values for the linearity verification.
(7) Use the dynamometer manufacturer's recommendations and good engineering judgment to select the order in which you will introduce the series of reference values. For example, you may select the reference values randomly to avoid correlation with previous measurements and to avoid the influence of hysteresis; you may select reference values in ascending or descending order to avoid long settling times of reference signals; or you may select values to ascend and then descend to incorporate the effects of any instrument hysteresis into the linearity verification.
(8) Set the dynamometer to operate at a reference condition.
(9) Allow time for the dynamometer to stabilize while it measures the reference values.
(10) At a recording frequency of at least 1 Hz, measure speed and torque values for 30 seconds and record the arithmetic mean of the recorded values,. Refer to 40 CFR 1065.602 for an example of calculating an arithmetic mean.
(11) Repeat the steps in paragraphs (c)(8) though (10) of this section until you measure speeds and torques at each of the reference settings.
(12) Use the arithmetic means, y ͞/> i, and reference values, y refi, to calculate least-squares linear regression parameters and statistical values to compare to the minimum performance criteria specified in Table 1 of this section. Use the calculations described in 40 CFR 1065.602. Using good engineering judgment, you may weight the results of individual data pairs (i.e., (y refi,y ͞/> i)), in the linear regression calculations. Table 1 follows:
| Measurement system | Quantity | Linearity criteria | |||
|---|---|---|---|---|---|
| |y min · (a 1−1) a 0 | | a 1 | SEE | r 2 | ||
| Speed | n | ≤0.05% · n max | 0.98-1.02 | ≤2% · n max | ≥0.990 |
| Torque (load) | T | ≤1% · T max | 0.99-1.01 | ≤1% · T max | ≥0.990 |
(d) Reference signals. Generate reference values for the linearity-verification protocol in paragraph (c) of this section as described for speed and torque in 40 CFR 1065.307(d).
[88 FR 4708, Jan. 24, 2023]
§1066.225 Roll runout and diameter verification procedure.
(a) Overview. This section describes the verification procedure for roll runout and roll diameter. Roll runout is a measure of the variation in roll radius around the circumference of the roll.
(b) Scope and frequency. Perform these verifications upon initial installation and after major maintenance that could affect roll surface finish or dimensions (such as resurfacing or polishing).
(c) Roll runout procedure. Verify roll runout based on the following procedure, or an equivalent procedure based on good engineering judgment:
(1) Perform this verification with laboratory and dynamometer temperatures stable and at equilibrium. Release the roll brake and shut off power to the dynamometer. Remove any dirt, rubber, rust, and debris from the roll surface. Mark measurement locations on the roll surface using a marker. Mark the roll at a minimum of four equally spaced locations across the roll width; we recommend taking measurements every 150 mm across the roll. Secure the marker to the deck plate adjacent to the roll surface and slowly rotate the roll to mark a clear line around the roll circumference. Repeat this process for all measurement locations.
(2) Measure roll runout using an indicator with a probe that allows for measuring the position of the roll surface relative to the roll centerline as it turns through a complete revolution. The indicator must have some means of being securely mounted adjacent to the roll. The indicator must have sufficient range to measure roll runout at all points, with a minimum accuracy of ±0.025 mm. Calibrate the indicator according to the instrument manufacturer's instructions.
(3) Position the indicator adjacent to the roll surface at the desired measurement location. Position the shaft of the indicator perpendicular to the roll such that the point of the indicator is slightly touching the surface of the roll and can move freely through a full rotation of the roll. Zero the indicator according to the instrument manufacturer's instructions. Avoid distortion of the runout measurement from the weight of a person standing on or near the mounted dial indicator.
(4) Slowly turn the roll through a complete rotation and record the maximum and minimum values from the indicator. Calculate runout as the difference between these maximum and minimum values.
(5) Repeat the steps in paragraphs (c)(3) and (4) of this section for all measurement locations.
(6) The roll runout must be less than 0.254 mm (0.0100 inches) at all measurement locations.
(d) Diameter procedure. Verify roll diameter based on the following procedure, or an equivalent procedure based on good engineering judgment:
(1) Prepare the laboratory and the dynamometer as specified in paragraph (c)(1) of this section.
(2) Measure roll diameter using a Pi Tape®. Orient the Pi Tape® to the marker line at the desired measurement location with the Pi Tape® hook pointed outward. Temporarily secure the Pi Tape® to the roll near the hook end with adhesive tape. Slowly turn the roll, wrapping the Pi Tape® around the roll surface. Ensure that the Pi Tape® is flat and adjacent to the marker line around the full circumference of the roll. Attach a 2.26-kg weight to the hook of the Pi Tape® and position the roll so that the weight dangles freely. Remove the adhesive tape without disturbing the orientation or alignment of the Pi Tape®.
(3) Overlap the gage member and the vernier scale ends of the Pi Tape® to read the diameter measurement to the nearest 0.01 mm. Follow the manufacturer's recommendation to correct the measurement to 20°C, if applicable.
(4) Repeat the steps in paragraphs (d)(2) and (3) of this section for all measurement locations.
(5) The measured roll diameter must be within ±0.254 mm of the specified nominal value at all measurement locations. You may revise the nominal value to meet this specification, as long as you use the corrected nominal value for all calculations in this subpart.
§1066.230 Time verification procedure.
(a) Overview. This section describes how to verify the accuracy of the dynamometer's timing device.
(b) Scope and frequency. Perform this verification upon initial installation and after major maintenance.
(c) Procedure. Perform this verification using one of the following procedures:
(1) WWV method. You may use the time and frequency signal broadcast by NIST from radio station WWV as the time standard if the trigger for the dynamometer timing circuit has a frequency decoder circuit, as follows:
(i) Contact station WWV by telephone by dialing (303) 499-7111 and listen for the time announcement. Verify that the trigger started the dynamometer timer. Use good engineering judgment to minimize error in receiving the time and frequency signal.
(ii) After at least 1000 seconds, re-dial station WWV and listen for the time announcement. Verify that the trigger stopped the dynamometer timer.
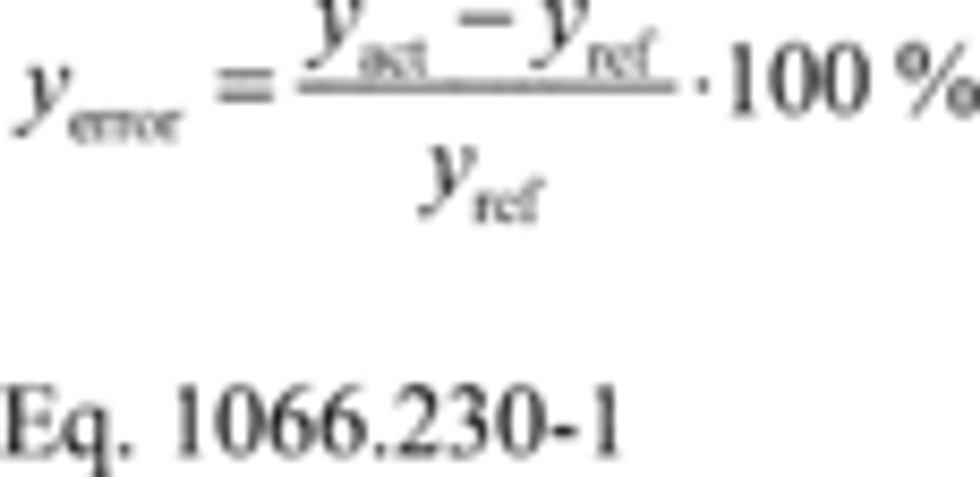
(iii) Compare the measured elapsed time, y act, to the corresponding time standard, y ref, to determine the time error, y error, using the following equation:
(2) Ramping method. You may use an operator-defined ramp function to serve as the time standard as follows:
(i) Set up a signal generator to output a marker voltage at the peak of each ramp to trigger the dynamometer timing circuit. Output the designated marker voltage to start the verification period.
(ii) After at least 1000 seconds, output the designated marker voltage to end the verification period.
(iii) Compare the measured elapsed time between marker signals, y act, to the corresponding time standard, y ref, to determine the time error, y error, using Eq. 1066.230-1.
(3) Dynamometer coastdown method. You may use a signal generator to output a known speed ramp signal to the dynamometer controller to serve as the time standard as follows:
(i) Generate upper and lower speed values to trigger the start and stop functions of the coastdown timer circuit. Use the signal generator to start the verification period.
(ii) After at least 1000 seconds, use the signal generator to end the verification period.
(iii) Compare the measured elapsed time between trigger signals, y act, to the corresponding time standard, y ref, to determine the time error, y error, using Eq. 1066.230-1.
(d) Performance evaluation. The time error determined in paragraph (c) of this section may not exceed ±0.001%.
§1066.235 Speed verification procedure.
(a) Overview. This section describes how to verify the accuracy of the dynamometer speed determination. When performing this verification, you must also ensure the dynamometer speed at any devices used to display or record vehicle speed (such as a driver's aid) is representative of the speed input from the dynamometer speed determination.
(b) Scope and frequency. Perform this verification upon initial installation, within 370 days before testing, and after major maintenance.
(c) Procedure. Use one of the following procedures to verify the accuracy and resolution of the dynamometer speed simulation:
(1) Pulse method. Connect a universal frequency counter to the output of the dynamometer's speed-sensing device in parallel with the signal to the dynamometer controller. The universal frequency counter must be calibrated according to the counter manufacturer's instructions and be capable of measuring with enough accuracy to perform the procedure as specified in this paragraph (c)(1). Make sure the instrumentation does not affect the signal to the dynamometer control circuits. Determine the speed error as follows:
(i) Set the dynamometer to speed-control mode. Set the dynamometer speed to a value of approximately 4.5 m/s (10 mi/hr); record the output of the frequency counter after 10 seconds. Determine the roll speed, v act, using the following equation:

Where:
f = frequency of the dynamometer speed sensing device, accurate to at least four significant figures.
d roll = nominal roll diameter, accurate to the nearest 1.0 mm, consistent with §1066.225(d).
n = the number of pulses per revolution from the dynamometer roll speed sensor.
Example:
f = 2.9231 Hz = 2.9231 s−1
d roll = 904.40 mm = 0.90440 m

v act = 8.3053 m/s
(ii) Repeat the steps in paragraph (c)(1)(i) of this section for the maximum speed expected during testing and at least two additional evenly spaced speed points between the starting speed and the maximum speed point.
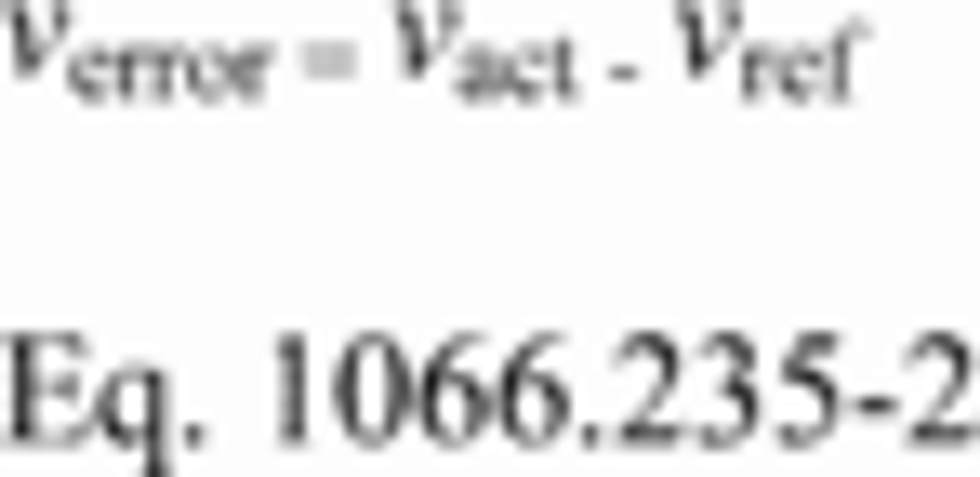
(iii) Compare the calculated roll speed, v act, to each corresponding speed set point, v ref, to determine values for speed error at each set point, v error, using the following equation:
Example:
v act = 8.3053 m/s
v ref = 8.3000 m/s
v error = 8.3053 − 8.3000 = 0.0053 m/s
(2) Frequency method. Install a piece of tape in the shape of an arrowhead on the surface of the dynamometer roll near the outer edge. Put a reference mark on the deck plate in line with the tape. Install a stroboscope or photo tachometer on the deck plate and direct the flash toward the tape on the roll. The stroboscope or photo tachometer must be calibrated according to the instrument manufacturer's instructions and be capable of measuring with enough accuracy to perform the procedure as specified in this paragraph (c)(2). Determine the speed error as follows:
(i) Set the dynamometer to speed-control mode. Set the dynamometer speed to a speed value of approximately 4.5 m/s (10 mi/hr). Tune the stroboscope or photo tachometer until the signal matches the dynamometer roll speed. Record the frequency. Determine the roll speed, y act, using Eq. 1066.235-1, using the stroboscope or photo tachometer's frequency for f.
(ii) Repeat the steps in paragraph (c)(2)(i) of this section for the maximum speed expected during testing and at least two additional evenly spaced speed points between the starting speed and the maximum speed point.
(iii) Compare the calculated roll speed, v act, to each corresponding speed set point, v ref, to determine values for speed error at each set point, y error, using Eq. 1066.235-2.
(d) Performance evaluation. The speed error determined in paragraph (c) of this section may not exceed ±0.02 m/s at any speed set point.
[79 FR 23823, Apr. 28, 2014, as amended at 80 FR 9120, Feb. 19, 2015; 81 FR 74199, Oct. 25, 2016]
§1066.240 Torque transducer verification.
Verify torque-measurement systems by performing the verifications described in §§1066.270 and 1066.275.
§1066.245 Response time verification.
(a) Overview. This section describes how to verify the dynamometer's response time to a step change in tractive force.
(b) Scope and frequency. Perform this verification upon initial installation, within 370 days before testing (i.e., annually), and after major maintenance.
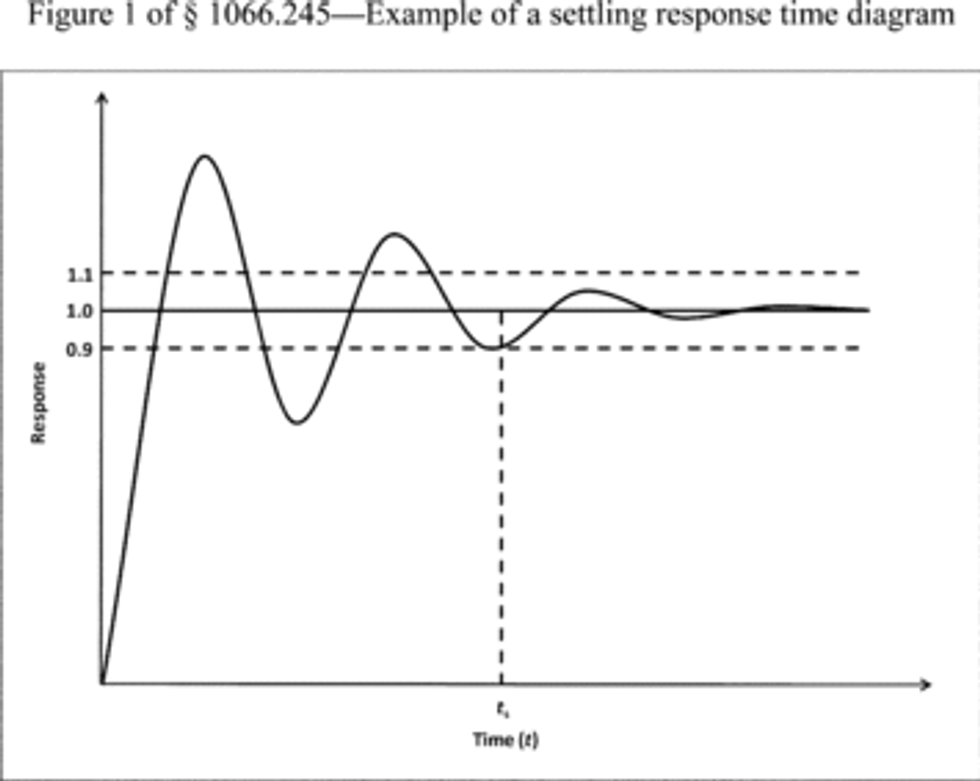
(c) Procedure. Use the dynamometer's automated process to verify response time. You may perform this test either at two different inertia settings corresponding approximately to the minimum and maximum vehicle weights you expect to test or using base inertia and two acceleration rates that cover the range of acceleration rates experienced during testing (such as 0.5 and 8 (mi/hr)/s). Use good engineering judgment to select road-load coefficients representing vehicles of the appropriate weight. Determine the dynamometer's settling response time, t s, based on the point at which there are no measured results more than 10% above or below the final equilibrium value, as illustrated in Figure 1 of this section. The observed settling response time must be less than 100 milliseconds for each inertia setting. Figure 1 follows:
[79 FR 23823, Apr. 28, 2014, as amended at 81 FR 74199, Oct. 25, 2016]
§1066.250 Base inertia verification.
(a) Overview. This section describes how to verify the dynamometer's base inertia.
(b) Scope and frequency. Perform this verification upon initial installation and after major maintenance, such as maintenance that could affect roll inertia.
(c) Procedure. Verify the base inertia using the following procedure:
(1) Warm up the dynamometer according to the dynamometer manufacturer's instructions. Set the dynamometer's road-load inertia to zero, turning off any electrical simulation of road load and inertia so that the base inertia of the dynamometer is the only inertia present. Motor the rolls to 5 mi/hr. Apply a constant force to accelerate the roll at a nominal rate of 1 (mi/hr)/s. Measure the elapsed time to accelerate from 10 to 40 mi/hr, noting the corresponding speed and time points to the nearest 0.01 mi/hr and 0.01 s. Also determine mean force over the measurement interval.
(2) Starting from a steady roll speed of 45 mi/hr, apply a constant force to the roll to decelerate the roll at a nominal rate of 1 mi/hr/s. Measure the elapsed time to decelerate from 40 to 10 mi/hr, noting the corresponding speed and time points to the nearest 0.01 mi/hr and 0.01 s. Also determine mean force over the measurement interval.
(3) Repeat the steps in paragraphs (c)(1) and (2) of this section for a total of five sets of results at the nominal acceleration rate and the nominal deceleration rate.
(4) Use good engineering judgment to select two additional acceleration and deceleration rate pairs that cover the middle and upper rates expected during testing. Repeat the steps in paragraphs (c)(1) through (3) of this section at each of these additional acceleration and deceleration rates.
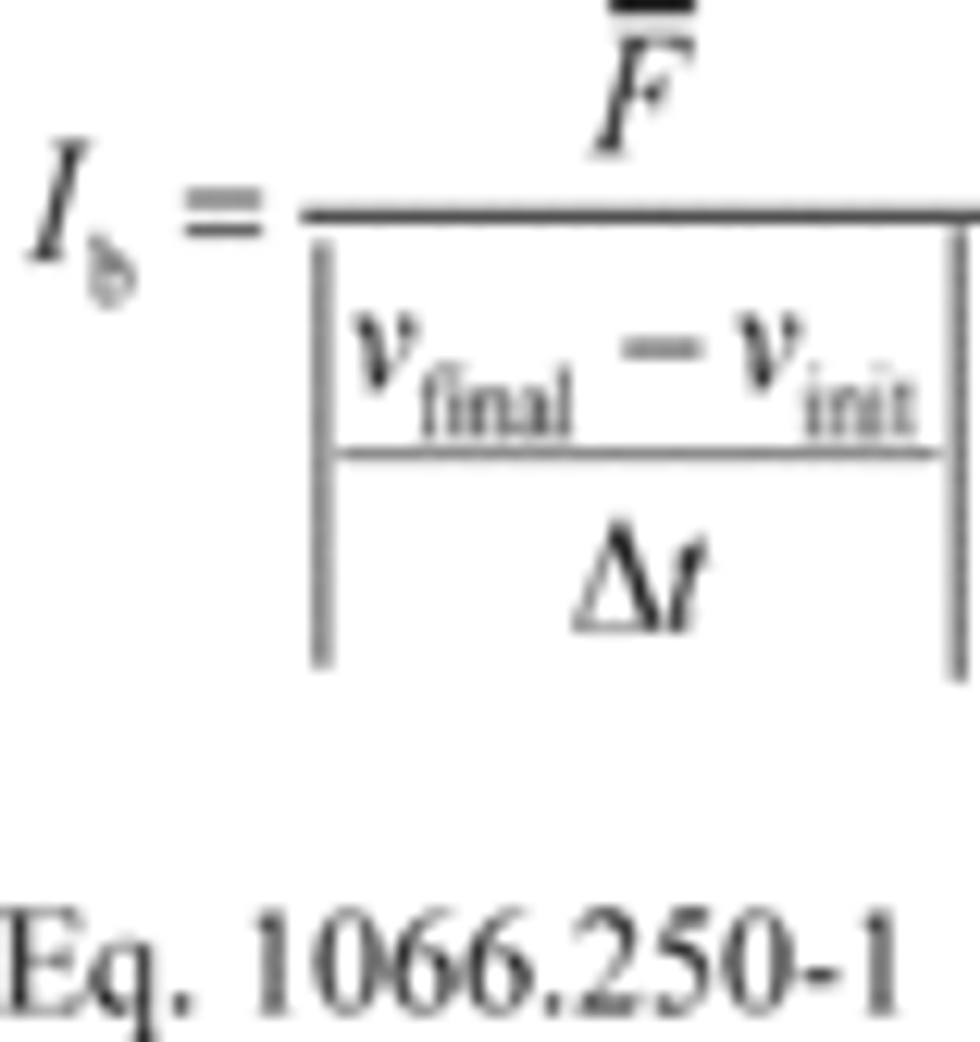
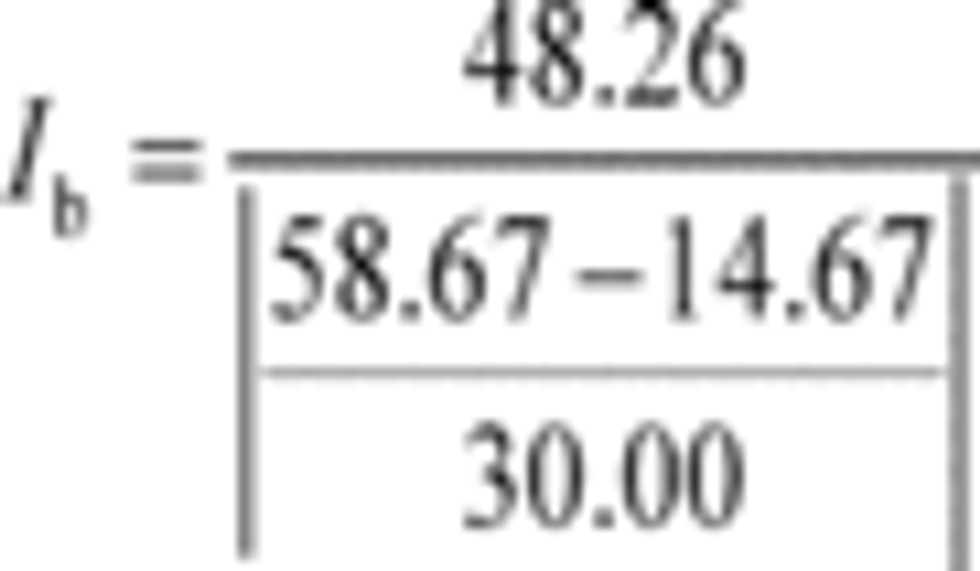
(5) Determine the base inertia, I b, for each measurement interval using the following equation:
Where:
F ͞/> = mean dynamometer force over the measurement interval as measured by the dynamometer.
v final = roll surface speed at the end of the measurement interval to the nearest 0.01 mi/hr.
v init = roll surface speed at the start of the measurement interval to the nearest 0.01 mi/hr.
Δt = elapsed time during the measurement interval to the nearest 0.01 s.
Example:
F ͞/> = 1.500 lbf = 48.26 ft·lbm/s 2
v final = 40.00 mi/hr = 58.67 ft/s
v init = 10.00 mi/hr = 14.67 ft/s
Δt = 30.00 s
I b = 32.90 lbm
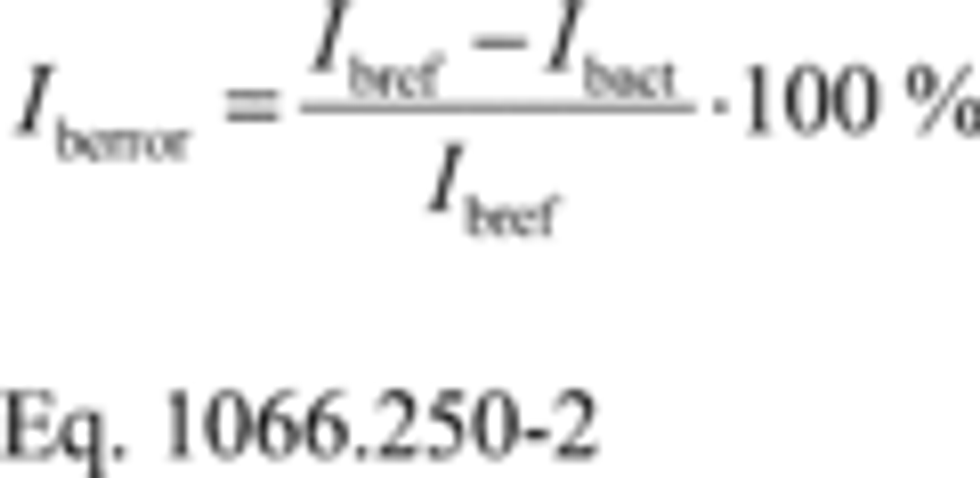
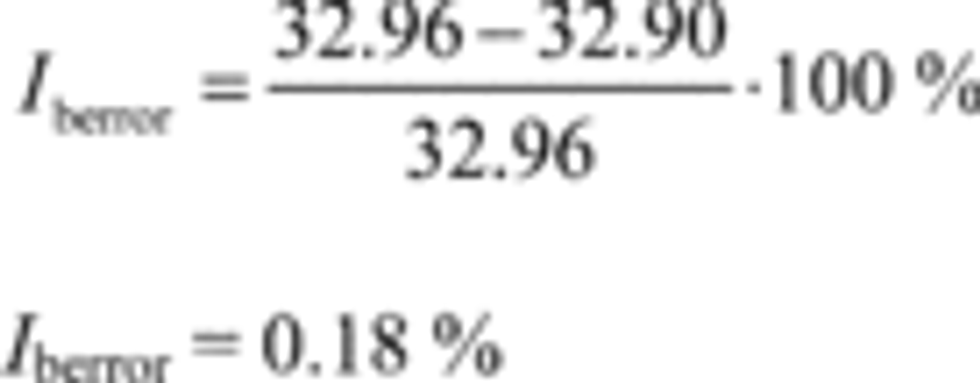
(6) Calculate the base inertia error, I berror, for each of the thirty measured base inertia values, I b, by comparing it to the manufacturer's stated base inertia, I bref, using the following equation:
Example:
I bref = 32.96 lbm
I bact = 32.90 lbm (from paragraph (c)(5) of this section)
(7) Determine the base inertia mean value i ͞/> b, from the ten acceleration and deceleration interval base inertia values for each of the three acceleration/deceleration rates. Then determine the base inertia mean value, i ͞/> b, from the base inertia values corresponding to acceleration/deceleration rates. Calculate base inertia mean values as described in 40 CFR 1065.602(b)
(8) Calculate the inertia error for the final base inertia mean value from paragraph (c)(7) of this section. Use Eq. 1066.250-2, substituting the final base inertia mean value from paragraph (c)(7) of this section for the individual base inertia.
(d) Performance evaluation. The dynamometer must meet the following specifications to be used for testing under this part:
(1) All base inertia errors determined under paragraph (c)(6) of this section may not exceed ±1.0%.
(2) The inertia error for the final base inertia mean value determined under paragraph (c)(8) of this section may not exceed ±0.20%.
[79 FR 23823, Apr. 28, 2014, as amended at 81 FR 74199, Oct. 25, 2016]
§1066.255 Parasitic loss verification.
(a) Overview. Verify the dynamometer's parasitic loss as described in this section, and correct as necessary. This procedure determines the dynamometer's internal losses that it must overcome to simulate road load. Characterize these losses in a parasitic loss curve that the dynamometer uses to apply compensating forces to maintain the desired road-load force at the roll surface.
(b) Scope and frequency. Perform this verification upon initial installation, after major maintenance, and upon failure of a verification in either §1066.270 or §1066.275.
(c) Procedure. Perform this verification by following the dynamometer manufacturer's specifications to establish a parasitic loss curve, taking data at fixed speed intervals to cover the range of vehicle speeds that will occur during testing. You may zero the load cell at a selected speed if that improves your ability to determine the parasitic loss. Parasitic loss forces may never be negative. Note that the torque transducers must be mathematically zeroed and spanned prior to performing this procedure.
(d) Performance evaluation. Some dynamometers automatically update the parasitic loss curve for further testing. If this is not the case, compare the new parasitic loss curve to the original parasitic loss curve from the dynamometer manufacturer or the most recent parasitic loss curve you programmed into the dynamometer. You may reprogram the dynamometer to accept the new curve in all cases, and you must reprogram the dynamometer if any point on the new curve departs from the earlier curve by more than ±9.0 N (±2.0 lbf) for dynamometers capable of testing vehicles at or below 20,000 pounds GVWR, or ±36.0 N (±8.0 lbf) for dynamometers not capable of testing vehicles at or below 20,000 pounds GVWR.
[79 FR 23823, Apr. 28, 2014, as amended at 80 FR 9120, Feb. 19, 2015; 86 FR 34581, Jun. 29, 2021]
§1066.260 Parasitic friction compensation evaluation.
(a) Overview. This section describes how to verify the accuracy of the dynamometer's friction compensation.
(b) Scope and frequency. Perform this verification upon initial installation, after major maintenance, and upon failure of a verification in either §1066.270 or §1066.275. Note that this procedure relies on proper verification of speed and torque, as described in §§1066.235 and 1066.240. You must also first verify the dynamometer's parasitic loss curve as specified in §1066.255.
(c) Procedure. Use the following procedure to verify the accuracy of the dynamometer's friction compensation:
(1) Warm up the dynamometer as specified by the dynamometer manufacturer.
(2) Perform a torque verification as specified by the dynamometer manufacturer. For torque verifications relying on shunt procedures, if the results do not conform to specifications, recalibrate the dynamometer using NIST-traceable standards as appropriate until the dynamometer passes the torque verification. Do not change the dynamometer's base inertia to pass the torque verification.
(3) Set the dynamometer inertia to the base inertia with the road-load coefficients A, B, and C set to 0. Set the dynamometer to speed-control mode with a target speed of 50 mi/hr or a higher speed recommended by the dynamometer manufacturer. Once the speed stabilizes at the target speed, switch the dynamometer from speed-control to torque-control and allow the roll to coast for 60 seconds. Record the initial and final speeds and the corresponding start and stop times. If friction compensation is executed perfectly, there will be no change in speed during the measurement interval.
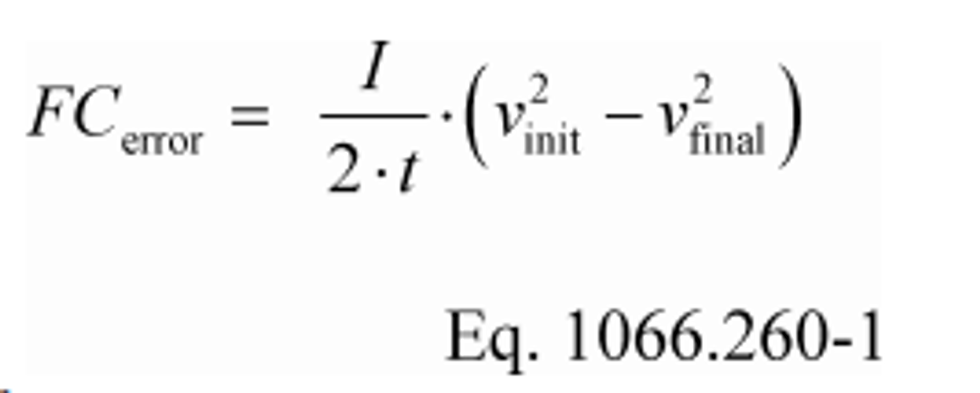
(4) Calculate the power equivalent of friction compensation error, FC error, using the following equation:
Where:
I = dynamometer inertia setting.
t = duration of the measurement interval, accurate to at least 0.01 s.
v init = the roll speed corresponding to the start of the measurement interval, accurate to at least 0.05 mi/hr.
v final = the roll speed corresponding to the end of the measurement interval, accurate to at least 0.05 mi/hr.
Example:
I = 2000 lbm = 62.16 lbf·s2/ft
t = 60.0 s
v init = 9.2 mi/hr = 13.5 ft/s
v final = 10.0 mi/hr = 14.7 ft/s

FC error = -17.5 ft·lbf/s =−0.032 hp
(5) The friction compensation error may not exceed ±0.15 hp for dynamometers capable of testing vehicles at or below 20,000 pounds GVWR, or ±0.6 hp for dynamometers not capable of testing vehicles at or below 20,000 pounds GVWR.
[79 FR 23823, Apr. 28, 2014, as amended at 81 FR 74200, Oct. 25, 2016; 86 FR 34581, Jun. 29, 2021]
§1066.265 Acceleration and deceleration verification.
(a) Overview. This section describes how to verify the dynamometer's ability to achieve targeted acceleration and deceleration rates. Paragraph (c) of this section describes how this verification applies when the dynamometer is programmed directly for a specific acceleration or deceleration rate. Paragraph (d) of this section describes how this verification applies when the dynamometer is programmed with a calculated force to achieve a targeted acceleration or deceleration rate.
(b) Scope and frequency. Perform this verification or an equivalent procedure upon initial installation and after major maintenance that could affect acceleration and deceleration accuracy. Note that this procedure relies on proper verification of speed as described in §1066.235.
(c) Verification of acceleration and deceleration rates. Activate the dynamometer's function generator for measuring roll revolution frequency. If the dynamometer has no such function generator, set up a properly calibrated external function generator consistent with the verification described in this paragraph (c). Use the function generator to determine actual acceleration and deceleration rates as the dynamometer traverses speeds between 10 and 40 mi/hr at various nominal acceleration and deceleration rates. Verify the dynamometer's acceleration and deceleration rates as follows:
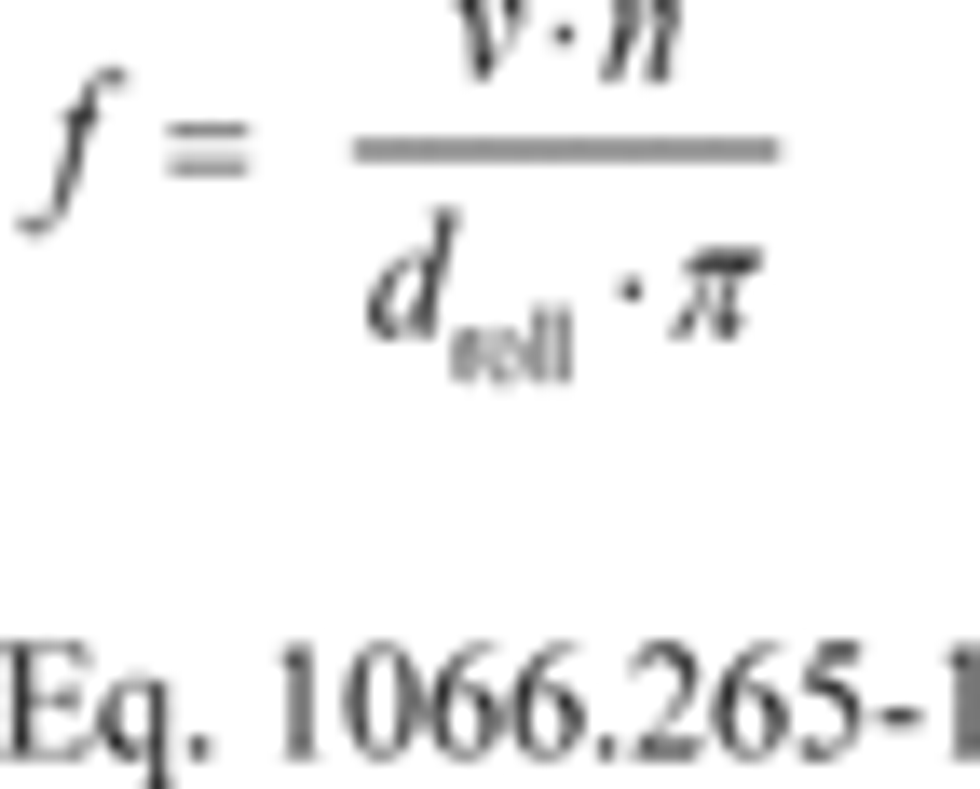
(1) Set up start and stop frequencies specific to your dynamometer by identifying the roll-revolution frequency, f, in revolutions per second (or Hz) corresponding to 10 mi/hr and 40 mi/hr vehicle speeds, accurate to at least four significant figures, using the following equation:
Where:
v = the target roll speed, in inches per second (corresponding to drive speeds of 10 mi/hr or 40 mi/hr).
n = the number of pulses from the dynamometer's roll-speed sensor per roll revolution.
d roll = roll diameter, in inches.
(2) Program the dynamometer to accelerate the roll at a nominal rate of 1 mi/hr/s from 10 mi/hr to 40 mi/hr. Measure the elapsed time to reach the target speed, to the nearest 0.01 s. Repeat this measurement for a total of five runs. Determine the actual acceleration rate for each run, a act, using the following equation:
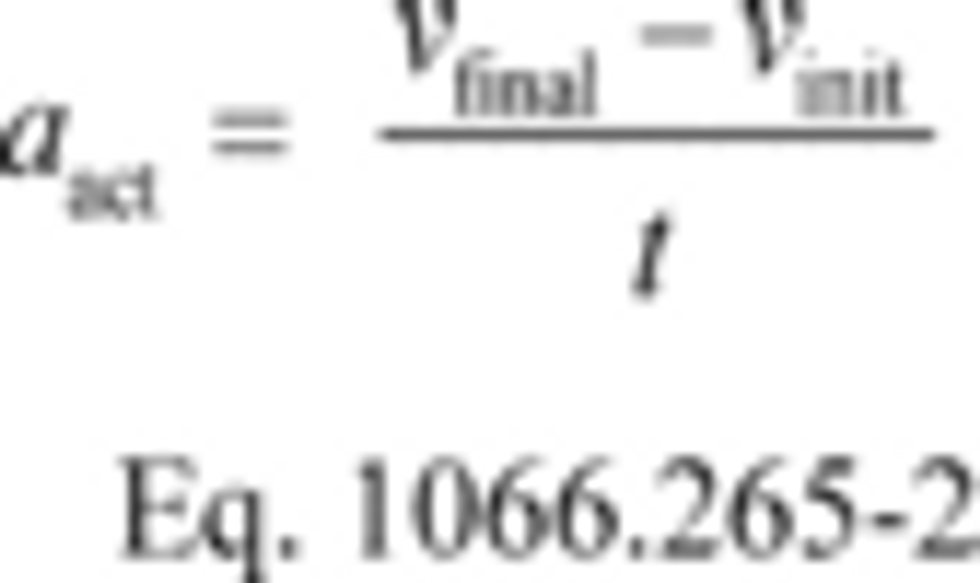
Where:
a act = acceleration rate (decelerations have negative values).
v final = the target value for the final roll speed.
v init = the setpoint value for the initial roll speed.
t = time to accelerate from v init to v final.
Example:
v final = 40 mi/hr
v init = 10 mi/hr
t = 30.003 s

a act = 0.999 (mi/hr)/s
(3) Program the dynamometer to decelerate the roll at a nominal rate of 1 (mi/hr)/s from 40 mi/hr to 10 mi/hr. Measure the elapsed time to reach the target speed, to the nearest 0.01 s. Repeat this measurement for a total of five runs. Determine the actual acceleration rate, a act, using Eq. 1066.265-2.
(4) Repeat the steps in paragraphs (c)(2) and (3) of this section for additional acceleration and deceleration rates in 1 (mi/hr)/s increments up to and including one increment above the maximum acceleration rate expected during testing. Average the five repeat runs to calculate a mean acceleration rate, a͞ act, at each setting.
(5) Compare each mean acceleration rate, a͞ act, to the corresponding nominal acceleration rate, a ref, to determine values for acceleration error, a error, using the following equation:
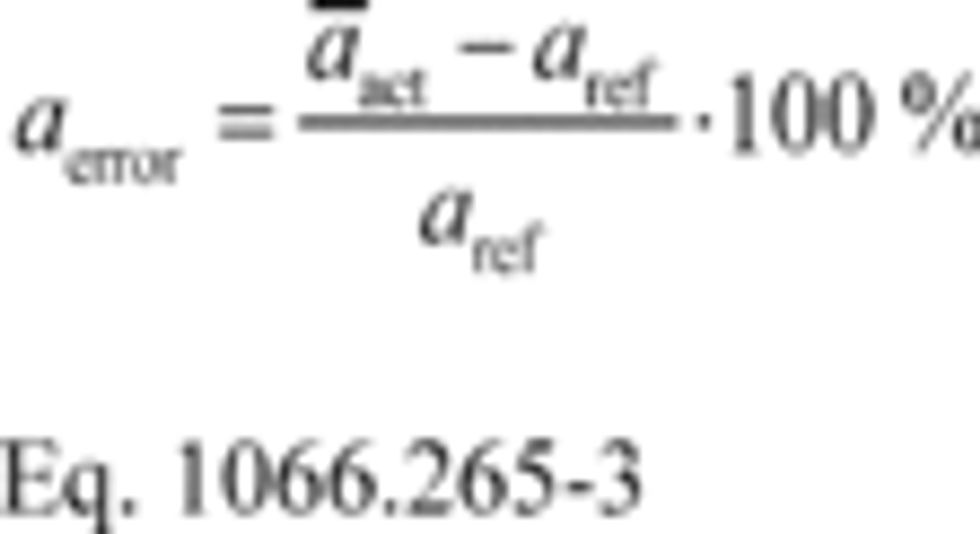
Example:
a͞ act = 0.999 (mi/hr)/s
a ref = 1 (mi/hr)/s

a error = −0.100%
(d) Verification of forces for controlling acceleration and deceleration. Program the dynamometer with a calculated force value and determine actual acceleration and deceleration rates as the dynamometer traverses speeds between 10 and 40 mi/hr at various nominal acceleration and deceleration rates. Verify the dynamometer's ability to achieve certain acceleration and deceleration rates with a given force as follows:
(1) Calculate the force setting, F, using the following equation:
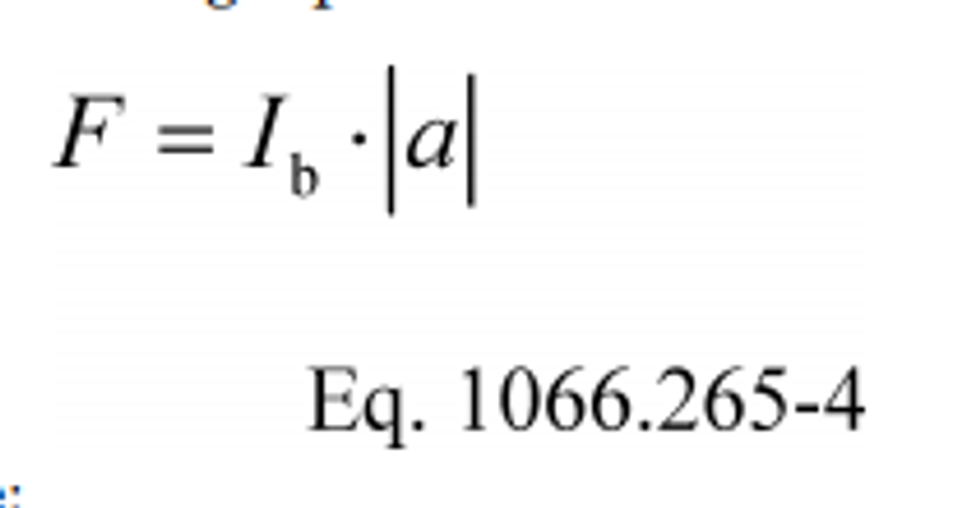
Where:
I b = the dynamometer manufacturer's stated base inertia, in lbf·s2/ft.
a = nominal acceleration rate, in ft/s2.
Example:
I b = 2967 lbm = 92.217 lbf·s2/ft
a = 1 (mi/hr)/s = 1.4667 ft/s2
F = 92.217·|1.4667|
F = 135.25 lbf
(2) Set the dynamometer to road-load mode and program it with a calculated force to accelerate the roll at a nominal rate of 1 (mi/hr)/s from 10 mi/hr to 40 mi/hr. Measure the elapsed time to reach the target speed, to the nearest 0.01 s. Repeat this measurement for a total of five runs. Determine the actual acceleration rate, a act, for each run using Eq. 1066.265-2. Repeat this step to determine measured “negative acceleration” rates using a calculated force to decelerate the roll at a nominal rate of 1 (mi/hr)/s from 40 mi/hr to 10 mi/hr. Average the five repeat runs to calculate a mean acceleration rate, a͞ act, at each setting.
(3) Repeat the steps in paragraph (d)(2) of this section for additional acceleration and deceleration rates as specified in paragraph (c)(4) of this section.
(4) Compare each mean acceleration rate, a͞ act, to the corresponding nominal acceleration rate, a͞ ref, to determine values for acceleration error, a͞ error, using Eq. 1066.265-3.
(e) Performance evaluation. The acceleration error from paragraphs (c)(5) and (d)(4) of this section may not exceed ±1.0%.
[79 FR 23823, Apr. 28, 2014, as amended at 81 FR 74200, Oct. 25, 2016; 86 FR 34581, Jun. 29, 2021]
§1066.270 Unloaded coastdown verification.
(a) Overview. Use force measurements to verify the dynamometer's settings based on coastdown procedures.
(b) Scope and frequency. Perform this verification upon initial installation, within 7 days of testing, and after major maintenance.
(c) Procedure. This procedure verifies the dynamometer's settings derived from coastdown testing. For dynamometers that have an automated process for this procedure, perform this evaluation by setting the initial speed, final speed, inertial coefficients, and road-load coefficients as required for each test, using good engineering judgment to ensure that these values properly represent in-use operation. Use the following procedure if your dynamometer does not perform this verification with an automated process:
(1) Warm up the dynamometer as specified by the dynamometer manufacturer.
(2) With the dynamometer in coastdown mode, set the dynamometer inertia for the smallest vehicle weight that you expect to test and set A, B, and C road-load coefficients to values typical of those used during testing. Program the dynamometer to coast down over the dynamometer operational speed range (typically from a speed of 80 mi/hr through a minimum speed at or below 10 mi/hr). Perform at least one coastdown run over this speed range, collecting data over each 10 mi/hr interval.
(3) Repeat the steps in paragraph (c)(2) of this section with the dynamometer inertia and road-load coefficients set for the largest vehicle weight that you expect to test.
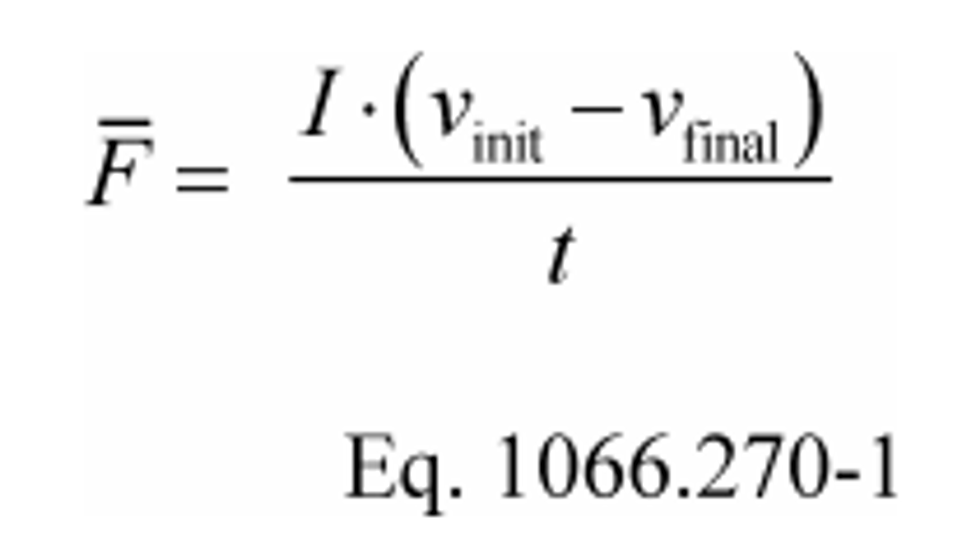
(4) Determine the mean coastdown force, F , for each speed and inertia setting for each of the coastdowns performed using the following equation:
Where:
F = the mean force measured during the coastdown for each speed interval and inertia setting, expressed in lbf and rounded to four significant figures.
I = the dynamometer's inertia setting, in lbf·s2/ft.
v init = the speed at the start of the coastdown interval, expressed in ft/s to at least four significant figures.
v final = the speed at the end of the coastdown interval, expressed in ft/s to at least four significant figures.
t = coastdown time for each speed interval and inertia setting, accurate to at least 0.01 s.
Example:
I = 2000 lbm = 62.16 lbf·s2/ft
v init = 25 mi/hr = 36.66 ft/s
v final = 15 mi/hr = 22.0 ft/s
t = 5.00 s

F = 182.3 lbf
(5) Calculate the target value of coastdown force, F ref, based on the applicable dynamometer parameters for each speed interval and inertia setting.
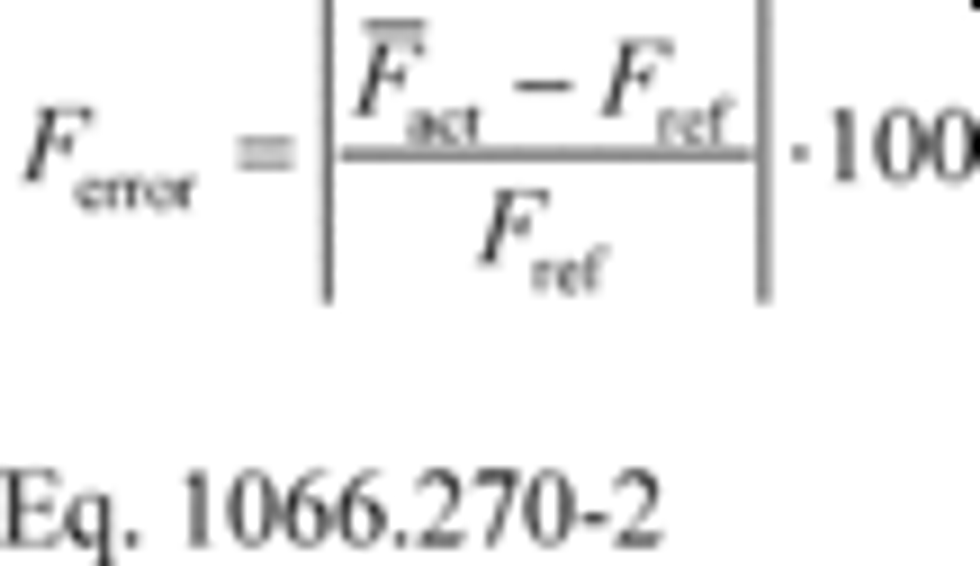
(6) Compare the mean value of the coastdown force measured for each speed interval and inertia setting, F͞ act, to the corresponding F ref to determine values for coastdown force error, F error, using the following equation:
Example:
F ref = 192 lbf
F͞ act = 191 lbf

F error = 0.5%
(d) Performance evaluation. The coastdown force error determined in paragraph (c) of this section may not exceed the following:
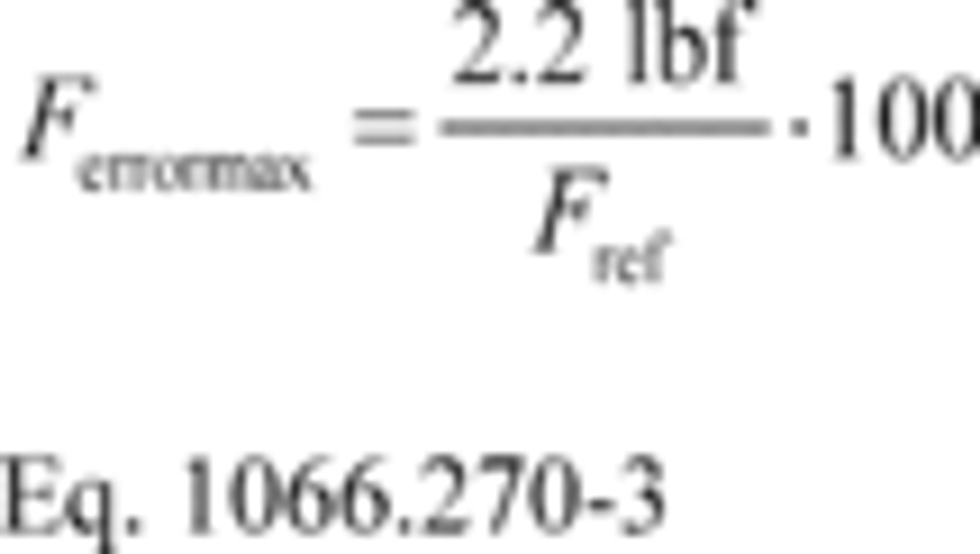
(1) For vehicles at or below 20,000 pounds GVWR, the maximum allowable error, F errormax, for all speed intervals and inertia settings is 1.0% or the value determined from Eq. 1066.270-3, whichever is greater.
Example:
F ref = 192 lbf

F errormax = 1.14%
(2) For vehicles above 20,000 pounds GVWR, the maximum allowable error, F errormax, for all speed intervals and inertia settings is 1.0% or the value determined from Eq. 1066.270-3 (substituting 8.8 lbf for 2.2 lbf in the numerator), whichever is greater.
(e) Remedy for nonconforming dynamometers. If the dynamometer is not able to meet this requirement, diagnose and repair the dynamometer before continuing with emission testing. Diagnosis should include performing the verifications in §1066.255 and §1066.260.
[79 FR 23823, Apr. 28, 2014, as amended at 80 FR 9120, Feb. 19, 2015; 81 FR 74201, Oct. 25, 2016; 86 FR 34582, Jun. 29, 2021]
§1066.275 Daily dynamometer readiness verification.
(a) Overview. This section describes how to verify that the dynamometer is ready for emission testing.
(b) Scope and frequency. Perform this verification upon initial installation, within 1 day before testing, and after major maintenance. You may run this within 7 days before testing if you accumulate data to support a less frequent verification interval.
(c) Procedure. For dynamometers that have an automated process for this verification procedure, perform this evaluation by setting the initial speed and final speed and the inertial and road-load coefficients as required for the test, using good engineering judgment to ensure that these values properly represent in-use operation. Use the following procedure if your dynamometer does not perform this verification with an automated process:
(1) With the dynamometer in coastdown mode, set the dynamometer inertia to the base inertia with the road-load coefficient A set to 20 lbf (or a force that results in a coastdown time of less than 10 minutes) and coefficients B and C set to 0. Program the dynamometer to coast down for one 10 mi/hr interval from 55 mi/hr down to 45 mi/hr. If your dynamometer is not capable of performing one discrete coastdown, then coast down with preset 10 mi/hr intervals that include a 55 mi/hr to 45 mi/hr interval.
(2) Perform the coastdown.
(3) Determine the coastdown force and coastdown force error using Eqs. 1066.270-1 and 1066.270-2.
(d) Performance evaluation. The coastdown force error determined in paragraph (c) of this section may not exceed the following:
(1) For vehicles at or below 20,000 pounds GVWR, 1.0% or the value determined from Eq. 1066.270-3, whichever is greater.
(2) For vehicles above 20,000 pounds GVWR, 1.0% or the value determined from Eq. 1066.270-3 (substituting 8.8 lbf for 2.2 lbf), whichever is greater.
(e) Remedy for nonconforming dynamometers. If the verification results fail to meet the performance criteria in paragraph (d) of this section, perform the procedure up to two additional times. If the dynamometer is consistently unable to meet the performance criteria, diagnose and repair the dynamometer before continuing with emission testing. Diagnosis should include performing the verifications in §1066.255 and §1066.260.
[79 FR 23823, Apr. 28, 2014, as amended at 81 FR 74201, Oct. 25, 2016; 86 FR 34582, Jun. 29, 2021]
['Air Programs']
['Air Emissions']
UPGRADE TO CONTINUE READING
Load More
J. J. Keller is the trusted source for DOT / Transportation, OSHA / Workplace Safety, Human Resources, Construction Safety and Hazmat / Hazardous Materials regulation compliance products and services. J. J. Keller helps you increase safety awareness, reduce risk, follow best practices, improve safety training, and stay current with changing regulations.
Copyright 2026 J. J. Keller & Associate, Inc. For re-use options please contact copyright@jjkeller.com or call 800-558-5011.
