['CMV Parts and Maintenance']
['Vehicle maintenance']
04/07/2025
...
S1. Purpose and Scope. This standard establishes requirements for ejection mitigation systems to reduce the likelihood of complete and partial ejections of vehicle occupants through side windows during rollovers or side impact events.
S2. Application. This standard applies to passenger cars, and to multipurpose passenger vehicles, trucks designed to carry at least one person, and buses with a gross vehicle weight rating of 4,536 kg or less, except walk-in vans, modified roof vehicles, convertibles, and vehicles with no doors or with doors that are designed to be easily attached or removed so the vehicle can be operated without doors. Also excluded from this standard are law enforcement vehicles, correctional institution vehicles, taxis and limousines, if they have a fixed security partition separating the 1st and 2nd or 2nd and 3rd rows and if they are produced by more than one manufacturer or are altered (within the meaning of 49 CFR 567.7).
S3. Definitions.
Ejection impactor means a device specified in S7.1 of this standard that is a component of the ejection mitigation test device and is the moving mass that strikes the ejection mitigation countermeasure.
Ejection impactor targeting point means the intersection of the y-axis of the ejection headform and the outer surface of the ejection headform.
Ejection mitigation countermeasure means a device or devices, except seat belts, integrated into the vehicle that reduce the likelihood of occupant ejection through a side window opening, and that requires no action by the occupant for activation.
Ejection propulsion mechanism means a device that is a component of the ejection mitigation test device consisting of a mechanism capable of propelling the ejection impactor and constraining it to move along its axis or shaft.
Limited-line manufacturer means a manufacturer that sells three or fewer carlines, as that term is defined in 49 CFR 583.4, in the United States during a production year.
Modified roof means the replacement roof on a motor vehicle whose original roof has been removed, in part or in total, or a roof that has to be built over the occupant compartment in vehicles that did not have an original roof over the occupant compartment.
Movable window means a daylight opening composed of glazing designed to be moved with respect to the vehicle or frame while the vehicle is in motion.
Side daylight opening means, other than a door opening, the locus of all points where a horizontal line, perpendicular to the vehicle vertical longitudinal plane, is tangent to the periphery of the opening. The periphery includes surfaces 100 millimeters inboard of the inside surface of the window glazing and 25 mm outboard of the outside surface of the side glazing. The periphery excludes the following: any flexible gasket material or weather stripping used to create a waterproof seal between the glazing or door and the vehicle interior; grab handles used to facilitate occupant egress and ingress; and any part of a seat.
Small manufacturer means an original vehicle manufacturer that produces or assembles fewer than 5,000 vehicles annually for sale in the United States.
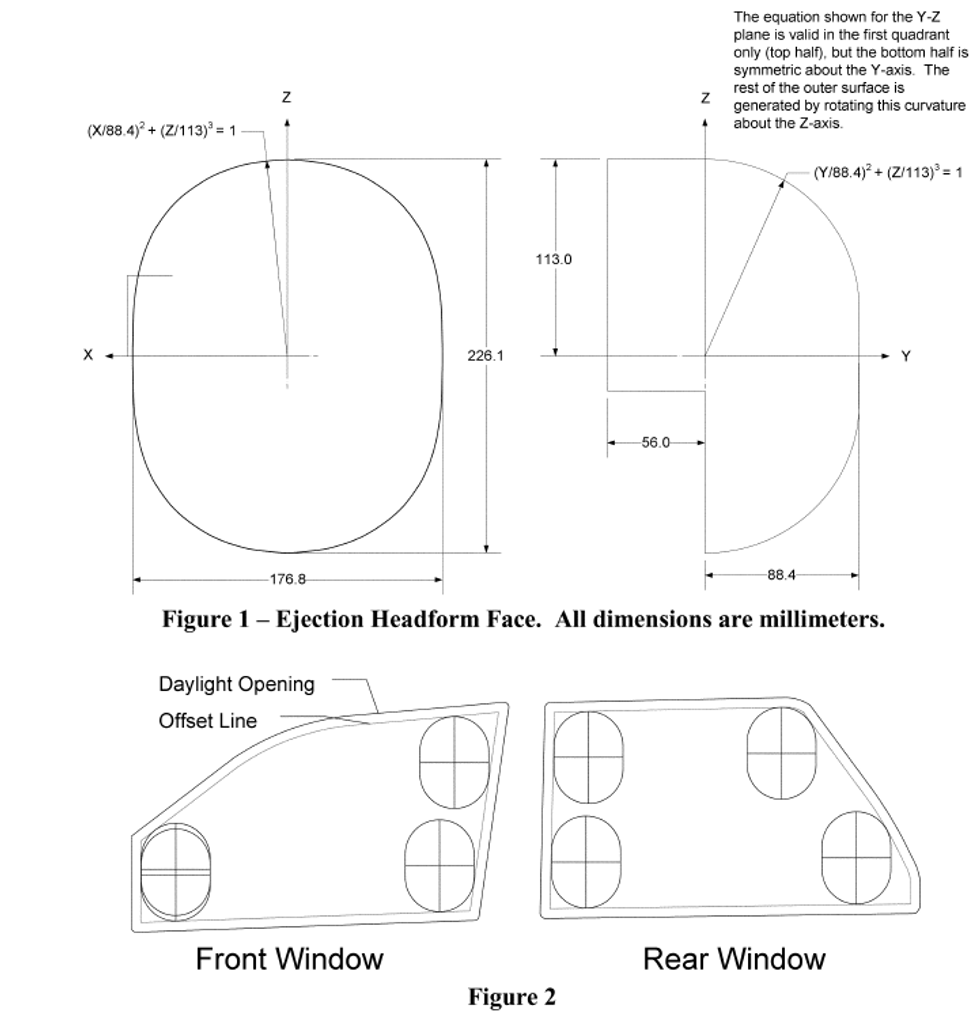
Target means the x-z plane projection of the ejection headform face as shown in Figure 1.
Walk-in van means a special cargo/mail delivery vehicle that only has a driver designated seating position. The vehicle has a sliding (or folding) side door and a roof clearance that enables a person of medium stature to enter the passenger compartment area in an up-right position.
Zero displacement plane means, a vertical plane parallel to the vehicle longitudinal centerline and tangent to the most outboard surface of the ejection headform when the headform is aligned with an impact target location and just touching the inside surface of a window covering the side daylight opening.
S4. Phase-in, performance and other requirements.
S4.1 Phase-in requirements.
S4.1.1 Except as provided in S4.1.3 of this standard, a percentage of each manufacturer’s vehicle production, as specified in S8 of this standard, manufactured on or after September 1, 2013 to August 31, 2017, shall meet the requirements of S4.2. Vehicles that are not subject to the phase-in may be certified as meeting the requirements specified in this standard.
S4.1.2 Except as provided in S4.1.3 of this section, each vehicle manufactured on or after September 1, 2017 must meet the requirements of S4.2 without use of advanced credits.
S4.1.3 Exceptions from the phase-in; special allowances.
(a) Vehicles produced by a small manufacturer and by a limited line manufacturer are not subject to S4.1.1 of this standard, but are subject to S4.1.2.
(b) Vehicles that are altered (within the meaning of 49 CFR 567.7) before September 1, 2018, after having been previously certified in accordance with part 567 of this chapter, and vehicles manufactured in two or more stages before September 1, 2018, are not required to meet the requirements of S4.2. Vehicles that are altered on or after September 1, 2018, and vehicles that are manufactured in two or more stages on or after September 1, 2018, must meet the requirements of S4.2.
S4.2 Performance and other requirements.
S4.2.1 When the ejection propulsion mechanism propels the ejection impactor into the impact target locations of each side daylight opening of a vehicle according to the test procedures specified in S5 of this standard, the most outboard surface of the ejection headform must not displace more than 100 millimeters beyond the zero displacement plane.
S4.2.1.1 No vehicle shall use movable glazing as the sole means of meeting the displacement limit of S4.2.1.
S4.2.1.2 Vehicles with an ejection mitigation countermeasure that deploys in the event of a rollover must deploy the countermeasure for the side daylight opening being tested according to the procedure specified in S5 of this standard.
S4.2.1.3 If a side daylight opening contains no target locations, the impact test of S4.2.1 is not performed on that opening.
S4.2.2 Vehicles that have an ejection mitigation countermeasure that deploys in the event of a rollover must have a monitoring system with a readiness indicator. The indicator shall monitor its own readiness and must be clearly visible from the driver’s designated seating position. The same readiness indicator required by S4.5.2 of FMVSS No. 208 may be used to meet the requirement. A list of the elements of the system being monitored by the indicator shall be included with the information furnished in accordance with S4.2.3.
S4.2.3 Written information.
(a) Vehicles with an ejection mitigation countermeasure that deploys in the event of a rollover must be described as such in the vehicle’s owner manual or in other written information provided by the vehicle manufacturer to the consumer.
(b) Vehicles that have an ejection mitigation countermeasure that deploys in the event of a rollover must include in written information a discussion of the readiness indicator required by S4.2.2, specifying a list of the elements of the system being monitored by the indicator, a discussion of the purpose and location of the telltale, and instructions to the consumer on the steps to take if the telltale is illuminated.
S4.2.4 Technical Documentation. For vehicles that have an ejection mitigation countermeasure that deploys in the event of a rollover, the vehicle manufacturer must make available to the agency, upon request, the following information: A discussion of the sensor system used to deploy the countermeasure, including the pertinent inputs to the computer or calculations within the computer and how its algorithm uses that information to determine if the countermeasure should be deployed.
S5. Test procedures.
S5.1 Demonstrate compliance with S4.2 of this standard in accordance with the test procedures specified in this standard, under the conditions of S6, using the equipment described in S7. In the impact test described by these procedures, target locations are identified (S5.2) and the zero displacement plane location is determined (S5.3). The glazing is pre-broken, fully retracted or removed prior to the impact test (S5.4). The countermeasure is deployed, if applicable, and an ejection impactor (see S7.1) strikes the countermeasure at the impact target locations, at the specified speeds and times (S5.5). The lateral displacement of the ejection impactor beyond the zero displacement plane is measured.
S5.2 Determination of impact target locations.
S5.2.1 Boundary of target location.
S5.2.1.1 Initial determination of offset line. Determine the location of an offset-line within the side daylight opening by projecting each point of the side daylight opening laterally onto a vehicle vertical longitudinal plane. Move each point by 25±2 mm towards the center of the side daylight opening projection and perpendicular to a line tangent to the projection at that point, while maintaining the point on a vehicle vertical longitudinal plane.
S5.2.1.2 Rearmost limit of offset line.
(a) Seats fixed in a forward facing direction. Except as provided in S5.2.1.2(b), if an offset line extends rearward of a transverse vertical vehicle plane located behind the seating reference point at the distance specified in 5.2.1.2(a)(1) or (2), the transverse vertical vehicle plane defines the rearward edge of the offset line for the purposes of determining target locations.
(1) For a vehicle with fewer than 3 rows—1,400 mm behind the rearmost SgRP.
(2) For a vehicle with 3 or more rows—600 mm behind the 3rd row SgRP.
(b) Seats not fixed in a forward facing direction. When the last row seat adjacent to the opening, in the case of a vehicle with fewer than 3 rows, or the 3rd row seat adjacent to the opening, in the case of a vehicle with 3 or more rows, is not fixed in the forward facing direction, the offset line may extend farther rearward than specified in S5.2.1.2(a) under the following conditions. With the seat in any non-forward facing orientation, the seat back set at an inclination position closest to the manufacturer’s design seat back angle, and all other seat adjustments at any possible position of adjustment, determine the location of a vertical transverse vehicle plane located behind the portion of the seat rearmost in the vehicle, at the distance specified in 5.2.1.2(b)(1) and (2). The boundary of target locations extends to this vertical plane if it is farther rearward than the plane determined in S5.2.1.2(a).
(1) For a vehicle with fewer than 3 rows—1,400 mm behind the portion of the seat rearmost in the vehicle.
(2) For a vehicle with 3 or more rows—600 mm behind the portion of the seat rearmost in the vehicle, for a seat in the 3rd row.
(c) Vehicles with partitions or bulkheads. If a vehicle has a fixed transverse partition or bulkhead behind which there are no designated seating positions, a vertical transverse vehicle plane 25 mm forward of the most forward portion of the partition or bulkhead defines the rearward edge of the offset line for the purposes of determining target locations when said plane is forward of the limiting plane defined in S5.2.1.2(a) or (b).
S5.2.2 Preliminary target locations.
(a) To identify the impact target locations, the following procedures are performed with the x and z axes of the target, shown in Figure 1 (provided for illustration purposes), aligned within ±1 degree of the vehicle longitudinal and vertical axes, respectively, and the target y axis pointing in the outboard direction.
(b) Place targets at any location inside the offset-line where the target is tangent to within ±2 mm of the offset-line at just two or three points (see Figure 2) (figure provided for illustration purposes).
S5.2.3 Determination of primary target locations. Divide the side daylight opening into four quadrants by passing a vertical line and a horizontal line, in a vehicle vertical longitudinal plane, through the geometric center of the side daylight opening.
S5.2.3.1 Front windows. For any side daylight opening forward of the vehicle B-pillar, the primary quadrants are the forward-lower and rearward-upper.
S5.2.3.2 Rear windows. For any side daylight opening rearward of the B-pillar, the primary quadrants are the forward-upper and rearward-lower.
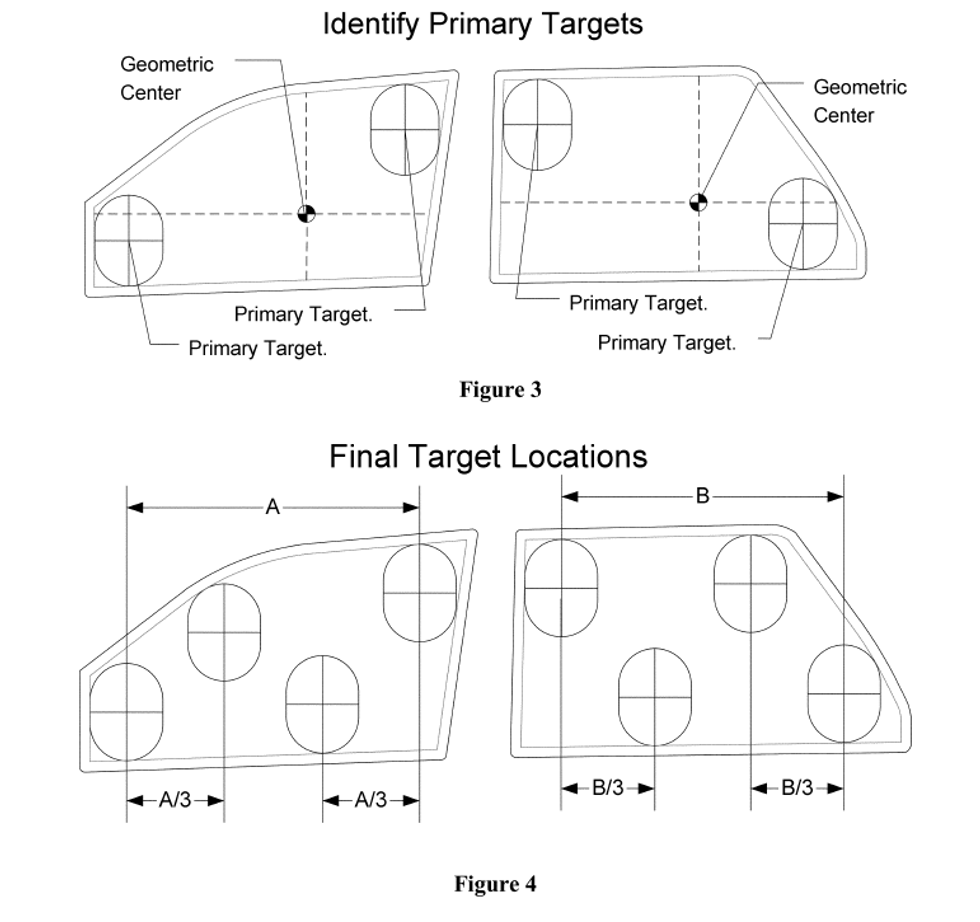
S5.2.3.3 If a primary quadrant contains only one target center, that target is the primary target for that quadrant (see Figure 3) (figure provided for illustration purposes). If there is more than one target center in a primary quadrant, the primary target for that quadrant is the lowest target in a lower quadrant and the highest target in an upper quadrant. If there is a primary quadrant that does not contain a target center, the target center closest to the primary quadrant outline is the primary target.
S5.2.4 Determination of secondary target locations.
S5.2.4.1 Front windows. Measure the horizontal distance between the centers of the primary targets. For a side daylight opening forward of the B-pillar, place one secondary target center rearward of the forward primary target by one-third of the horizontal distance between the primary target centers and tangent with upper portion of the offset-line. Place another secondary target center rearward of the forward primary target by two-thirds of the horizontal distance between the primary target centers and tangent with the lower portion of the offset-line (see figure 4) (figure provided for illustration purposes).
S5.2.4.2 Rear windows. For side daylight openings rearward of the B-pillar, place one secondary target center rearward of the forward primary target by one-third of the horizontal distance between the primary target centers and tangent with lower portion of the offset-line. Place another secondary target center rearward of the forward primary target by two-thirds of the horizontal distance between the primary target centers and tangent with the upper portion of the offset-line (see Figure 4) (figure provided for illustration purposes).
S5.2.5 Target adjustment.
S5.2.5.1 Target elimination and reconstitution.
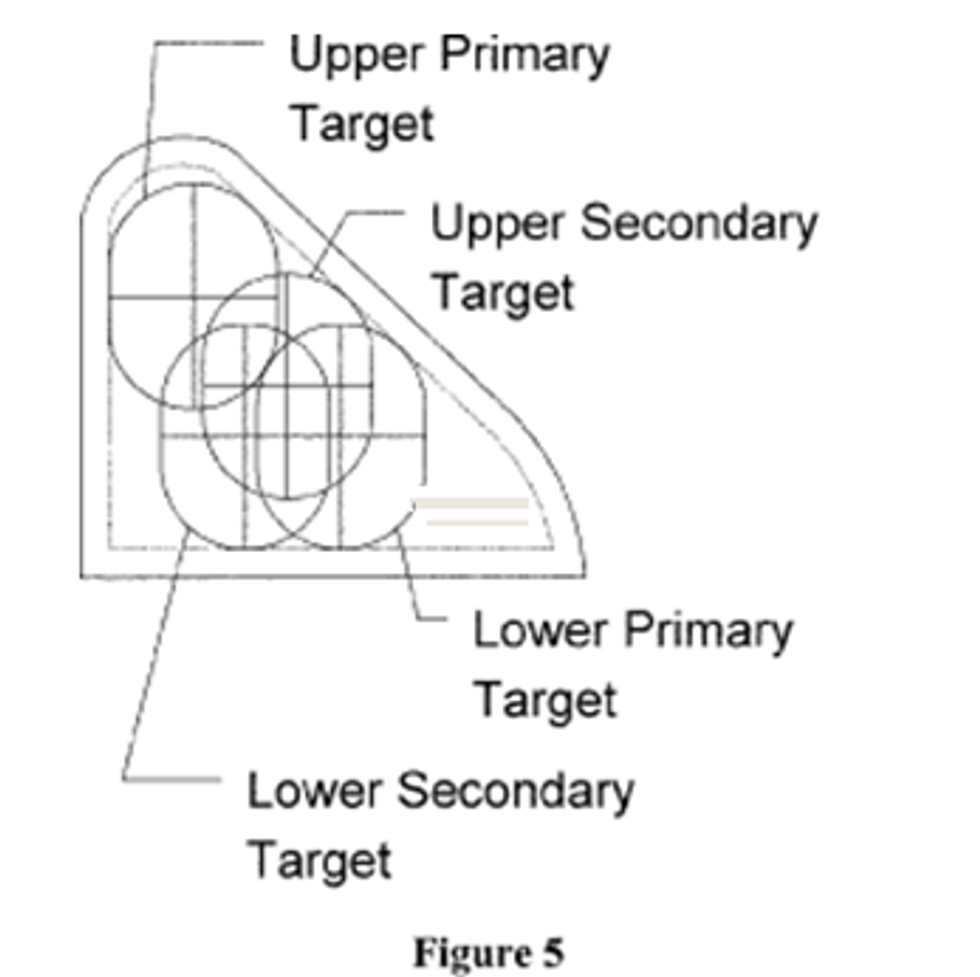
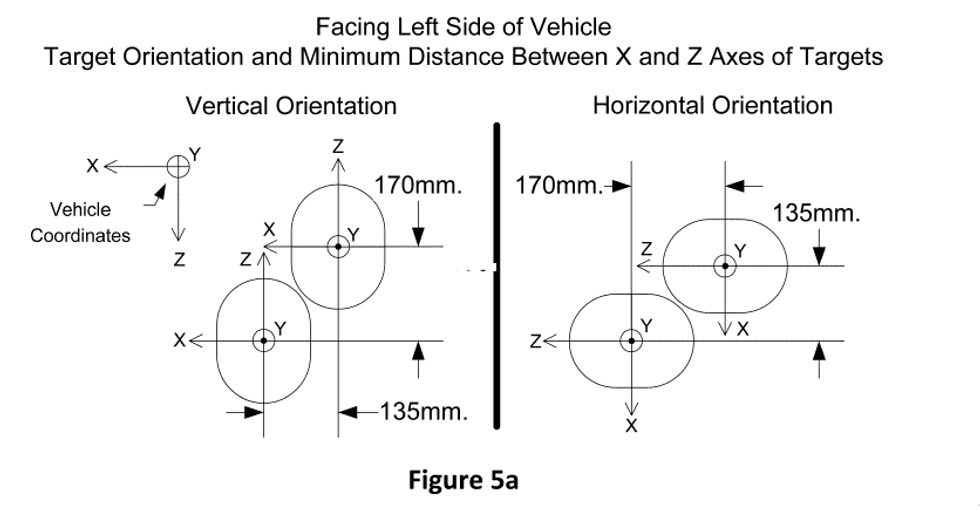
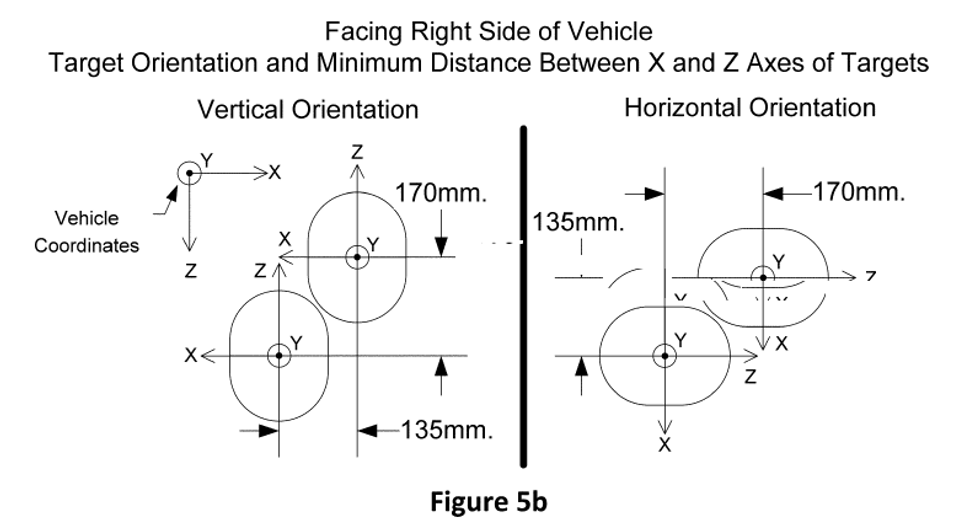
S5.2.5.1.1 Target elimination. Determine the horizontal and vertical distance between the centers of the targets. If the minimum distance between the z axes of the targets is less than 135 mm and the minimum distance between the x axes of the targets is less than 170 mm, eliminate the targets in the order of priority given in steps 1 through 4 of Table 1 (see Figure 5, 5a and 5b) (figures provided for illustration purposes). In each case, both the z axes of the targets must be closer than 135 mm and x axes of the targets must be closer than 170 mm. If the minimum distance between the z axes of the targets is not less than 135 mm or the minimum distance between the x axes of the targets is not less than 170 mm, do not eliminate the target. Continue checking all the targets listed in steps 1 through 4 of Table 1.
| Step | Measure distance from z axis to z axis and x axis to x axis for these targets | Eliminate this target if distances between z axes of targets and x axes of targets are less than 135 mm and 170 mm, respectively |
| 1 | Upper Secondary to Lower Secondary | Upper Secondary. |
| 2 | Upper Primary to Upper or Remaining Secondary | Upper or Remaining Secondary. |
| 3 | Lower Primary to Lower or Remaining Secondary | Lower or Remaining Secondary. |
| 4 | Upper Primary to Lower Primary | Upper Primary. |
S5.2.5.1.2 Target reconstitution. If after following the procedure given in S5.2.5.1.1, there are only two targets remaining, determine the absolute distance between the centers of these targets. If this distance is greater than or equal to 360 mm, place a target such that its center bisects a line connecting the centers of the remaining targets.
S5.2.5.2 Target reorientation—90 degree rotation. If after following the procedure given in S5.2.5.1 there are less than four targets in a side daylight opening, repeat the procedure in 5.2 through 5.2.5.1.2, with a modification to S5.2 as follows. Reorient the target by rotating it 90 degrees about the y axis of the target such that the target positive z axis is aligned within 1 degree of the vehicle longitudinal axis, pointing in the direction of the vehicle positive x axis (see Figures 5a and 5b) (figures provided for illustration purposes). If after performing the procedure in this section, the remaining targets exceed the number of targets determined with the original orientation of the target, the reoriented targets represent the final target locations for the side daylight opening.
S5.2.5.3 Target reorientation—incremental rotation. If after following the procedure given in S5.2.5.2 there are no targets in a side daylight opening, starting with the target in the position defined in S5.2.2(a), reorient the target by rotating it in 5 degree increments about the y axis of the target by rotating the target positive z axis toward the vehicle positive x axis. At each increment of rotation, attempt to fit the target within the offset line of the side daylight opening. At the first increment of rotation where the target will fit, place the target center as close as possible to the geometric center of the side daylight opening. If more than one position exists that is closest to the geometric center of the side daylight opening, select the lowest.
S5.3 Determination of zero displacement plane. The glazing covering the target location of the side daylight opening being tested is intact and in place in the case of fixed glazing and intact and fully closed in the case of movable glazing. With the ejection impactor targeting point aligned within ±2 mm of the center of any target location specified in S5.2, and with the ejection impactor on the inside of the vehicle, slowly move the impactor towards the window until contact is made with the interior of the glazing with no more than 20 N of pressure being applied to the window. The location of the most outboard surface of the headform establishes the zero displacement plane for this target location.
S5.4 Window position and condition. Subject to S5.5(b), prior to impact testing, the glazing covering the target location must be removed from the side daylight opening, fully retracted, or pre-broken according to the procedure in S5.4.1, at the vehicle manufacturer’s option.
S5.4.1 Window glazing pre-breaking procedure.
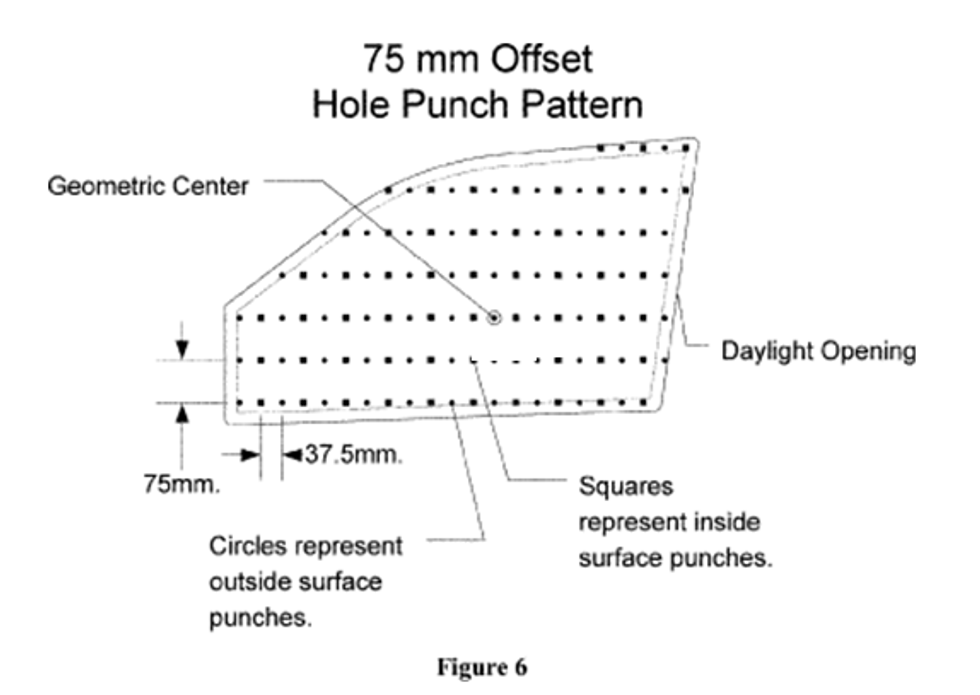
S5.4.1.1 Breakage pattern. Locate the geometric center of the side daylight opening, established in S5.2.3 of this standard. Mark the outside surface of the window glazing in a horizontal and vertical grid of points separated by 75±2 mm with one point coincident within ±2 mm of the geometric center of the side daylight opening (see Figure 6) (figure provided for illustration purposes). Mark the inside surface of the window glazing in a horizontal and vertical grid of points separated by 75±2 mm with the entire grid horizontally offset by 37.5 ± 2 mm from the grid of points on the outside of the glazing.
S5.4.1.2 Breakage method.
(a) Start with the inside surface of the window and forward-most, lowest mark made as specified in S5.4.1.1 of this standard. Use a center punch in this procedure. The punch tip has a 5 ±2 mm diameter prior to coming to a point. The spring is adjusted to require 150 ±25 N of force to activate the punch. Only once at each mark location, apply pressure to activate the spring in the center punch in a direction which is perpendicular to the tangent of the window surface at the point of contact, within ±10 degrees. Apply the pressure only once at each mark location, even if the glazing does not break or no hole results.
(b) Use a 100 ±10 mm x 100 ±10 mm piece of plywood with a minimum thickness of 18 mm as a reaction surface on the opposite side of the glazing to prevent to the extent possible the window surface from deforming by more than 10 mm when pressure is being applied to the hole-punch.
(c) Continue the procedure with the center punch by moving rearward in the grid until the end of a row is reached. When the end of a row is reached, move to the forward-most mark on the next higher row and continue the procedure. Continue in this pattern until the procedure is conducted at each marked location on the inside surface of the glazing.
(d) Repeat the process on the outside surface of the window.
(e) If punching a hole causes the glazing to disintegrate, halt the breakage procedure and proceed with the headform impact test.
S5.5 Impact speeds and time delays. The ejection impactor speeds specified below must be achieved after propulsion has ceased.
(a) Vehicles with or without an ejection mitigation countermeasure that deploys in a rollover. For a vehicle with an ejection mitigation countermeasure that deploys in a rollover, using the ejection propulsion mechanism, propel the ejection impactor such that it first strikes the countermeasure, while aligned with any target location specified in S5.2 of this standard, 1.5 ±0.1 seconds after activation of the ejection mitigation countermeasure that deploys in the event of a rollover, and at a speed of 20 ±0.5 km/h. For a vehicle without an ejection mitigation countermeasure that deploys in a rollover, propel the ejection impactor at any time such that it first strikes the countermeasure, while aligned with any target location specified in S5.2 of this standard, at a speed of 20 ±0.5 km/h.
(b) Vehicles with an ejection mitigation countermeasure that deploys in a rollover. For a vehicle with an ejection mitigation countermeasure that deploys in a rollover, remove or fully retract any movable glazing from the side daylight opening. Using the ejection propulsion mechanism, propel the ejection impactor such that it first strikes the countermeasure, while aligned with any target location specified in S5.2 of this standard, 6.0 ±0.1 seconds after activation of an ejection mitigation countermeasure that deploys in the event of a rollover, and at a speed of 16 ±0.5 km/h.
(c) An ejection mitigation countermeasure that deploys in the event of a rollover is described as such in the vehicle’s owner manual or in other written information provided by the vehicle manufacturer to the consumer.
S5.6 Ejection impactor orientation.
S5.6.1 If the targets for the side daylight opening being impacted were determined by the procedure specified in S5.2.2 through S5.2.5.1 only, the ejection impactor orientation is as follows. At the time of launch of the ejection impactor the x, y and z axes of the ejection headform must be aligned within ±1 degree of the vehicle longitudinal, transverse and vertical axes, respectively.
S5.6.2 If the targets for the side daylight opening being impacted were determined by the procedure specified in S5.2.5.2, the ejection impactor orientation is as follows. At the time of launch the ejection impactor is rotated by 90 degrees about the ejection headform y axis, from the orientation specified in S5.6.1, resulting in the headform positive z axis pointing in the direction of the vehicle positive x axis.
S5.6.3 If the targets for the side daylight opening being impacted were determined by the procedure specified in S5.2.5.3, the ejection impactor orientation is as follows. At the time of launch the ejection impactor is rotated about the y axis of the ejection headform by rotating the headform positive z axis towards the vehicle positive x axis, in the increment determined to be necessary in S5.2.5.3 to fit the target within the side daylight opening.
S5.6.4 After any test, extend the ejection impactor to the zero plane and determine that x, y and z axes of the ejection headform remain aligned within ±1 degree of its orientation at launch as specified in S5.6.1—5.6.3.
S6 General test conditions.
S6.1 Vehicle test attitude. The vehicle is supported off its suspension at an attitude determined in accordance with S6.1(a) through (f).
(a) The vehicle is loaded to its unloaded vehicle weight.
(b) All tires are inflated to the manufacturer's specifications listed on the vehicle's tire placard.
(c) Place vehicle on a level surface.
(d) Pitch: Measure the sill angle of the left front door sill and mark where the angle is measured.
(e) Roll: Mark a point on the vehicle body above the left and right front wheel wells. Determine the vertical height of these two points from the level surface.
(f) Support the vehicle off its suspension such that the left front door sill angle is within ±1 degree of that measured at the marked area in S6.1(d) and the vertical height difference of the two points marked in S6.1(e) is within ±5 mm of the vertical height difference determined in S6.1(e).
S6.2 Doors.
(a) Except as provided in S6.2(b) or S6.2(c), doors, including any rear hatchback or tailgate, are fully closed and latched but not locked.
(b) During testing, any side door on the opposite side of the longitudinal centerline of the vehicle from the target to be impacted may be open or removed.
(c) During testing, any rear hatchback or tailgate may be open or removed for testing any target.
S6.3 Steering wheel, steering column, seats, grab handles, and exterior mirrors. During targeting and testing, the steering wheel, steering column, seats, grab handles and exterior mirrors may be removed from the vehicle or adjusted to facilitate testing and/or provide an unobstructed path for headform travel through and beyond the vehicle.
S6.4 Other vehicle components and structures. During targeting and testing, interior vehicle components and vehicle structures other than specified in S6.2 and S6.3 may be removed or adjusted to the extent necessary to allow positioning of the ejection propulsion mechanism and provide an unobstructed path for the headform travel through and beyond the vehicle.
S6.5 Temperature and humidity.
(a) During testing, the ambient temperature is between 18 degrees C. and 29 degrees C., at any relative humidity between 10 percent and 70 percent.
(b) The headform specified in S7.1.1 of this standard is exposed to the conditions specified in S6.5(a) for a continuous period not less than one hour, prior to the test.
S7. Ejection mitigation test device specifications. The ejection mitigation test device consists of an ejection impactor and ejection propulsion mechanism with the following specifications. The ability of a test device to meet these specifications may be determined outside of the vehicle.
S7.1 Ejection impactor. The ejection impactor consists of an ejection headform attached to a shaft. The ejection impactor has a mass of 18 kg ±0.05 kg. The shaft is parallel to the y axis of the headform.
S7.1.1 Ejection headform dimensions. The ejection headform has the dimensions shown in Figure 1 and is depicted in the “Parts List; Ejection Mitigation Headform Drawing Package,” December 2010, and the “Parts List and Drawings; Ejection Mitigation Headform Drawing Package,” December 2010 (incorporated by reference; see §571.5).
S7.2 Static deflection. The ejection impactor targeting point must not deflect more than 20 mm in the x-z plane when a 981 N ± 5 N force is applied in a vehicle vertical longitudinal plane, through the y axis of the headform and no more than 5 mm rear of the posterior surface of the headform. The force is applied once in each of the following headform axes: +z, ¥z, +x, ¥x. The static deflection measurement is made with the ejection impactor extended 400 mm outboard of the theoretical point of impact with the countermeasure and attached to the ejection propulsion mechanism, including any support frame and anchors.
S7.3 Frictional characteristics.
(a) Measure the dynamic coefficient of friction of the ejection impactor and any associated bearings and bearing housing in a test ready orientation. Repeat the measurement in three more orientations with the ejection impactor and any associated bearings and bearing housing rotated 90, 180 and 270 degrees about the headform y axis. Perform the measurement five consecutive times at each orientation.
(b) Measure the average force necessary to move the ejection impactor 200 mm rearward into the ejection propulsion mechanism at a rate of 50 (±13) mm per second, starting at a point 400 mm outboard of the theoretical point of impact with the countermeasure. Measure the force to an accuracy of ±5 N. The measurement excludes the force measured over the first 25 mm of travel and is recorded at a minimum frequency of 100 Hz. During the test a 100 kg ± 0.5 kg mass is attached to the impactor with its center of gravity passing through the axis of motion of the impactor and no more than 5 mm rear of the posterior surface of the headform.
(c) Take the five force level averages made at each impactor orientation in S7.3(a) and average them. Take the maximum of the force average values and divide by 9.81 times the combined mass of the ejection impactor and mass added in S7.3(b). The resulting value must not exceed 0.25.
S7.4 Targeting accuracy. Determine that the ejection mitigation test device can deliver the ejection impactor targeting point through a zone defined by a cylinder with a 20 mm diameter and 100 mm length, when the ejection impactor is moving at the speed specified in S5.5. The projection of the long axis of the cylinder is normal to the target and passes through the target center. The long axis of the cylinder is bisected by a vehicle vertical longitudinal plane passing through the theoretical point of impact with the countermeasure.
S8 Phase-in Schedule for Vehicle Certification.
S8.1 Vehicles manufactured on or after September 1, 2013 and before September 1, 2016. At anytime during the production years ending August 31, 2014, August 31, 2015, and August 31, 2016, each manufacturer shall, upon request from the Office of Vehicle Safety Compliance, provide information identifying the vehicles (by make, model and vehicle identification number) that have been certified as complying with this standard. The manufacturer’s designation of a vehicle as a certified vehicle is irrevocable.
S8.2 Vehicles manufactured on or after September 1, 2013 and before September 1, 2014. Subject to S8.9, for vehicles manufactured on or after September 1, 2013 and before September 1, 2014, the number of vehicles complying with S4.2 shall be not less than 25 percent of:
(a) The manufacturer’s average annual production of vehicles manufactured in the three previous production years; or
(b) The manufacturer’s production in the current production year.
S8.3 Vehicles manufactured on or after September 1, 2014 and before September 1, 2015. Subject to S8.9, for vehicles manufactured on or after September 1, 2014 and before September 1, 2015, the number of vehicles complying with S4.2 shall be not less than 50 percent of:
(a) The manufacturer's average annual production of vehicles manufactured in the three previous production years; or
(b) The manufacturer's production in the current production year.
S8.4 Vehicles manufactured on or after September 1, 2015 and before September 1, 2016. Subject to S8.9, for vehicles manufactured on or after September 1, 2015 and before September 1, 2016, the number of vehicles complying with S4.2 shall be not less than 75 percent of:
(a) The manufacturer's average annual production of vehicles manufactured in the three previous production years; or
(b) The manufacturer's production in the current production year.
S8.5 Vehicles manufactured on or after September 1, 2016 and before September 1, 2017. Subject to S8.9, for vehicles manufactured on or after September 1, 2016 and before September 1, 2017, the number of vehicles complying with S4.2 shall be not less than 100 percent of the manufacturer’s production in the current production year.
8.6 Vehicles produced by more than one manufacturer. For the purpose of calculating average annual production of vehicles for each manufacturer and the number of vehicles manufactured by each manufacturer under S8.1 through S8.4, a vehicle produced by more than one manufacturer shall be attributed to a single manufacturer as follows, subject to S8.7.
(a) A vehicle that is imported shall be attributed to the importer.
(b) A vehicle manufactured in the United States by more than one manufacturer, one of which also markets the vehicle, shall be attributed to the manufacturer that markets the vehicle.
S8.7 A vehicle produced by more than one manufacturer shall be attributed to any one of the vehicle’s manufacturers specified by an express written contract, reported to the National Highway Traffic Safety Administration under 49 CFR part 585, between the manufacturer so specified and the manufacturer to which the vehicle would otherwise be attributed under S8.5.
S8.8 For the purposes of calculating average annual production of vehicles for each manufacturer and the number of vehicles manufactured by each manufacturer under S8, do not count any vehicle that is excluded by this standard from the requirements.
S8.9 Calculation of complying vehicles.
(a) For the purposes of calculating the vehicles complying with S8.2, a manufacturer may count a vehicle if it is manufactured on or after March 1, 2011 but before September 1, 2014.
(b) For purposes of complying with S8.3, a manufacturer may count a vehicle if it—
(1) Is manufactured on or after March 1, 2011 but before September 1, 2015 and,
(2) Is not counted toward compliance with S8.2.
(c) For purposes of complying with S8.4, a manufacturer may count a vehicle if it—
(1) Is manufactured on or after March 1, 2011 but before September 1, 2016 and,
(2) Is not counted toward compliance with S8.2 or S8.3.
(d) For purposes of complying with S8.5, a manufacturer may count a vehicle if it—
(1) Is manufactured on or after March 1, 2011 but before September 1, 2017 and,
(2) Is not counted toward compliance with S8.2, S8.3, or S8.4.
(e) For the purposes of calculating average annual production of vehicles for each manufacturer and the number of vehicles manufactured by each manufacturer, each vehicle that is excluded from having to meet this standard is not counted.
[76 FR 3296 Jan. 19, 2011; 76 FR 10524 Feb. 25, 2011; 78 FR 55165, Sept. 9, 2013; 85 FR 85535, Dec. 29, 2020; 85 FR 85535, Dec. 29, 2020; 87 FR 18599, March 30, 2022]
['CMV Parts and Maintenance']
['Vehicle maintenance']
UPGRADE TO CONTINUE READING
Load More
J. J. Keller is the trusted source for DOT / Transportation, OSHA / Workplace Safety, Human Resources, Construction Safety and Hazmat / Hazardous Materials regulation compliance products and services. J. J. Keller helps you increase safety awareness, reduce risk, follow best practices, improve safety training, and stay current with changing regulations.
Copyright 2026 J. J. Keller & Associate, Inc. For re-use options please contact copyright@jjkeller.com or call 800-558-5011.
