['Air Programs']
['Criteria Air Pollutants', 'Air Quality']
05/13/2025
...
1.0 Applicability.
1.1 This method provides a measurement of the mass concentration of total suspended particulate matter (TSP) in ambient air for determining compliance with the primary and secondary national ambient air quality standards for particulate matter as specified in §50.6 and §50.7 of this chapter. The measurement process is nondestructive, and the size of the sample collected is usually adequate for subsequent chemical analysis. Quality assurance procedures and guidance are provided in part 58, appendixes A and B, of this chapter and in References 1 and 2.
2.0 Principle.
2.1 An air sampler, properly located at the measurement site, draws a measured quantity of ambient air into a covered housing and through a filter during a 24-hr (nominal) sampling period. The sampler flow rate and the geometry of the shelter favor the collection of particles up to 25-50 µm (aerodynamic diameter), depending on wind speed and direction.(3) The filters used are specified to have a minimum collection efficiency of 99 percent for 0.3 µm (DOP) particles (see Section 7.1.4).
2.2 The filter is weighed (after moisture equilibration) before and after use to determine the net weight (mass) gain. The total volume of air sampled, corrected to EPA standard conditions (25°C, 760 mm Hg [101 kPa]), is determined from the measured flow rate and the sampling time. The concentration of total suspended particulate matter in the ambient air is computed as the mass of collected particles divided by the volume of air sampled, corrected to standard conditions, and is expressed in micrograms per standard cubic meter (µg/std m 3). For samples collected at temperatures and pressures significantly different than standard conditions, these corrected concentrations may differ substantially from actual concentrations (micrograms per actual cubic meter), particularly at high elevations. The actual particulate matter concentration can be calculated from the corrected concentration using the actual temperature and pressure during the sampling period.
3.0 Range.
3.1 The approximate concentration range of the method is 2 to 750 µg/std m 3. The upper limit is determined by the point at which the sampler can no longer maintain the specified flow rate due to the increased pressure drop of the loaded filter. This point is affected by particle size distribution, moisture content of the collected particles, and variability from filter to filter, among other things. The lower limit is determined by the sensitivity of the balance (see Section 7.10) and by inherent sources of error (see Section 6).
3.2 At wind speeds between 1.3 and 4.5 m/sec (3 and 10 mph), the high-volume air sampler has been found to collect particles up to 25 to 50 µm, depending on wind speed and direction.(3) For the filter specified in Section 7.1, there is effectively no lower limit on the particle size collected.
4.0 Precision.
4.1 Based upon collaborative testing, the relative standard deviation (coefficient of variation) for single analyst precision (repeatability) of the method is 3.0 percent. The corresponding value for interlaboratory precision (reproducibility) is 3.7 percent.(4)
5.0 Accuracy.
5.1 The absolute accuracy of the method is undefined because of the complex nature of atmospheric particulate matter and the difficulty in determining the “true” particulate matter concentration. This method provides a measure of particulate matter concentration suitable for the purpose specified under Section 1.0, Applicability.
6.0 Inherent Sources of Error.
6.1 Airflow variation. The weight of material collected on the filter represents the (integrated) sum of the product of the instantaneous flow rate times the instantaneous particle concentration. Therefore, dividing this weight by the average flow rate over the sampling period yields the true particulate matter concentration only when the flow rate is constant over the period. The error resulting from a nonconstant flow rate depends on the magnitude of the instantaneous changes in the flow rate and in the particulate matter concentration. Normally, such errors are not large, but they can be greatly reduced by equipping the sampler with an automatic flow controlling mechanism that maintains constant flow during the sampling period. Use of a contant flow controller is recommended.*
*At elevated altitudes, the effectiveness of automatic flow controllers may be reduced because of a reduction in the maximum sampler flow.
6.2 Air volume measurement. If the flow rate changes substantially or nonuniformly during the sampling period, appreciable error in the estimated air volume may result from using the average of the presampling and postsampling flow rates. Greater air volume measurement accuracy may be achieved by (1) equipping the sampler with a flow controlling mechanism that maintains constant air flow during the sampling period,* (2) using a calibrated, continuous flow rate recording device to record the actual flow rate during the samping period and integrating the flow rate over the period, or (3) any other means that will accurately measure the total air volume sampled during the sampling period. Use of a continuous flow recorder is recommended, particularly if the sampler is not equipped with a constant flow controller.
6.3 Loss of volatiles. Volatile particles collected on the filter may be lost during subsequent sampling or during shipment and/or storage of the filter prior to the postsampling weighing.(5) Although such losses are largely unavoidable, the filter should be reweighed as soon after sampling as practical.
6.4 Artifact particulate matter. Artifact particulate matter can be formed on the surface of alkaline glass fiber filters by oxidation of acid gases in the sample air, resulting in a higher than true TSP determination.(6 7) This effect usually occurs early in the sample period and is a function of the filter pH and the presence of acid gases. It is generally believed to account for only a small percentage of the filter weight gain, but the effect may become more significant where relatively small particulate weights are collected.
6.5 Humidity. Glass fiber filters are comparatively insensitive to changes in relative humidity, but collected particulate matter can be hygroscopic.(8) The moisture conditioning procedure minimizes but may not completely eliminate error due to moisture.
6.6 Filter handling. Careful handling of the filter between the presampling and postsampling weighings is necessary to avoid errors due to loss of fibers or particles from the filter. A filter paper cartridge or cassette used to protect the filter can minimize handling errors. (See Reference 2, Section 2).
6.7 Nonsampled particulate matter. Particulate matter may be deposited on the filter by wind during periods when the sampler is inoperative. (9) It is recommended that errors from this source be minimized by an automatic mechanical device that keeps the filter covered during nonsampling periods, or by timely installation and retrieval of filters to minimize the nonsampling periods prior to and following operation.
6.8 Timing errors. Samplers are normally controlled by clock timers set to start and stop the sampler at midnight. Errors in the nominal 1,440-min sampling period may result from a power interruption during the sampling period or from a discrepancy between the start or stop time recorded on the filter information record and the actual start or stop time of the sampler. Such discrepancies may be caused by (1) poor resolution of the timer set-points, (2) timer error due to power interruption, (3) missetting of the timer, or (4) timer malfunction. In general, digital electronic timers have much better set-point resolution than mechanical timers, but require a battery backup system to maintain continuity of operation after a power interruption. A continuous flow recorder or elapsed time meter provides an indication of the sampler run-time, as well as indication of any power interruption during the sampling period and is therefore recommended.
6.9 Recirculation of sampler exhaust. Under stagnant wind conditions, sampler exhaust air can be resampled. This effect does not appear to affect the TSP measurement substantially, but may result in increased carbon and copper in the collected sample. (10) This problem can be reduced by ducting the exhaust air well away, preferably downwind, from the sampler.
7.0 Apparatus.
(See References 1 and 2 for quality assurance information.)
Note:
Samplers purchased prior to the effective date of this amendment are not subject to specifications preceded by (†).
7.1 Filter. (Filters supplied by the Environmental Protection Agency can be assumed to meet the following criteria. Additional specifications are required if the sample is to be analyzed chemically.)
7.1.1 Size: 20.3 ±0.2 × 25.4 ±0.2 cm (nominal 8 × 10 in).
7.1.2 Nominal exposed area: 406.5 cm 2 (63 in 2).
7.1.3. Material: Glass fiber or other relatively inert, nonhygroscopic material. (8)
7.1.4 Collection efficiency: 99 percent minimum as measured by the DOP test (ASTM-2986) for particles of 0.3 µm diameter.
7.1.5 Recommended pressure drop range: 42-54 mm Hg (5.6-7.2 kPa) at a flow rate of 1.5 std m 3/min through the nominal exposed area.
7.1.6 pH: 6 to 10. (11)
7.1.7 Integrity: 2.4 mg maximum weight loss. (11)
7.1.8 Pinholes: None.
7.1.9 Tear strength: 500 g minimum for 20 mm wide strip cut from filter in weakest dimension. (See ASTM Test D828-60).
7.1.10 Brittleness: No cracks or material separations after single lengthwise crease.
7.2 Sampler. The air sampler shall provide means for drawing the air sample, via reduced pressure, through the filter at a uniform face velocity.
7.2.1 The sampler shall have suitable means to:
a. Hold and seal the filter to the sampler housing.
b. Allow the filter to be changed conveniently.
c. Preclude leaks that would cause error in the measurement of the air volume passing through the filter.
d. (†) Manually adjust the flow rate to accommodate variations in filter pressure drop and site line voltage and altitude. The adjustment may be accomplished by an automatic flow controller or by a manual flow adjustment device. Any manual adjustment device must be designed with positive detents or other means to avoid unintentional changes in the setting.
(†) See note at beginning of Section 7 of this appendix.
7.2.2 Minimum sample flow rate, heavily loaded filter: 1.1 m 3/min (39 ft 3/min).‡
‡ These specifications are in actual air volume units; to convert to EPA standard air volume units, multiply the specifications by (Pb/Pstd)(298/T) where Pb and T are the barometric pressure in mm Hg (or kPa) and the temperature in K at the sampler, and Pstd is 760 mm Hg (or 101 kPa).
7.2.3 Maximum sample flow rate, clean filter: 1.7 m 3/min (60 ft 3/min).‡
7.2.4 Blower Motor: The motor must be capable of continuous operation for 24-hr periods.
7.3 Sampler shelter.
7.3.1 The sampler shelter shall:
a. Maintain the filter in a horizontal position at least 1 m above the sampler supporting surface so that sample air is drawn downward through the filter.
b. Be rectangular in shape with a gabled roof, similar to the design shown in Figure 1.
c. Cover and protect the filter and sampler from precipitation and other weather.
d. Discharge exhaust air at least 40 cm from the sample air inlet.
e. Be designed to minimize the collection of dust from the supporting surface by incorporating a baffle between the exhaust outlet and the supporting surface.
7.3.2 The sampler cover or roof shall overhang the sampler housing somewhat, as shown in Figure 1, and shall be mounted so as to form an air inlet gap between the cover and the sampler housing walls. † This sample air inlet should be approximately uniform on all sides of the sampler. † The area of the sample air inlet must be sized to provide an effective particle capture air velocity of between 20 and 35 cm/sec at the recommended operational flow rate. The capture velocity is the sample air flow rate divided by the inlet area measured in a horizontal plane at the lower edge of the cover. † Ideally, the inlet area and operational flow rate should be selected to obtain a capture air velocity of 25 ±2 cm/sec.
7.4 Flow rate measurement devices.
7.4.1 The sampler shall incorporate a flow rate measurement device capable of indicating the total sampler flow rate. Two common types of flow indicators covered in the calibration procedure are (1) an electronic mass flowmeter and (2) an orifice or orifices located in the sample air stream together with a suitable pressure indicator such as a manometer, or aneroid pressure gauge. A pressure recorder may be used with an orifice to provide a continuous record of the flow. Other types of flow indicators (including rotameters) having comparable precision and accuracy are also acceptable.
7.4.2 † The flow rate measurement device must be capable of being calibrated and read in units corresponding to a flow rate which is readable to the nearest 0.02 std m 3/min over the range 1.0 to 1.8 std m 3/min.
7.5 Thermometer, to indicate the approximate air temperature at the flow rate measurement orifice, when temperature corrections are used.
7.5.1 Range: −40° to + 50°C (223-323 K).
7.5.2 Resolution: 2°C (2 K).
7.6 Barometer, to indicate barometric pressure at the flow rate measurement orifice, when pressure corrections are used.
7.6.1 Range: 500 to 800 mm Hg (66-106 kPa).
7.6.2 Resolution: ±5 mm Hg (0.67 kPa).
7.7 Timing/control device.
7.7.1 The timing device must be capable of starting and stopping the sampler to obtain an elapsed run-time of 24 hr ±1 hr (1,440 ±60 min).
7.7.2 Accuracy of time setting: ±30 min, or better. (See Section 6.8).
7.8 Flow rate transfer standard, traceable to a primary standard. (See Section 9.2.)
7.8.1 Approximate range: 1.0 to 1.8 m 3/min.
7.8.2 Resolution: 0.02 m 3/min.
7.8.3 Reproducibility: ±2 percent (2 times coefficient of variation) over normal ranges of ambient temperature and pressure for the stated flow rate range. (See Reference 2, Section 2.)
7.8.4 Maximum pressure drop at 1.7 std m3/min; 50 cm H2 O (5 kPa).
7.8.5 The flow rate transfer standard must connect without leaks to the inlet of the sampler and measure the flow rate of the total air sample.
7.8.6 The flow rate transfer standard must include a means to vary the sampler flow rate over the range of 1.0 to 1.8 m 3/min (35-64 ft 3/min) by introducing various levels of flow resistance between the sampler and the transfer standard inlet.
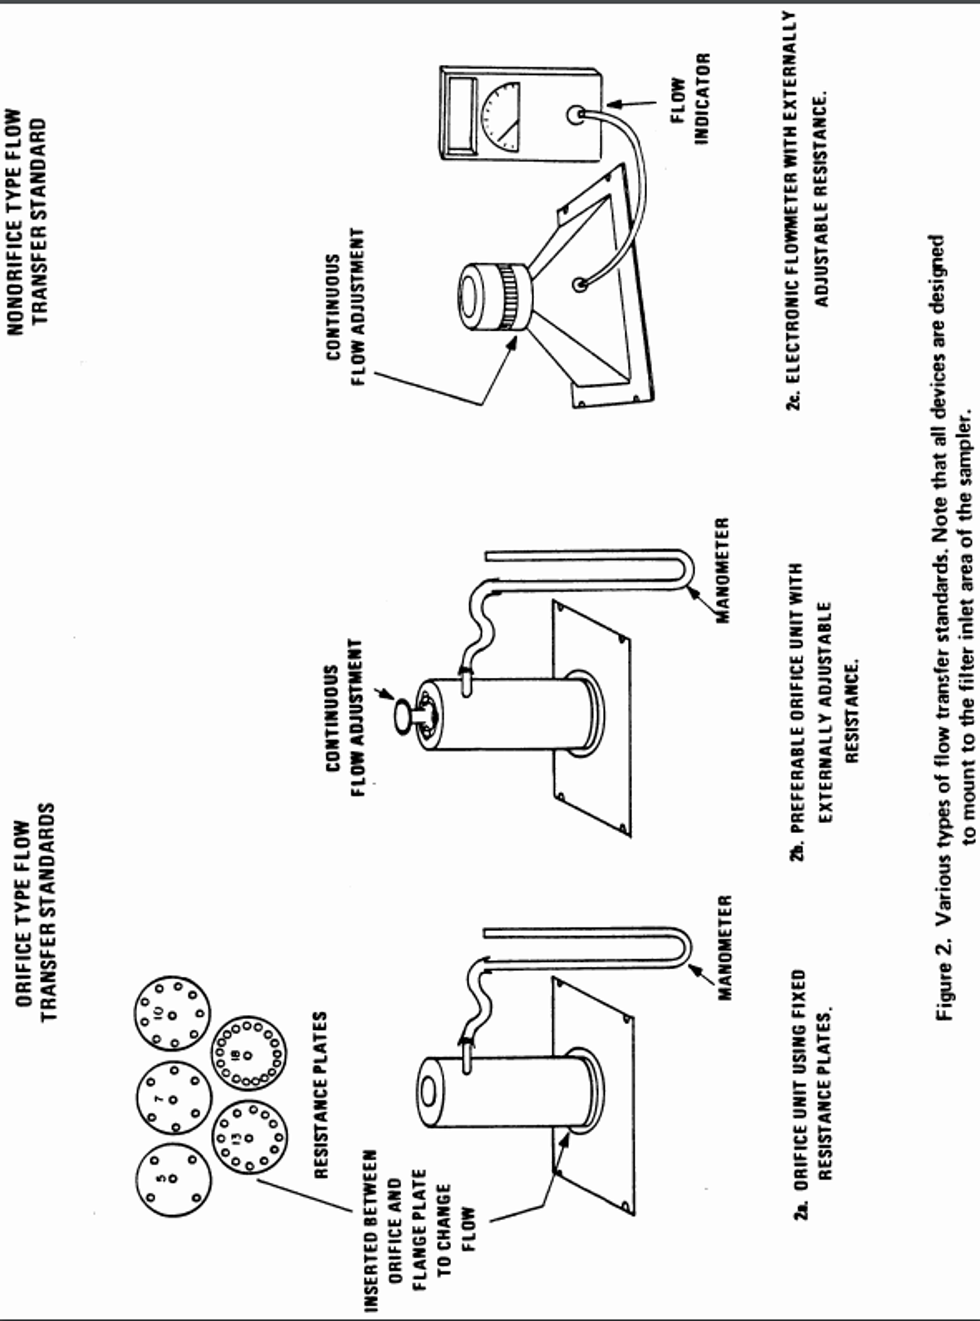
7.8.7 The conventional type of flow transfer standard consists of: An orifice unit with adapter that connects to the inlet of the sampler, a manometer or other device to measure orifice pressure drop, a means to vary the flow through the sampler unit, a thermometer to measure the ambient temperature, and a barometer to measure ambient pressure. Two such devices are shown in Figures 2a and 2b. Figure 2a shows multiple fixed resistance plates, which necessitate disassembly of the unit each time the flow resistance is changed. A preferable design, illustrated in Figure 2b, has a variable flow restriction that can be adjusted externally without disassembly of the unit. Use of a conventional, orifice-type transfer standard is assumed in the calibration procedure (Section 9). However, the use of other types of transfer standards meeting the above specifications, such as the one shown in Figure 2c, may be approved; see the note following Section 9.1.
7.9 Filter conditioning environment
7.9.1 Controlled temperature: between 15° and 30°C with less than ±3°C variation during equilibration period.
7.9.2 Controlled humidity: Less than 50 percent relative humidity, constant within ±5 percent.
7.10 Analytical balance.
7.10.1 Sensitivity: 0.1 mg.
7.10.2 Weighing chamber designed to accept an unfolded 20.3 × 25.4 cm (8 × 10 in) filter.
7.11 Area light source, similar to X-ray film viewer, to backlight filters for visual inspection.
7.12 Numbering device, capable of printing identification numbers on the filters before they are placed in the filter conditioning environment, if not numbered by the supplier.
8.0 Procedure.
(See References 1 and 2 for quality assurance information.)
8.1 Number each filter, if not already numbered, near its edge with a unique identification number.
8.2 Backlight each filter and inspect for pinholes, particles, and other imperfections; filters with visible imperfections must not be used.
8.3 Equilibrate each filter in the conditioning environment for at least 24-hr.
8.4 Following equilibration, weigh each filter to the nearest milligram and record this tare weight (Wi) with the filter identification number.
8.5 Do not bend or fold the filter before collection of the sample.
8.6 Open the shelter and install a numbered, preweighed filter in the sampler, following the sampler manufacturer's instructions. During inclement weather, precautions must be taken while changing filters to prevent damage to the clean filter and loss of sample from or damage to the exposed filter. Filter cassettes that can be loaded and unloaded in the laboratory may be used to minimize this problem (See Section 6.6).
8.7 Close the shelter and run the sampler for at least 5 min to establish run-temperature conditions.
8.8 Record the flow indicator reading and, if needed, the barometric pressure (P 33) and the ambient temperature (T 33) see NOTE following step 8.12). Stop the sampler. Determine the sampler flow rate (see Section 10.1); if it is outside the acceptable range (1.1 to 1.7 m 3/min [39-60 ft 3/min]), use a different filter, or adjust the sampler flow rate. Warning: Substantial flow adjustments may affect the calibration of the orifice-type flow indicators and may necessitate recalibration.
8.9 Record the sampler identification information (filter number, site location or identification number, sample date, and starting time).
8.10 Set the timer to start and stop the sampler such that the sampler runs 24-hrs, from midnight to midnight (local time).
8.11 As soon as practical following the sampling period, run the sampler for at least 5 min to again establish run-temperature conditions.
8.12 Record the flow indicator reading and, if needed, the barometric pressure (P 33) and the ambient temperature (T 33).
Note:
No onsite pressure or temperature measurements are necessary if the sampler flow indicator does not require pressure or temperature corrections (e.g., a mass flowmeter) or if average barometric pressure and seasonal average temperature for the site are incorporated into the sampler calibration (see step 9.3.9). For individual pressure and temperature corrections, the ambient pressure and temperature can be obtained by onsite measurements or from a nearby weather station. Barometric pressure readings obtained from airports must be station pressure, not corrected to sea level, and may need to be corrected for differences in elevation between the sampler site and the airport. For samplers having flow recorders but not constant flow controllers, the average temperature and pressure at the site during the sampling period should be estimated from weather bureau or other available data.
8.13 Stop the sampler and carefully remove the filter, following the sampler manufacturer's instructions. Touch only the outer edges of the filter. See the precautions in step 8.6.
8.14 Fold the filter in half lengthwise so that only surfaces with collected particulate matter are in contact and place it in the filter holder (glassine envelope or manila folder).
8.15 Record the ending time or elapsed time on the filter information record, either from the stop set-point time, from an elapsed time indicator, or from a continuous flow record. The sample period must be 1,440 ±60 min. for a valid sample.
8.16 Record on the filter information record any other factors, such as meteorological conditions, construction activity, fires or dust storms, etc., that might be pertinent to the measurement. If the sample is known to be defective, void it at this time.
8.17 Equilibrate the exposed filter in the conditioning environment for at least 24-hrs.
8.18 Immediately after equilibration, reweigh the filter to the nearest milligram and record the gross weight with the filter identification number. See Section 10 for TSP concentration calculations.
9.0 Calibration.
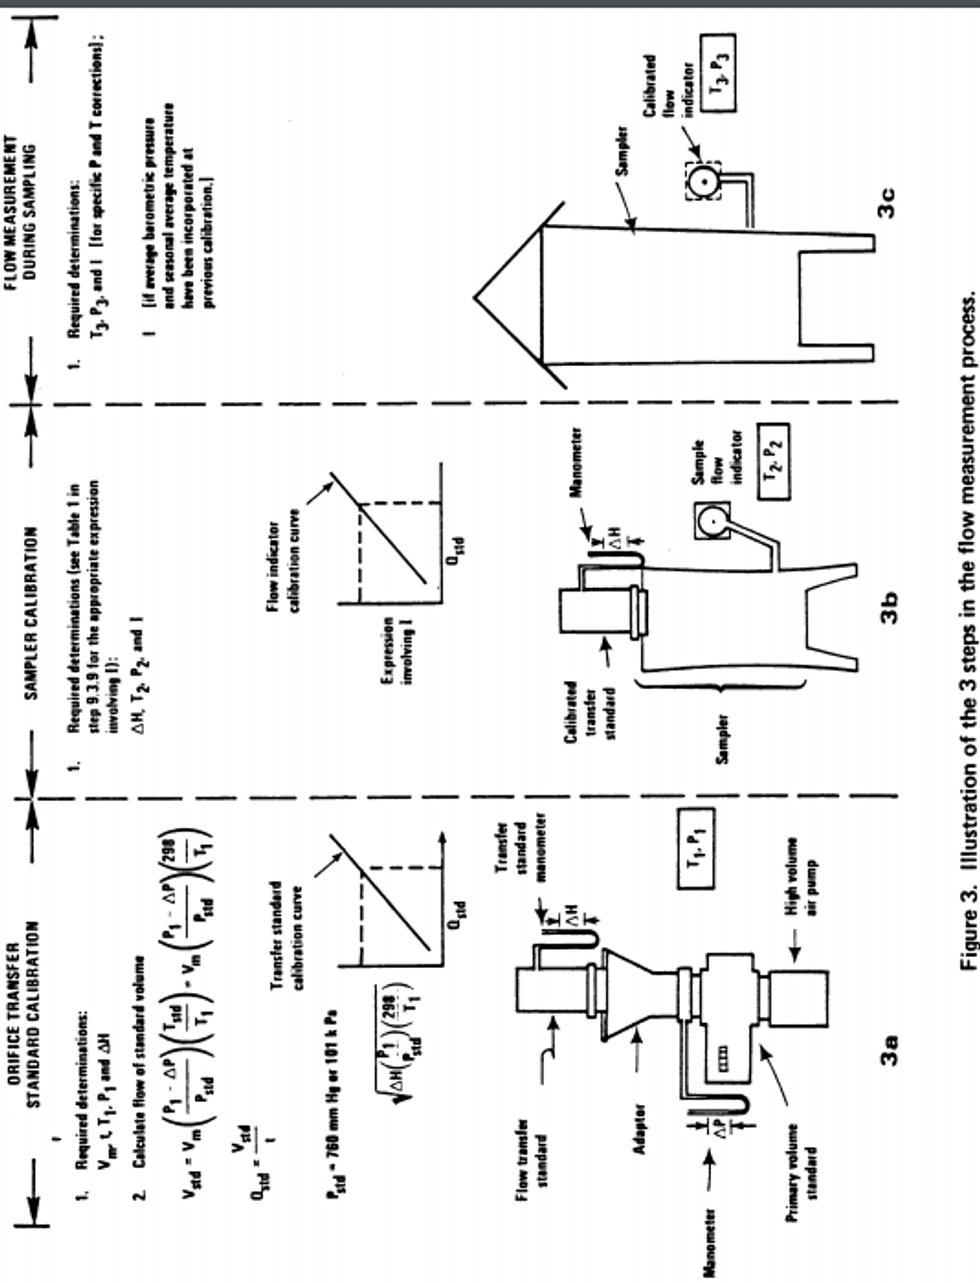
9.1 Calibration of the high volume sampler's flow indicating or control device is necessary to establish traceability of the field measurement to a primary standard via a flow rate transfer standard. Figure 3a illustrates the certification of the flow rate transfer standard and Figure 3b illustrates its use in calibrating a sampler flow indicator. Determination of the corrected flow rate from the sampler flow indicator, illustrated in Figure 3c, is addressed in Section 10.1
Note:
The following calibration procedure applies to a conventional orifice-type flow transfer standard and an orifice-type flow indicator in the sampler (the most common types). For samplers using a pressure recorder having a square-root scale, 3 other acceptable calibration procedures are provided in Reference 12. Other types of transfer standards may be used if the manufacturer or user provides an appropriately modified calibration procedure that has been approved by EPA under Section 2.8 of appendix C to §53.11 of this chapter.
9.2 Certification of the flow rate transfer standard.
9.2.1 Equipment required: Positive displacement standard volume meter traceable to the National Bureau of Standards (such as a Roots meter or equivalent), stop-watch, manometer, thermometer, and barometer.
9.2.2 Connect the flow rate transfer standard to the inlet of the standard volume meter. Connect the manometer to measure the pressure at the inlet of the standard volume meter. Connect the orifice manometer to the pressure tap on the transfer standard. Connect a high-volume air pump (such as a high-volume sampler blower) to the outlet side of the standard volume meter. See Figure 3a.
9.2.3 Check for leaks by temporarily clamping both manometer lines (to avoid fluid loss) and blocking the orifice with a large-diameter rubber stopper, wide cellophane tape, or other suitable means. Start the high-volume air pump and note any change in the standard volume meter reading. The reading should remain constant. If the reading changes, locate any leaks by listening for a whistling sound and/or retightening all connections, making sure that all gaskets are properly installed.
9.2.4 After satisfactorily completing the leak check as described above, unclamp both manometer lines and zero both manometers.
9.2.5 Achieve the appropriate flow rate through the system, either by means of the variable flow resistance in the transfer standard or by varying the voltage to the air pump. (Use of resistance plates as shown in Figure 1a is discouraged because the above leak check must be repeated each time a new resistance plate is installed.) At least five different but constant flow rates, evenly distributed, with at least three in the specified flow rate interval (1.1 to 1.7 m 3/min [39-60 ft 3/min]), are required.
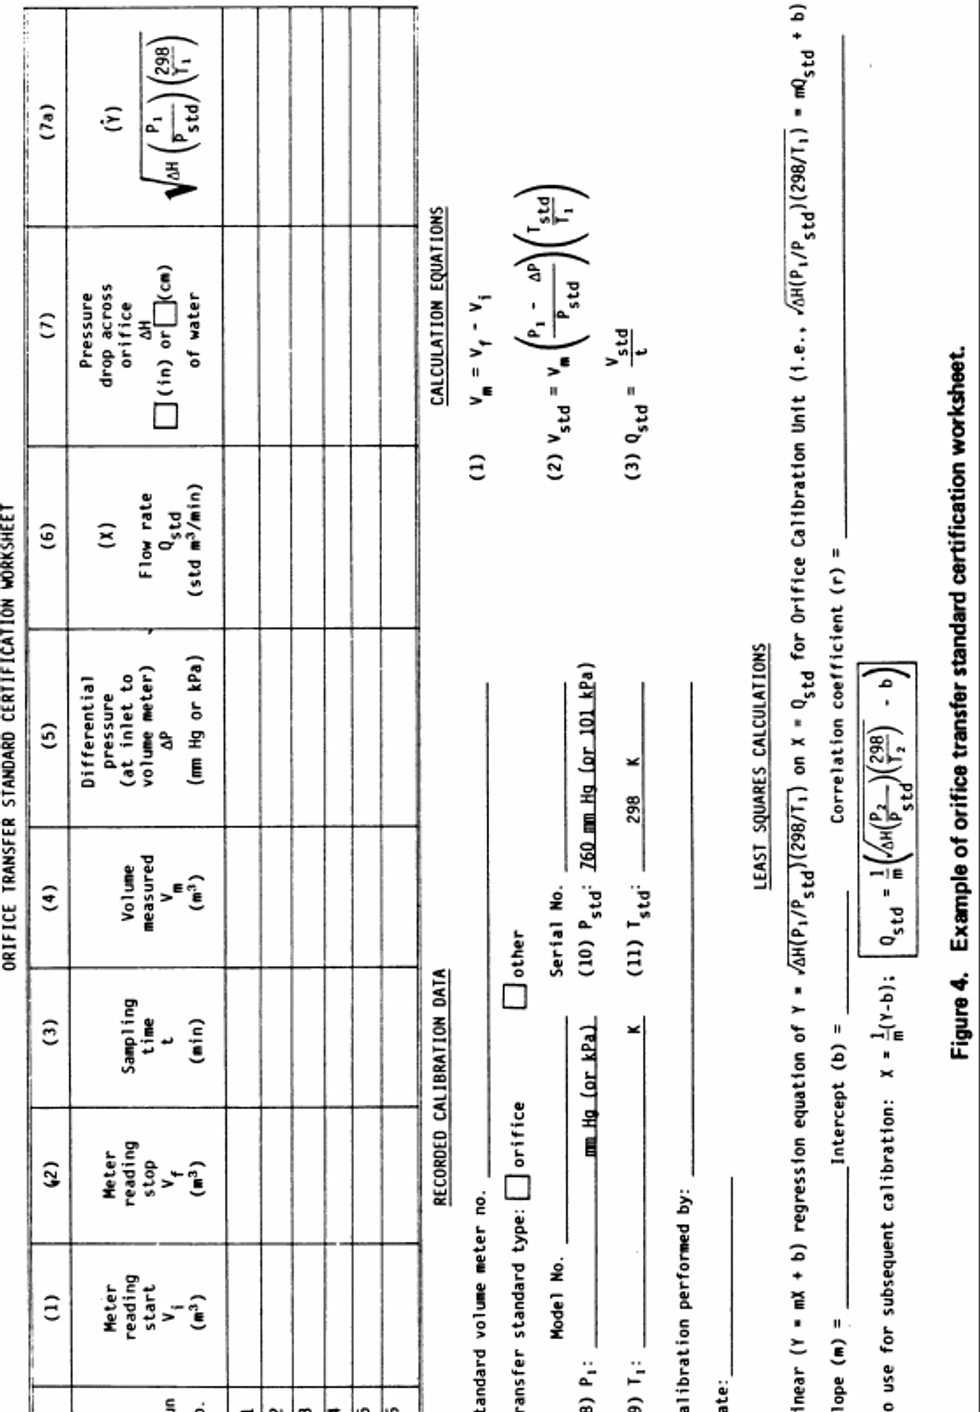
9.2.6 Measure and record the certification data on a form similar to the one illustrated in Figure 4 according to the following steps.
9.2.7 Observe the barometric pressure and record as P1 (item 8 in Figure 4).
9.2.8 Read the ambient temperature in the vicinity of the standard volume meter and record it as T1 (item 9 in Figure 4).
9.2.9 Start the blower motor, adjust the flow, and allow the system to run for at least 1 min for a constant motor speed to be attained.
9.2.10 Observe the standard volume meter reading and simultaneously start a stopwatch. Record the initial meter reading (Vi) in column 1 of Figure 4.
9.2.11 Maintain this constant flow rate until at least 3 m 3 of air have passed through the standard volume meter. Record the standard volume meter inlet pressure manometer reading as ΔP (column 5 in Figure 4), and the orifice manometer reading as ΔH (column 7 in Figure 4). Be sure to indicate the correct units of measurement.
9.2.12 After at least 3 m 3 of air have passed through the system, observe the standard volume meter reading while simultaneously stopping the stopwatch. Record the final meter reading (Vf) in column 2 and the elapsed time (t) in column 3 of Figure 4.
9.2.13 Calculate the volume measured by the standard volume meter at meter conditions of temperature and pressures as Vm = Vf−Vi. Record in column 4 of Figure 4.
9.2.14 Correct this volume to standard volume (std m 3) as follows:

where:
Vstd = standard volume, std m 3;
Vm = actual volume measured by the standard volume meter;
P1 = barometric pressure during calibration, mm Hg or kPa;
ΔP = differential pressure at inlet to volume meter, mm Hg or kPa;
Pstd = 760 mm Hg or 101 kPa;
Tstd = 298 K;
T1 = ambient temperature during calibration, K.
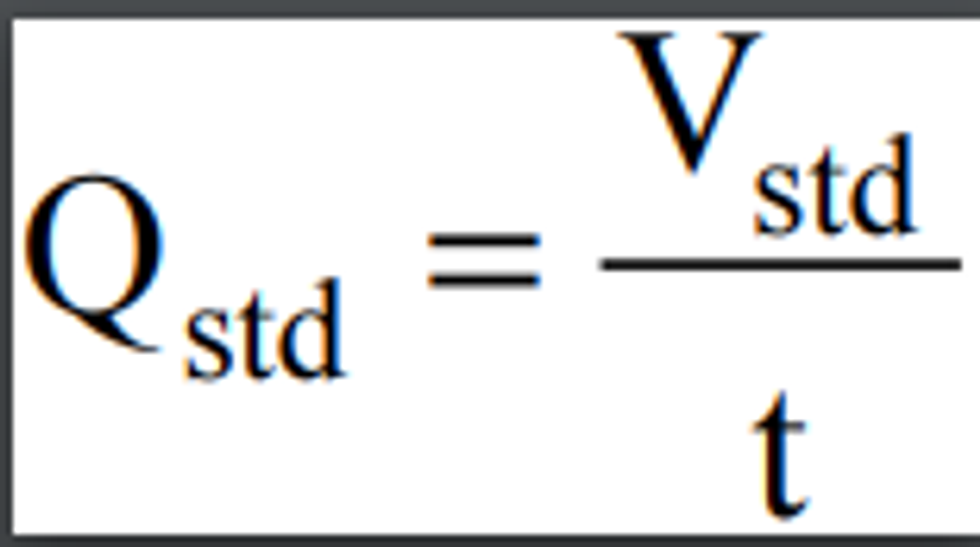
Calculate the standard flow rate (std m 3/min) as follows:
where:
Qstd = standard volumetric flow rate, std m 3/min
t = elapsed time, minutes.
Record Qstd to the nearest 0.01 std m 3/min in column 6 of Figure 4.
9.2.15 Repeat steps 9.2.9 through 9.2.14 for at least four additional constant flow rates, evenly spaced over the approximate range of 1.0 to 1.8 std m 3/min (35-64 ft 3/min).
9.2.16 For each flow, compute
√ΔΔH (P1/Pstd)(298/T1)
(column 7a of Figure 4) and plot these value against Qstd as shown in Figure 3a. Be sure to use consistent units (mm Hg or kPa) for barometric pressure. Draw the orifice transfer standard certification curve or calculate the linear least squares slope (m) and intercept (b) of the certification curve:
√ΔΔH (P1/Pstd)(298/T1)
= mQstd + b. See Figures 3 and 4. A certification graph should be readable to 0.02 std m 3/min.
9.2.17 Recalibrate the transfer standard annually or as required by applicable quality control procedures. (See Reference 2.)
9.3 Calibration of sampler flow indicator.
Note:
For samplers equipped with a flow controlling device, the flow controller must be disabled to allow flow changes during calibration of the sampler's flow indicator, or the alternate calibration of the flow controller given in 9.4 may be used. For samplers using an orifice-type flow indicator downstream of the motor, do not vary the flow rate by adjusting the voltage or power supplied to the sampler.
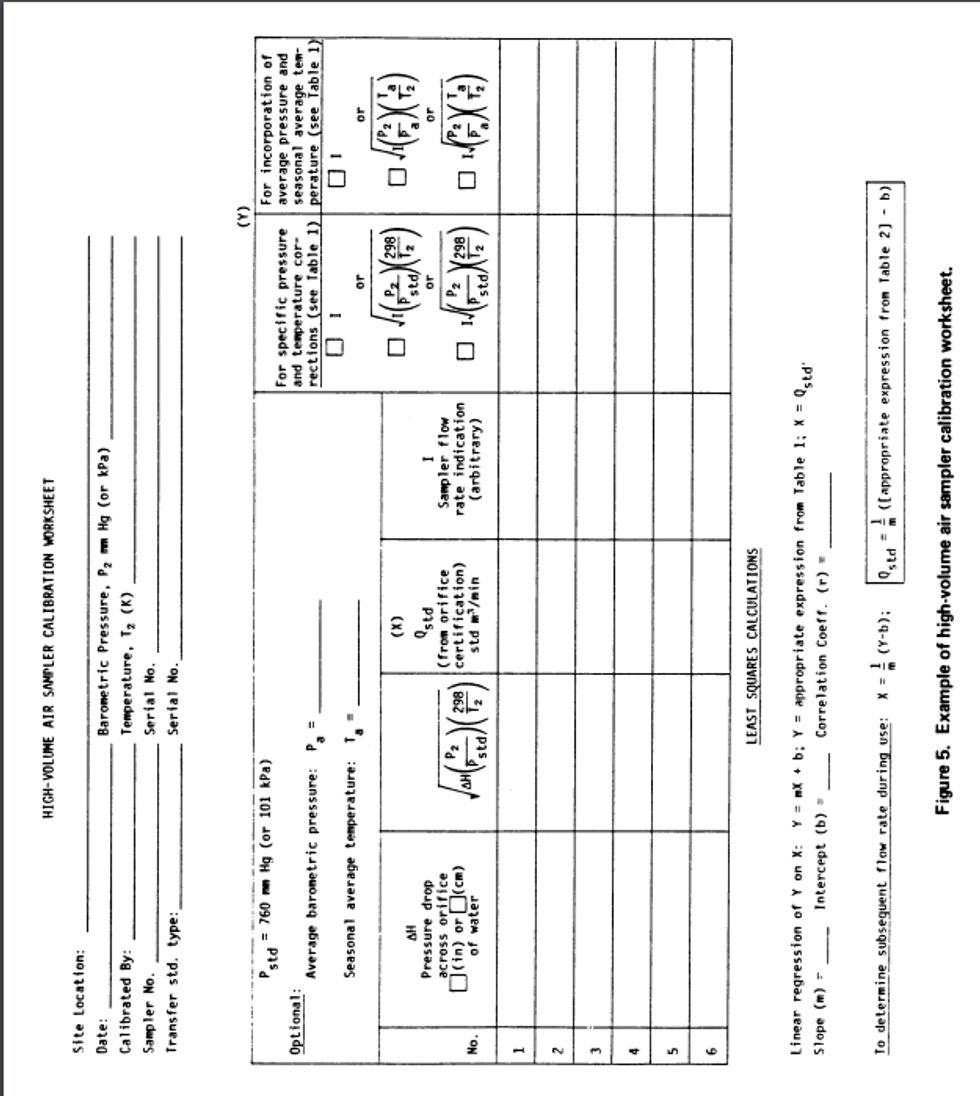
9.3.1 A form similar to the one illustrated in Figure 5 should be used to record the calibration data.
9.3.2 Connect the transfer standard to the inlet of the sampler. Connect the orifice manometer to the orifice pressure tap, as illustrated in Figure 3b. Make sure there are no leaks between the orifice unit and the sampler.
9.3.3 Operate the sampler for at least 5 minutes to establish thermal equilibrium prior to the calibration.
9.3.4 Measure and record the ambient temperature, T2, and the barometric pressure, P2, during calibration.
9.3.5 Adjust the variable resistance or, if applicable, insert the appropriate resistance plate (or no plate) to achieve the desired flow rate.
9.3.6 Let the sampler run for at least 2 min to re-establish the run-temperature conditions. Read and record the pressure drop across the orifice (ΔH) and the sampler flow rate indication (I) in the appropriate columns of Figure 5.
9.3.7 Calculate √ΔΔH(P2/Pstd)(298/T2) and determine the flow rate at standard conditions (Qstd) either graphically from the certification curve or by calculating Qstd from the least square slope and intercept of the transfer standard's transposed certification curve: Qstd = 1/m √ΔH(P2/Pstd)(298/T2)−b. Record the value of Qstd on Figure 5.
9.3.8 Repeat steps 9.3.5, 9.3.6, and 9.3.7 for several additional flow rates distributed over a range that includes 1.1 to 1.7 std m 3/min.
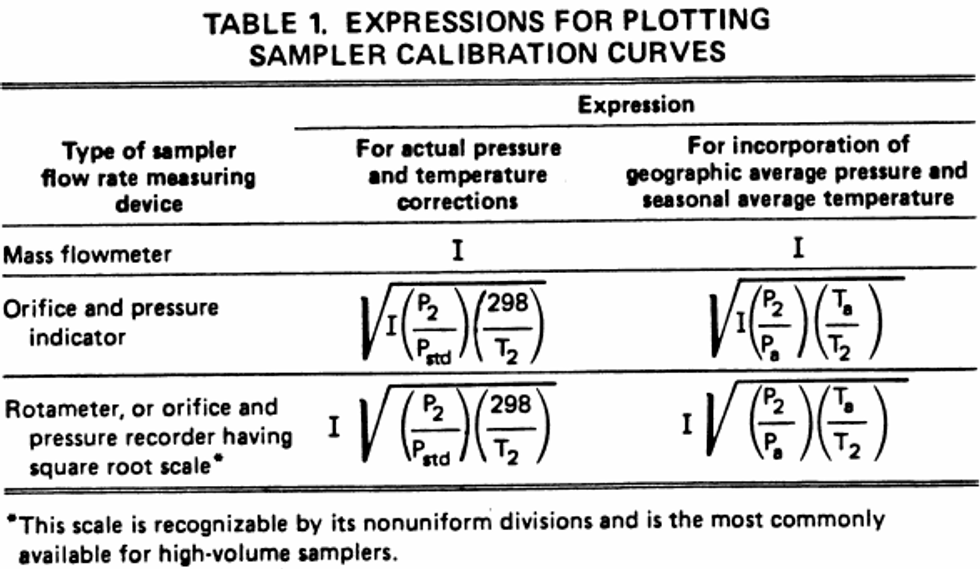
9.3.9 Determine the calibration curve by plotting values of the appropriate expression involving I, selected from table 1, against Qstd. The choice of expression from table 1 depends on the flow rate measurement device used (see Section 7.4.1) and also on whether the calibration curve is to incorporate geographic average barometric pressure (Pa) and seasonal average temperature (Ta) for the site to approximate actual pressure and temperature. Where Pa and Ta can be determined for a site for a seasonal period such that the actual barometric pressure and temperature at the site do not vary by more than ±60 mm Hg (8 kPa) from Pa or ±15°C from Ta, respectively, then using Pa and Ta avoids the need for subsequent pressure and temperature calculation when the sampler is used. The geographic average barometric pressure (Pa) may be estimated from an altitude-pressure table or by making an (approximate) elevation correction of −26 mm Hg (−3.46 kPa) for each 305 m (1,000 ft) above sea level (760 mm Hg or 101 kPa). The seasonal average temperature (Ta) may be estimated from weather station or other records. Be sure to use consistent units (mm Hg or kPa) for barometric pressure.
9.3.10 Draw the sampler calibration curve or calculate the linear least squares slope (m), intercept (b), and correlation coefficient of the calibration curve: [Expression from table 1]= mQstd + b. See Figures 3 and 5. Calibration curves should be readable to 0.02 std m 3/min.
9.3.11 For a sampler equipped with a flow controller, the flow controlling mechanism should be re-enabled and set to a flow near the lower flow limit to allow maximum control range. The sample flow rate should be verified at this time with a clean filter installed. Then add two or more filters to the sampler to see if the flow controller maintains a constant flow; this is particularly important at high altitudes where the range of the flow controller may be reduced.
9.4 Alternate calibration of flow-controlled samplers. A flow-controlled sampler may be calibrated solely at its controlled flow rate, provided that previous operating history of the sampler demonstrates that the flow rate is stable and reliable. In this case, the flow indicator may remain uncalibrated but should be used to indicate any relative change between initial and final flows, and the sampler should be recalibrated more often to minimize potential loss of samples because of controller malfunction.
9.4.1 Set the flow controller for a flow near the lower limit of the flow range to allow maximum control range.
9.4.2 Install a clean filter in the sampler and carry out steps 9.3.2, 9.3.3, 9.3.4, 9.3.6, and 9.3.7.
9.4.3 Following calibration, add one or two additional clean filters to the sampler, reconnect the transfer standard, and operate the sampler to verify that the controller maintains the same calibrated flow rate; this is particularly important at high altitudes where the flow control range may be reduced.
10.0 Calculations of TSP Concentration.
10.1 Determine the average sampler flow rate during the sampling period according to either 10.1.1 or 10.1.2 below.
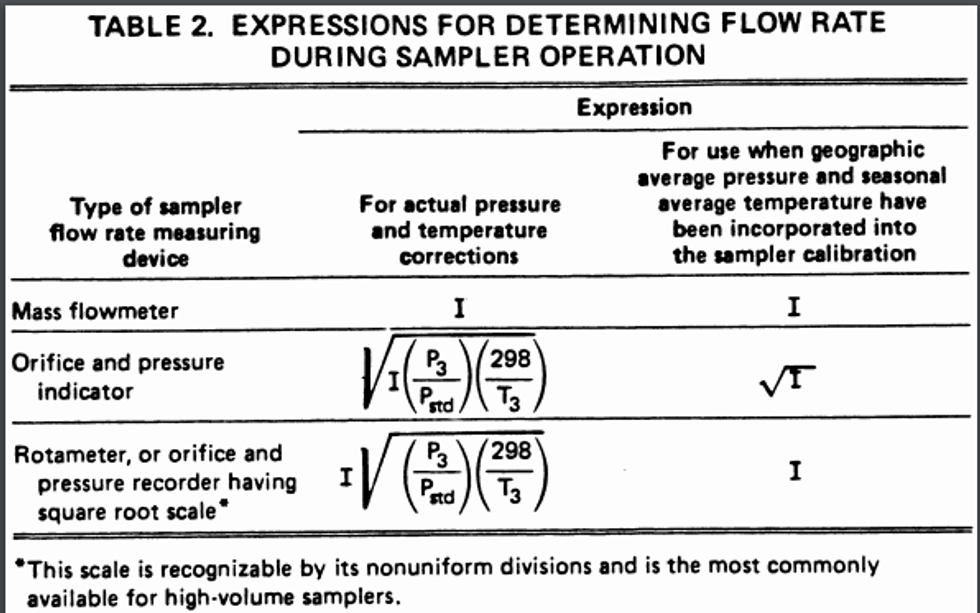
10.1.1 For a sampler without a continuous flow recorder, determine the appropriate expression to be used from table 2 corresponding to the one from table 1 used in step 9.3.9. Using this appropriate expression, determine Qstd for the initial flow rate from the sampler calibration curve, either graphically or from the transposed regression equation:
Qstd =
1/m ([Appropriate expression from table 2]−b)
Similarly, determine Qstd from the final flow reading, and calculate the average flow Qstd as one-half the sum of the initial and final flow rates.
10.1.2 For a sampler with a continuous flow recorder, determine the average flow rate device reading, I, for the period. Determine the appropriate expression from table 2 corresponding to the one from table 1 used in step 9.3.9. Then using this expression and the average flow rate reading, determine Qstd from the sampler calibration curve, either graphically or from the transposed regression equation:
Qstd =
1/m ([Appropriate expression from table 2]−b)
If the trace shows substantial flow change during the sampling period, greater accuracy may be achieved by dividing the sampling period into intervals and calculating an average reading before determining Qstd.
10.2 Calculate the total air volume sampled as:
V − Qstd × t
where:
V = total air volume sampled, in standard volume units, std m 3/;
Qstd = average standard flow rate, std m 3/min;
t = sampling time, min.
10.3 Calculate and report the particulate matter concentration as:

where:
TSP = mass concentration of total suspended particulate matter, µg/std m 3;
Wi = initial weight of clean filter, g;
Wf = final weight of exposed filter, g;
V = air volume sampled, converted to standard conditions, std m 3,
10 6 = conversion of g to µg.
10.4 If desired, the actual particulate matter concentration (see Section 2.2) can be calculated as follows:
(TSP)a = TSP (P3/Pstd)(298/T3)
where:
(TSP)a = actual concentration at field conditions, µg/m 3;
TSP = concentration at standard conditions, µg/std m 3;
P3 = average barometric pressure during sampling period, mm Hg;
Pstd = 760 mn Hg (or 101 kPa);
T3 = average ambient temperature during sampling period, K.
11.0 References.
1. Quality Assurance Handbook for Air Pollution Measurement Systems, Volume I, Principles. EPA-600/9-76-005, U.S. Environmental Protection Agency, Research Triangle Park, NC 27711, 1976.
2. Quality Assurance Handbook for Air Pollution Measurement Systems, Volume II, Ambient Air Specific Methods. EPA-600/4-77-027a, U.S. Environmental Protection Agency, Research Triangle Park, NC 27711, 1977.
3. Wedding, J. B., A. R. McFarland, and J. E. Cernak. Large Particle Collection Characteristics of Ambient Aerosol Samplers. Environ. Sci. Technol. 11:387-390, 1977.
4. McKee, H. C., et al. Collaborative Testing of Methods to Measure Air Pollutants, I. The High-Volume Method for Suspended Particulate Matter. J. Air Poll. Cont. Assoc., 22 (342), 1972.
5. Clement, R. E., and F. W. Karasek. Sample Composition Changes in Sampling and Analysis of Organic Compounds in Aerosols. The Intern. J. Environ. Anal. Chem., 7:109, 1979.
6. Lee, R. E., Jr., and J. Wagman. A Sampling Anomaly in the Determination of Atmospheric Sulfuric Concentration. Am. Ind. Hygiene Assoc. J., 27:266, 1966.
7. Appel, B. R., et al. Interference Effects in Sampling Particulate Nitrate in Ambient Air. Atmospheric Environment, 13:319, 1979.
8. Tierney, G. P., and W. D. Conner. Hygroscopic Effects on Weight Determinations of Particulates Collected on Glass-Fiber Filters. Am. Ind. Hygiene Assoc. J., 28:363, 1967.
9. Chahal, H. S., and D. J. Romano. High-Volume Sampling Effect of Windborne Particulate Matter Deposited During Idle Periods. J. Air Poll. Cont. Assoc., Vol. 26 (885), 1976.
10. Patterson, R. K. Aerosol Contamination from High-Volume Sampler Exhaust. J. Air Poll. Cont. Assoc., Vol. 30 (169), 1980.
11. EPA Test Procedures for Determining pH and Integrity of High-Volume Air Filters. QAD/M-80.01. Available from the Methods Standardization Branch, Quality Assurance Division, Environmental Monitoring Systems Laboratory (MD-77), U.S. Environmental Protection Agency, Research Triangle Park, NC 27711, 1980.
12. Smith, F., P. S. Wohlschlegel, R. S. C. Rogers, and D. J. Mulligan. Investigation of Flow Rate Calibration Procedures Associated with the High-Volume Method for Determination of Suspended Particulates. EPA-600/4-78-047, U.S. Environmental Protection Agency, Research Triangle Park, NC, June 1978XXXX.

[47 FR 54912, Dec. 6, 1982; 48 FR 17355, Apr. 22, 1983]
['Air Programs']
['Criteria Air Pollutants', 'Air Quality']
UPGRADE TO CONTINUE READING
Load More
J. J. Keller is the trusted source for DOT / Transportation, OSHA / Workplace Safety, Human Resources, Construction Safety and Hazmat / Hazardous Materials regulation compliance products and services. J. J. Keller helps you increase safety awareness, reduce risk, follow best practices, improve safety training, and stay current with changing regulations.
Copyright 2026 J. J. Keller & Associate, Inc. For re-use options please contact copyright@jjkeller.com or call 800-558-5011.
